The OVS Plugin
Introduction to the OVS Plugin
The OVS plugin is the native SDN implementations in CloudStack, using GRE isolation method. The plugin can be used by CloudStack to implement isolated guest networks and to provide additional services like NAT, port forwarding and load balancing.
Features of the OVS Plugin
The following table lists the CloudStack network services provided by the OVS Plugin.
| Network Service | CloudStack version |
|---|---|
| Virtual Networking | >= 4.0 |
| Static NAT | >= 4.3 |
| Port Forwarding | >= 4.3 |
| Load Balancing | >= 4.3 |
Table: Supported Services
Note
The Virtual Networking service was originally called ‘Connectivity’ in CloudStack 4.0
The following hypervisors are supported by the OVS Plugin.
| Hypervisor | CloudStack version |
|---|---|
| XenServer | >= 4.0 |
| KVM | >= 4.3 |
Table: Supported Hypervisors
Configuring the OVS Plugin
Prerequisites
Before enabling the OVS plugin the hypervisor needs to be install OpenvSwitch. Default, XenServer has already installed OpenvSwitch. However, you must install OpenvSwitch manually on KVM. CentOS 6.4 and OpenvSwitch 1.10 are recommended.
KVM hypervisor:
- CentOS 6.4 is recommended.
- To make sure that the native bridge module will not interfere with openvSwitch the bridge module should be added to the blacklist. See the modprobe documentation for your distribution on where to find the blacklist. Make sure the module is not loaded either by rebooting or executing rmmod bridge before executing next steps.
Zone Configuration
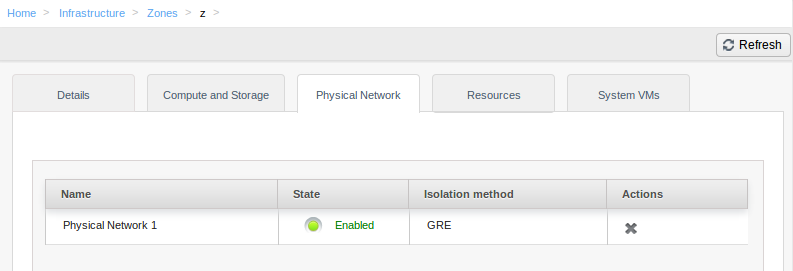
CloudStack needs to have at least one physical network with the isolation method set to “GRE”. This network should be enabled for the Guest traffic type.
Note
With KVM, the traffic type should be configured with the traffic label that matches the name of the Integration Bridge on the hypervisor. For example, you should set the traffic label as following:
- Management & Storage traffic: cloudbr0
- Guest & Public traffic: cloudbr1 See KVM networking configuration guide for more detail.
Agent Configuration
Note
Only for KVM hypervisor
Configure network interfaces:
/etc/sysconfig/network-scripts/ifcfg-eth0
DEVICE=eth0
BOOTPROTO=none
IPV6INIT=no
NM_CONTROLLED=no
ONBOOT=yes
TYPE=OVSPort
DEVICETYPE=ovs
OVS_BRIDGE=cloudbr0

/etc/sysconfig/network-scripts/ifcfg-eth1
DEVICE=eth1
BOOTPROTO=none
IPV6INIT=no
NM_CONTROLLED=no
ONBOOT=yes
TYPE=OVSPort
DEVICETYPE=ovs
OVS_BRIDGE=cloudbr1

/etc/sysconfig/network-scripts/ifcfg-cloudbr0
DEVICE=cloudbr0
ONBOOT=yes
DEVICETYPE=ovs
TYPE=OVSBridge
BOOTPROTO=static
IPADDR=172.16.10.10
GATEWAY=172.16.10.1
NETMASK=255.255.255.0
HOTPLUG=no

/etc/sysconfig/network-scripts/ifcfg-cloudbr1
DEVICE=cloudbr1
ONBOOT=yes
DEVICETYPE=ovs
TYPE=OVSBridge
BOOTPROTO=none
HOTPLUG=no

/etc/sysconfig/network
NETWORKING=yes
HOSTNAME=testkvm1
GATEWAY=172.10.10.1
Edit /etc/cloudstack/agent/agent.properties
network.bridge.type=openvswitch
libvirt.vif.driver=com.cloud.hypervisor.kvm.resource.OvsVifDriver
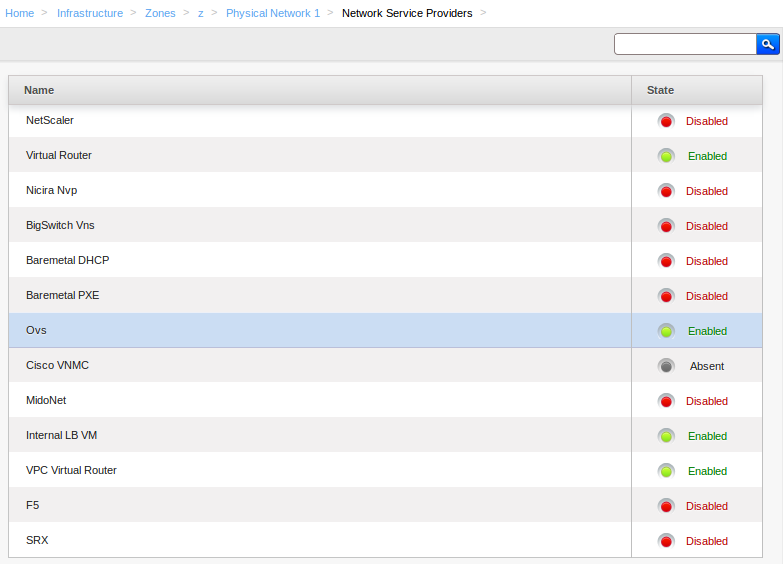
Enabling the service provider
The OVS provider is disabled by default. Navigate to the “Network Service Providers” configuration of the physical network with the GRE isolation type. Navigate to the OVS provider and press the “Enable Provider” button.
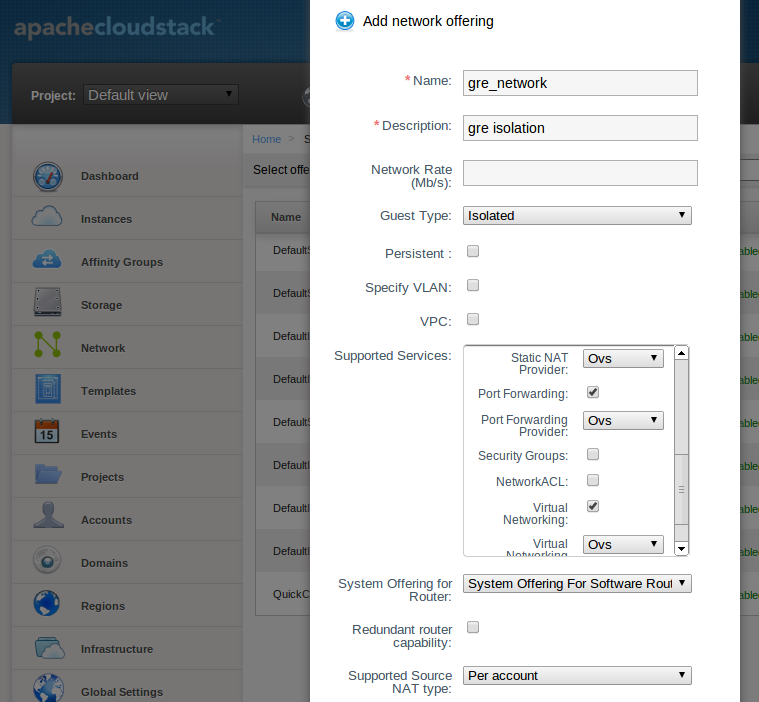
Network Offerings
Using the OVS plugin requires a network offering with Virtual Networking enabled and configured to use the OVS element. Typical use cases combine services from the Virtual Router appliance and the OVS plugin.
| Service | Provider |
|---|---|
| VPN | VirtualRouter |
| DHCP | VirtualRouter |
| DNS | VirtualRouter |
| Firewall | VirtualRouter |
| Load Balancer | OVS |
| User Data | VirtualRouter |
| Source NAT | VirtualRouter |
| Static NAT | OVS |
| Post Forwarding | OVS |
| Virtual Networking | OVS |
Table: Isolated network offering with regular services from the Virtual Router.
Note
The tag in the network offering should be set to the name of the physical network with the OVS provider.
Isolated network with network services. The virtual router is still required to provide network services like dns and dhcp.
| Service | Provider |
|---|---|
| DHCP | VirtualRouter |
| DNS | VirtualRouter |
| User Data | VirtualRouter |
| Source NAT | VirtualRouter |
| Static NAT | OVS |
| Post Forwarding | OVS |
| Load Balancing | OVS |
| Virtual Networking | OVS |
Table: Isolated network offering with network services
Using the OVS plugin with VPC
OVS plugin does not work with VPC at that time
DPDK Support
Since version 4.12 it is possible to enable DPDK support on CloudStack along with the OVS plugin.
Agent configuration
Edit /etc/cloudstack/agent/agent.properties to enable DPDK support on the agent and on ovs-vstcl commands for port creations as well as the path to OVS ports (usually: /var/run/openvswitch)
openvswitch.dpdk.enabled=true
openvswitch.dpdk.ovs.path=OVS_PATH
Agent should be restarted for actions to take effect.
Additional VM configurations
In order to enable DPDK on VM deployments, users should pass addition configuration to VMs. The required configurations are listed on the next section. Administrators can allow users to pass additional configurations to their VMs by the account scoped setting:
enable.additional.vm.configuration
Users are able to pass extra configurations as part of the ‘deployVirtualMachine’ or ‘updateVirtualMachine’ API methods. These extra configurations are included on the resulting XML domain of the virtual machine and are also persisted on CloudStack database as details on the ‘user_vm_details’ table.
The ‘deployVirtualMachine’ and ‘updateVirtualMachine’ API methods accept a URL UTF-8 string encoded parameter ‘extraconfig’.
Parameter is decoded following these rules:
- There could be multiple XML sections, separated by a new line
- Each section can be named, setting a title ending on ‘:’ at the first line
- Double quotes instead of single quotes should be used
- Configurations are persisted as VM details, with the key: ‘extraconfig-TITLE’ or ‘extraconfig-N’ where N is a number.
Example:
In order to pass the below extra configuration to the VM, named ‘config-1’
config-1:
<tag>
   <inner-tag>VALUE</inner-tag>
</tag>
The ‘extraconfig’ parameter should receive the UTF-8 URL encoded string:
config-1%3A%0A%3Ctag%3E%0A%20%20%20%3Cinner-tag%3EVALUE%3C%2Finner-tag%3E%0A%3C%2Ftag%3E
On ‘user_vm_details’ table the additional configuration is persisted with key: ‘extraconfig-config-1’
Additional configurations to enable DPDK on VMs
To enable DPDK on VM deployments:
Set the global configuration to ‘true’ (as global setting or account setting)
enable.additional.vm.configuration
Generate the UTF-8 URL encoded additional configuration to enable huge pages and NUMA, examples below:
dpdk-hugepages:
<memoryBacking>
   <hugepages>
   </hugepages>
</memoryBacking>

dpdk-numa:
<cpu mode="host-passthrough">
   <numa>
      <cell id="0" cpus="0" memory="9437184" unit="KiB" memAccess="shared"/>
   </numa>
</cpu>
Pass the ‘extraconfig’ parameter to ‘deployVirtualMachine’ or ‘updateVirtualMachine’ API methods as a single UTF-8 URL encoded string containing multiple extra configurations (as shown above). Note: if multiple extra configurations are needed, follow the example above and add new sections separated by an empty line, encode the whole string and pass it as a single string to the APIs as ‘extraconfig’ parameter.
deployVirtualMachine extraconfig=dpdk-hugepages%3A%0A%3CmemoryBacking%3E%0A%20%20%20%3Chugepages%3E%0A%20%20%20%20%3C%2Fhugepages%3E%0A%3C%2FmemoryBacking%3E%0A%0Adpdk-numa%3A%0A%3Ccpu%20mode%3D%22host-passthrough%22%3E%0A%20%20%20%3Cnuma%3E%0A%20%20%20%20%20%20%20%3Ccell%20id%3D%220%22%20cpus%3D%220%22%20memory%3D%229437184%22%20unit%3D%22KiB%22%20memAccess%3D%22shared%22%2F%3E%0A%20%20%20%3C%2Fnuma%3E%0A%3C%2Fcpu%3E%0A
Additionally, users can pass extra configuration named ‘dpdk-interface-TAG’ to be included on VMs interfaces definition. Example below:
dpdk-interface-model:
<model type='virtio'/>
DPDK ports
When VM is created or started, CloudStack creates ports with DPDK support with format: “csdpdk-N” where N is a number, incremented on new ports creation. This port is set into the ‘source’ property of the ‘interface’ tag on the XML domain of the VM, prepended by the value of the OVS path set on the property:
openvswitch.dpdk.ovs.path=OVS_PATH
That would set interfaces to type ‘vhostuser’ and reference the ports created in the XML domain of the VMs as:
<interface type='vhostuser'>
   <source type="unix" path="<OVS_PATH>/<port_name>" mode="client"/>
   ...
</interface>
Revision History
0-0 Mon Dec 2 2013 Nguyen Anh Tu tuna@apache.org Documentation created for 4.3.0 version of the OVS Plugin