Security Groups
About Security Groups
Security groups provide a way to isolate traffic to instances. A security group is a group of instances that filter their incoming and outgoing traffic according to a set of rules, called ingress and egress rules. These rules filter network traffic according to the IP address that is attempting to communicate with the instance. Security groups are particularly useful in zones that use basic networking, because there is a single guest network for all Guest Instances. In advanced zones, security groups are supported only on the KVM hypervisor and XenServer/XCP-ng with the network backend configured as “bridge”.
Note
In a zone that uses advanced networking, you can instead define multiple guest networks to isolate traffic to instances.
Each CloudStack account comes with a default security group that denies all inbound traffic and allows all outbound traffic. The default security group can be modified so that all new instances inherit some other desired set of rules.
Any CloudStack user can set up any number of additional security groups. When a new instance is launched, it is assigned to the default security group unless another user-defined security group is specified. An instance can be a member of any number of security groups. You can change the security groups of an instance only in a stopped state; you can not move a running instance from one security group to another.
You can modify a security group by deleting or adding any number of ingress and egress rules. When you do, the new rules apply to all instances in the group, whether running or stopped.
If no ingress rules are specified, then no traffic will be allowed in, except for responses to any traffic that has been allowed out through an egress rule.
Adding a Security Group
A user or administrator can define a new security group.
Log in to the CloudStack UI as an administrator or end user.
In the left navigation, choose Network.
In Select view, choose Security Groups.
Click Add Security Group.
Provide a name and description.
Click OK.
The new security group appears in the Security Groups Details tab.
To make the security group useful, continue to Adding Ingress and Egress Rules to a Security Group.
Security Groups in Advanced Zones (KVM Only)
CloudStack provides the ability to use security groups to provide isolation between guests on a single shared, zone-wide network in an advanced zone where KVM is the hypervisor. Using security groups in advanced zones rather than multiple VLANs allows a greater range of options for setting up guest isolation in a cloud.
Both IPv4 and IPv6 are supported when using Security Groups.
Limitations
The following are not supported for this feature:
Two IP ranges with the same VLAN and different gateway or netmask in security group-enabled shared network.
Two IP ranges with the same VLAN and different gateway or netmask in account-specific shared networks.
Multiple VLAN ranges in security group-enabled shared network.
Multiple VLAN ranges in account-specific shared networks.
Security groups must be enabled in the zone in order for this feature to be used.
Enabling Security Groups
In order for security groups to function in a zone, the security groups feature must first be enabled for the zone. The administrator can do this when creating a new zone, by selecting a network offering that includes security groups. The procedure is described in Basic Zone Configuration in the Advanced Installation Guide.
To enable security groups for an existing advanced zone which doesn’t have security groups enabled, the administrator can enable the SecurityGroupProvider for the physical network of the zone. This will allow user to create networks with Security Groups.
Adding Ingress and Egress Rules to a Security Group
Log in to the CloudStack UI as an administrator or end user.
In the left navigation, choose Network
In Select view, choose Security Groups, then click the security group you want.
To add an ingress rule, click the Ingress Rules tab and fill out the following fields to specify what network traffic is allowed into instance instances in this security group. If no ingress rules are specified, then no traffic will be allowed in, except for responses to any traffic that has been allowed out through an egress rule.
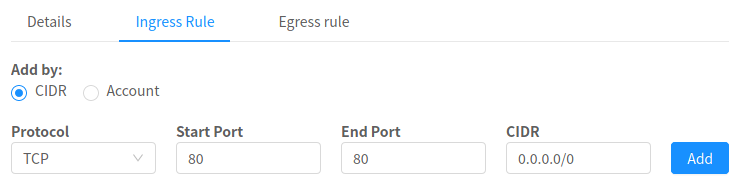
Add by CIDR/Account. Indicate whether the source of the traffic will be defined by IP address (CIDR) or an existing security group in a CloudStack account (Account). Choose Account if you want to allow incoming traffic from all instances in another security group
Protocol. The networking protocol that sources will use to send traffic to the security group. TCP and UDP are typically used for data exchange and end-user communications. ICMP is typically used to send error messages or network monitoring data.
Start Port, End Port. (TCP, UDP only) A range of listening ports that are the destination for the incoming traffic. If you are opening a single port, use the same number in both fields.
ICMP Type, ICMP Code. (ICMP only) The type of message and error code that will be accepted.
CIDR. (Add by CIDR only) To accept only traffic from IP addresses within a particular address block, enter a CIDR or a comma-separated list of CIDRs. The CIDR is the base IP address of the incoming traffic. For example, 192.168.0.0/22 or 2001:db8:100::/64. To allow all CIDRs, set to 0.0.0.0/0 (IPv4) or ::/0 (IPv6).
Account, Security Group. (Add by Account only) To accept only traffic from another security group, enter the CloudStack account and name of a security group that has already been defined in that account. To allow traffic between instances within the security group you are editing now, enter the same name you used in step 7.
The following example allows inbound HTTP access from anywhere:
To add an egress rule, click the Egress Rules tab and fill out the following fields to specify what type of traffic is allowed to be sent out of instances in this security group. If no egress rules are specified, then all traffic will be allowed out. Once egress rules are specified, the following types of traffic are allowed out: traffic specified in egress rules; queries to DNS and DHCP servers; and responses to any traffic that has been allowed in through an ingress rule
Add by CIDR/Account. Indicate whether the destination of the traffic will be defined by IP address (CIDR) or an existing security group in a CloudStack account (Account). Choose Account if you want to allow outgoing traffic to all instances in another security group.
Protocol. The networking protocol that instances will use to send outgoing traffic. TCP and UDP are typically used for data exchange and end-user communications. ICMP is typically used to send error messages or network monitoring data.
Start Port, End Port. (TCP, UDP only) A range of listening ports that are the destination for the outgoing traffic. If you are opening a single port, use the same number in both fields.
ICMP Type, ICMP Code. (ICMP only) The type of message and error code that will be sent
CIDR. (Add by CIDR only) To send traffic only to IP addresses within a particular address block, enter a CIDR or a comma-separated list of CIDRs. The CIDR is the base IP address of the destination. For example, 192.168.0.0/22 or 2001:db8:200::/64. To allow all CIDRs, set to 0.0.0.0/0 (IPv4) or ::/0 (IPv6).
Account, Security Group. (Add by Account only) To allow traffic to be sent to another security group, enter the CloudStack account and name of a security group that has already been defined in that account. To allow traffic between instances within the security group you are editing now, enter its name.
Click Add.