Storage Overview
CloudStack defines two types of storage: primary and secondary. Primary storage can be accessed by either iSCSI or NFS. Additionally, direct attached storage may be used for primary storage. Secondary storage is always accessed using NFS.
There is no ephemeral storage in CloudStack. All volumes on all nodes are persistent.
Primary Storage
This section gives technical details about CloudStack primary storage. For more information about the concepts behind primary storage see Primary Storage . For information about how to install and configure primary storage through the CloudStack UI, see the in the Installation Guide.
Best Practices for Primary Storage
The speed of primary storage will impact guest performance. If possible, choose smaller, higher RPM drives or SSDs for primary storage.
There are two ways CloudStack can leverage primary storage:
Static: This is CloudStack’s traditional way of handling storage. In this model, a preallocated amount of storage (ex. a volume from a SAN) is given to CloudStack. CloudStack then permits many of its volumes to be created on this storage (can be root and/or data disks). If using this technique, ensure that nothing is stored on the storage. Adding the storage to CloudStack will destroy any existing data.
Dynamic: This is a newer way for CloudStack to manage storage. In this model, a storage system (rather than a preallocated amount of storage) is given to CloudStack. CloudStack, working in concert with a storage plug-in, dynamically creates volumes on the storage system and each volume on the storage system maps to a single CloudStack volume. This is highly useful for features such as storage Quality of Service. Currently this feature is supported for data disks (Disk Offerings).
Runtime Behavior of Primary Storage
Root volumes are created automatically when an Instance is created. Root volumes are deleted when the Instance is destroyed. Data volumes can be created and dynamically attached to Instances. Data volumes are not deleted when Instances are destroyed.
Administrators should monitor the capacity of primary storage devices and add additional primary storage as needed. See Add Primary Storage.
Administrators add primary storage to the system by creating a CloudStack storage pool. Each storage pool is associated with a cluster or a zone.
With regards to data disks, when a User executes a Disk Offering to create a data disk, the information is initially written to the CloudStack database only. Upon the first request that the data disk be attached to an Instance, CloudStack determines what storage to place the volume on and space is taken from that storage (either from pre-allocated storage or from a storage system (ex. a SAN), depending on how the primary storage was added to CloudStack).
Hypervisor Support for Primary Storage
The following table shows storage options and parameters for different hypervisors.
Storage media \ hypervisor |
VMware vSphere |
Citrix XenServer |
KVM |
Hyper-V |
|---|---|---|---|---|
Format for Disks, Templates, and Snapshots |
VMDK |
VHD |
QCOW2 |
VHD Snapshots are not supported. |
iSCSI support |
VMFS |
Clustered LVM |
Yes, via Shared Mountpoint |
No |
Fiber Channel support |
VMFS |
Yes, via Existing SR |
Yes, via Shared Mountpoint |
No |
NFS support |
Yes |
Yes |
Yes |
No |
Local storage support |
Yes |
Yes |
Yes |
Yes |
Storage over-provisioning |
NFS and iSCSI |
NFS |
NFS |
No |
SMB/CIFS |
No |
No |
No |
Yes |
Ceph/RBD |
No |
No |
Yes |
No |
PowerFlex/ScaleIO |
No |
No |
Yes |
No |
XenServer uses a clustered LVM system to store Instance images on iSCSI and Fiber Channel volumes and does not support over-provisioning in the hypervisor. The storage server itself, however, can support thin-provisioning. As a result the CloudStack can still support storage over-provisioning by running on thin-provisioned storage volumes.
KVM supports “Shared Mountpoint” storage. A shared mountpoint is a file system path local to each server in a given cluster. The path must be the same across all Hosts in the cluster, for example /mnt/primary1. This shared mountpoint is assumed to be a clustered filesystem such as OCFS2. In this case the CloudStack does not attempt to mount or unmount the storage as is done with NFS. The CloudStack requires that the administrator insure that the storage is available
VMware vSphere supports NFS, VMFS5, VMFS6, vSAN, vVols, DatastoreCluster storage types. For DatastoreCluster storage type, any changes to the datastore cluster at vCenter can be synchronised with CloudStack, like any addition of new child datastore to the DatastoreCluster or removal or existing child datastore from the DatastoreCluster. Synchronisation of DatastoreCluster happens during host connect or storage pool maintenance operations or by calling the API syncStoragePool.
With NFS storage, CloudStack manages the overprovisioning. In this case the global configuration parameter storage.overprovisioning.factor controls the degree of overprovisioning. This is independent of hypervisor type.
Local storage is an option for primary storage for vSphere, XenServer, and KVM. When the local disk option is enabled, a local disk storage pool is automatically created on each host. To use local storage for the System Virtual Machines (such as the Virtual Router), set system.vm.use.local.storage to true in global configuration.
CloudStack supports multiple primary storage pools in a Cluster. For example, you could provision 2 NFS servers in primary storage. Or you could provision 1 iSCSI LUN initially and then add a second iSCSI LUN when the first approaches capacity.
Using Multiple Local Storages (KVM only)
Since CloudStack 4.17.0.0, multiple local storages are supported on KVM hosts. The changes have been possible by editing the agent.properties file. Since CloudStack 4.19.0.0, it’s possible to add Local storage pool via UI/API as well. It’s advised that only one or the other method is used, not both.
Manually adding Local Storage Pool
In order to use multiple local storage pools, you need to
Enable Local Storage For User VMs in the zone details (Edit the Zone, tick the “Enable local storage for user VMs”)
Create local directories on KVM hosts
Edit /etc/cloudstack/agent/agent.properties
Add extra directories to “local.storage.path”.
Add UUID of directories to “local.storage.uuid” (UUID can be generated by uuidgen). “local.storage.uuid” must be present in the agent.properties file and should not be deleted.
local.storage.uuid=a43943c1-1759-4073-9db1-bc0ea19203aa,f5b1220b-4446-42dc-a872-cffd281f9f8c
local.storage.path=/var/lib/libvirt/images,/var/lib/libvirt/images2
Restart cloudstack-agent service
Storage pools will be automatically created in libvirt by the CloudStack agent
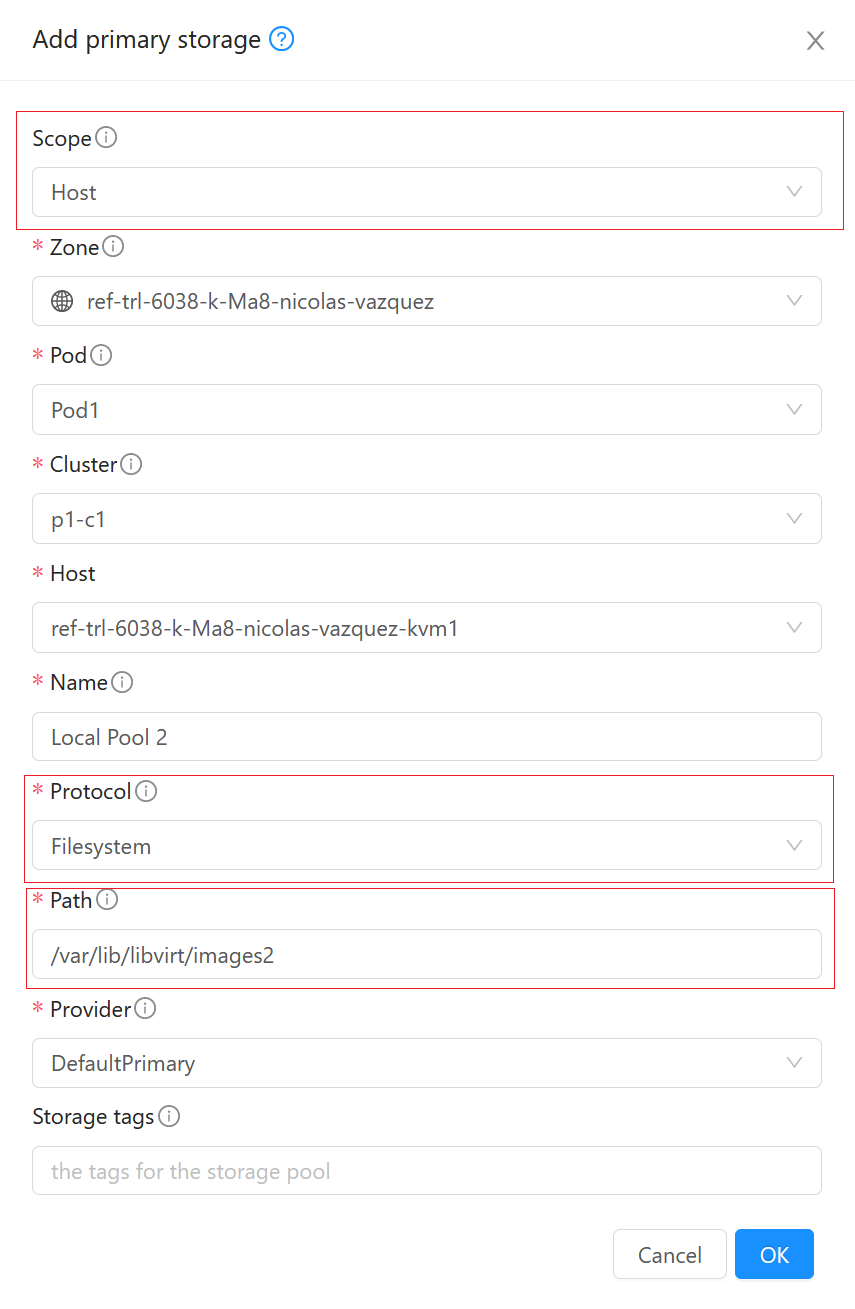
Adding a Local Storage Pool via UI
When using UI, ensure that the scope of the storage is set to “Host”, and ensure that the protocol is set to “Filesystem”.
Adding a Local Storage Pool via Command Line
Using Cloudmonkey command line.
cmk create storagepool zoneid=07d64765-3123-4fc2-b947-25d2c36f5bb4 name=test provider=DefaultPrimary podid=0af34b96-e88d-440e-a6bd-c4e8aab4aa4a clusterid=49db6a16-2f6c-4583-9d07-37ccceb248ae url=file://10.9.8.7/var/lib/libvirt/images2
Changing the Scope of the Primary Storage
Scope of a Primary Storage can be changed from Zone-wide to Cluster-wide and vice versa when the Primary Storage is in Disabled state. An action button is displayed in UI for each Primary Storage in Disabled state.

Scope change from Cluster to Zone will connect the Primary Storage to all Hosts of the zone running the same hypervisor as set on the storage pool.

Scope change from Zone to Cluster will disconnect the Primary Storage from all Hosts that were previously connected to the Primary Storage and are not a part of the specified Cluster. So, if there are running VMs on such hosts using this Storage Pool, they cannot be disconnected from the hosts. In this case the Scope change operation will error out. The user VMs need to be stopped or migrated and system VMs need to be destroyed while the primary Storage is disabled, before attempting the operation again. listAffectedVmsForstorageScopeChange API can be used to get the list of all such VMs.
This might be a long running operation depending on how many hosts are there in the zone which need to be connected or disconnected to the storage pool.
This feature is tested and supported for the following hypervisor and storage combinations:
KVM with NFS
KVM with CEPH/RBD
VMWare with NFS
It is possible to use this functionality with other configurations but some manual intervention might be needed by the Administrator to make it work.
Storage Access Groups
When a primary storage is added in CloudStack, either at the Zone or Cluster scope, it gets connected to all the hosts within that scope. Using Storage Access Groups, this behavior can be controlled by defining groups on both primary storage and hosts, ensuring connections are established only within those groups. When a Storage Access Group is set on a primary storage (a text string attribute similar to tag), and the same group is assigned to a host, the primary storage will connect only to that host. A Storage Access Group can also be applied at the Cluster, Pod, or Zone level, allowing all hosts in that entity to inherit the group automatically.
For example, if there are 50 hosts across 10 clusters, with 5 hosts per cluster, and a zone-wide primary storage is added, it will connect to all 50 hosts. If the operator wants to limit the connection to a few hosts in just the first 2 clusters, Storage Access Groups can be set on the primary storage and those specific hosts — or directly on the two clusters to achieve the same effect.
Adding Storage Access Group on a primary storage.

Adding Storage Access Group on a host. Similarly it can be applied Cluster/Pod/Zone.

A primary storage with a Storage Access Group will connect only to hosts that have the same Storage Access Group. A storage pool without a Storage Access Group will connect to all hosts, including those with or without any Storage Access Group.
Note: Storage Access Groups are not applicable for local primary storages. Currently this is tested with NFS and Dell PowerFlex storages.
Maintenance Mode for Primary Storage
Primary storage may be placed into maintenance mode. This is useful, for example, to replace faulty RAM in a storage device. Maintenance mode for a storage device will first stop any new guests from being provisioned on the storage device. Then it will stop all guests that have any volume on that storage device. When all such guests are stopped the storage device is in maintenance mode and may be shut down. When the storage device is online again you may cancel maintenance mode for the device. The CloudStack will bring the device back online and attempt to start all guests that were running at the time of the entry into maintenance mode.
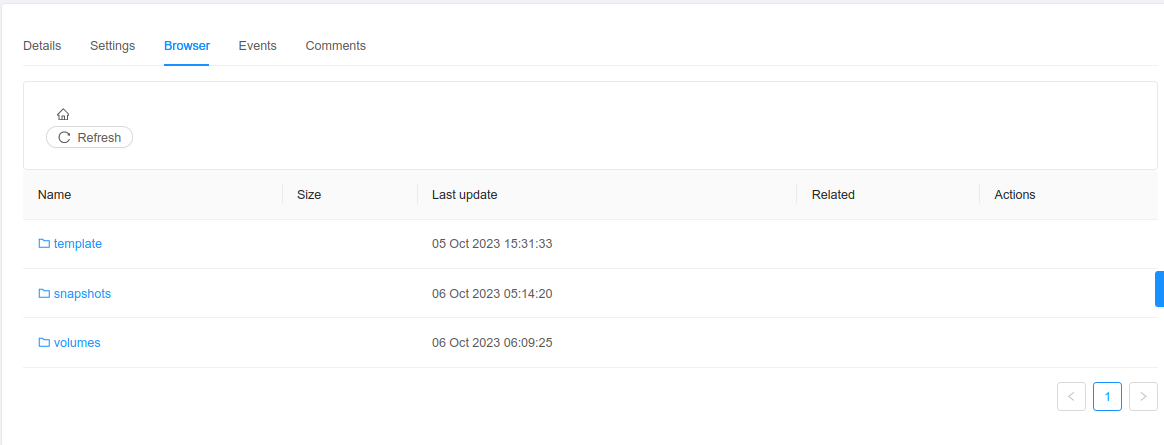
Browsing files on a primary storage
Files can be listed at a path on a primary storage using listStoragePoolObjects command or via UI under “Browser” tab for a primary storage. Depending on the hypervisor, files and directories on a primary storage will get associated with the cloudstack resources like snapshots, volumes, templates, and ISOs.

Note
If files or folders are not associated with a cloudstack resource, it doesn’t mean that they are not used by cloudstack.
Setting NFS Mount Options on the Storage Pool
NFS mount options can be added while creating an NFS storage pool for KVM hosts. When the storage pool is mounted on the KVM hypervisor host, these options will be used. Options currently tested and supported are vers and nconnect.
Although it depends on the NFS server, but commonly supported vers values are 3 for NFSv3 and minor versions 4.0, 4.1 and 4.2 for NFSv4. nconnect values can range from 1 to 16.
Administrator can give the NFS mount options while adding a Primary Storage
from the Create Zone Wizard as well as the Add Primary Storage form.


NFS mount options can be changed on a pre-existing Storage Pool in maintenance
mode using the Edit Primary Storage form. Running VMs using volumes in the
Storage Pool will either be stopped or the volumes would be migrated to other
available pools upon enabling maintenance mode.
Storage Pool will be unmounted and mounted again on the KVM hosts using the
new options upon cancelling the maintenance mode.

Mount failing due to an incorrect mount option
Add Storage Pool will fail with the error An incorrect mount option was specified.
In the Update storage pool case, cancel maintenance will throw the above error. The Administrator should set the correct mount option and cancel the maintenance mode again.
Version Requirements
This feature needs libvirt version 5.1.0 and above on the KVM hosts.
The nconnect mount option exists in all Linux distributions with kernel 5.3 or higher
A note on the nconnect option
This option defines the count of TCP connections that the client makes to the NFS server. The nconnect setting is applied only during the first mount process to the particular NFS server for a given NFS version.
If the same client executes the mount command again to the same NFS server using the same version, it will get the same nconnect value as the first mount. All mount point to the same server at a given version share the same number of TCP connections. To change the nconnect settings all the such mount points need to be unmounted and then mounted again with the new nconnect value.
So, from CloudStack’s perspective also, the first storage pool created from an NFS server will set the nconnect setting on the hypervisor host corresponding to the server. Specifying a different nconnect mount option while creating a new storage pool from the same server will not change the nconnect setting on the host.
Similarly if there is only one pre-existing storage pool from a give NFS server mounted on the host, modifying the nconnect mount option via CloudStack will change the nconnect setting on that host. If there are more than one storage pools from the same server mounted on a host. Changing the nconnect mount option on one of the storage pools via CloudStack will not do anything. To change the nconnect setting on the host, after modifying nconnect mount option on all storage pools, the host needs to be restarted.
Secondary Storage
This section gives concepts and technical details about CloudStack secondary storage. For information about how to install and configure secondary storage through the CloudStack UI, see Add Secondary Storage.
Browsing files on a secondary storage
Files can be listed at a path on a secondary storage using listImageStoreObjects command or via UI under “Browser” tab for a secondary storage. Depending on the hypervisor, files and directories on a primary storage will get associated with the cloudstack resources like snapshots, volumes, templates, and ISOs.
Note
If files or folders are not associated with a cloudstack resource, it doesn’t mean that they are not used by cloudstack.
Migration of data between secondary storages
One may choose to completely migrate the data or migrate data such that the stores are balanced by choosing the appropriate Migration Policy. In order to facilitate distributing the migration load, SSVMs are spawned up if a file transfer takes more than a defined threshold. Following are the Global setting values to one may want to look at before proceeding with the migration task:
Configuration Parameters
Description
image.store.imbalance.threshold
The storage imbalance threshold that is compared with the standard deviation percentage for a storage utilization metric. The value is a percentage in decimal format.
secstorage.max.migrate.sessions
The max number of concurrent copy command execution sessions that an SSVM can handle
max.ssvm.count
Number of additional SSVMs to handle migration of data objects concurrently
max.data.migration.wait.time
Maximum wait time for a data migration task before spawning a new SSVM
Selective migration of templates and snapshots across secondary storages is also possible using the migrateResourceToAnotherSecondaryStorage command. Or via UI under “Browser” tab for a secondary storage.
Read only
Secondary storages can also be set to read-only in order to cordon it off from being used for storing any further Templates, Volumes and Snapshots.
cmk updateImageStore id=4440f406-b9b6-46f1-93a4-378a75cf15de readonly=true
Direct resources to a specific secondary storage
By default, ACS allocates ISOs, volumes, snapshots, and templates to the freest secondary storage of the zone. In order to direct these resources to a specific secondary storage, the user can utilize the functionality of the dynamic secondary storage selectors using heuristic rules. This functionality utilizes JavaScript rules, defined by the user, to direct these resources to a specific secondary storage. When creating the heuristic rule, the script will have access to some preset variables with information about the secondary storage in the zone, about the resource the rule will be applied upon, and about the account that triggered the allocation. These variables are presented in the table below:
Resource
Variables
Secondary Storage
id
name
usedDiskSize
totalDiskSize
protocolSnapshot
size
hypervisorType
nameISO/Template
format
hypervisorType
templateType
nameVolume
size
formatAccount
id
name
domain.id
domain.name
To utilize this functionality, the user needs to create a selector, using the API createSecondaryStorageSelector. Each selector created specifies the type of resource the heuristic rule will be verified upon allocation (e.g. ISO, snapshot, template or volume), and the zone the heuristic will be applied on. It is noteworthy that can only be one heuristic rule for the same type within a zone. Another thing to consider is that the heuristic rule should return the ID of a valid secondary storage. Below, some examples are presented for heuristic rules considering different scenarios:
Allocate a resource type to a specific secondary storage.
function findStorageWithSpecificId(pool) {
   return pool.id === '7432f961-c602-4e8e-8580-2496ffbbc45d';
}

secondaryStorages.filter(findStorageWithSpecificId)[0].id
Dedicate storage pools for a type of template format.
function directToDedicatedQCOW2Pool(pool) {
   return pool.id === '7432f961-c602-4e8e-8580-2496ffbbc45d';
}

function directToDedicatedVHDPool(pool) {
   return pool.id === '1ea0109a-299d-4e37-8460-3e9823f9f25c';
}

if (template.format === 'QCOW2') {
   secondaryStorages.filter(directToDedicatedQCOW2Pool)[0].id
} else if (template.format === 'VHD') {
   secondaryStorages.filter(directToDedicatedVHDPool)[0].id
}
Direct snapshot of volumes with the KVM hypervisor to a specific secondary storage.
if (snapshot.hypervisorType === 'KVM') {
   '7432f961-c602-4e8e-8580-2496ffbbc45d';
}
Direct resources to a specific domain:
if (account.domain.id == '52d83793-26de-11ec-8dcf-5254005dcdac') {
   '1ea0109a-299d-4e37-8460-3e9823f9f25c'
} else if (account.domain.id == 'c1186146-5ceb-4901-94a1-dd1d24bd849d') {
   '7432f961-c602-4e8e-8580-2496ffbbc45d'
}
Working With Volumes
A volume provides storage to a Guest Instance. The volume can provide for a root disk or an additional data disk. CloudStack supports additional volumes for Guest Instances.
Volumes are created for a specific hypervisor type. A volume that has been attached to guest using one hypervisor type (e.g, XenServer) may not be attached to a guest that is using another hypervisor type, for example:vSphere, KVM. This is because the different hypervisors use different disk image formats.
CloudStack defines a volume as a unit of storage available to a Guest Instance. Volumes are either root disks or data disks. The root disk has “/” in the file system and is usually the boot device. Data disks provide for additional storage, for example: “/opt” or “D:”. Every Guest Instance has a root disk, and Instances can also optionally have a data disk. End Users can mount multiple data disks to Guest Instances. Users choose data disks from the disk offerings created by administrators. The User can create a Template from a volume as well; this is the standard procedure for private Template creation. Volumes are hypervisor-specific: a volume from one hypervisor type may not be used on a guest of another hypervisor type.
Note
CloudStack supports attaching up to
13 data disks on XenServer hypervisor versions 6.0 and above, And all versions of VMware.
64 data disks on Hyper-V.
6 data disks on other hypervisor types.
Creating a New Volume
You can add more data disk volumes to a Guest Instance at any time, up to the limits of your storage capacity. Both CloudStack administrators and Users can add volumes to Instances. When you create a new volume, it is stored as an entity in CloudStack, but the actual storage resources are not allocated on the physical storage device until you attach the volume. This optimization allows the CloudStack to provision the volume nearest to the guest that will use it when the first attachment is made.
When creating a new volume from an existing ROOT Volume Snapshot, it is required to explicitly define a Disk offering (UI will offer only Disk offerings whose disk size is equal or bigger than the size of the Snapshot).
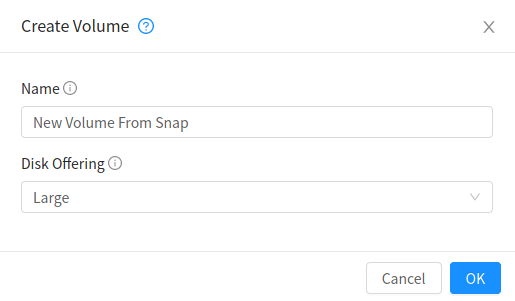
When creating a new volume from an existing DATA Volume Snapshot, the disk offering associated with the Snapshots (inherited from the original volume) is assigned to the new volume.
Using Local Storage for Data Volumes
You can create data volumes on local storage (supported with XenServer, KVM, and VMware). The data volume is placed on the same host as the Instance, that is attached to the data volume. These local data volumes can be attached to Instances, detached, re-attached, and deleted just as with the other types of data volume.
Local storage is ideal for scenarios where persistence of data volumes and HA is not required. Some of the benefits include reduced disk I/O latency and cost reduction from using inexpensive local disks.
In order for local volumes to be used, the feature must be enabled for the zone.
You can create a data disk offering for local storage. When a User creates a new Instance, they can select this disk offering in order to cause the data disk volume to be placed in local storage.
You can not migrate an Instance that has a volume in local storage to a different host, nor migrate the volume itself away to a different host. If you want to put a host into maintenance mode, you must first stop any Instances with local data volumes on that host.
Volume Encryption
CloudStack supports LUKS-based volume encryption on KVM. Encrypted volumes are managed through the Key Management System (KMS), where you can create and manage the encryption keys used to protect your data.
To create an encrypted volume, select a KMS Key from the UI when creating the volume, or supply the key ID via the API. The key must belong to the same zone as the volume.
Warning
Deleting the KMS key used to encrypt a volume will render that volume permanently unrecoverable.
To Create a New Volume
Log in to the CloudStack UI as a User or admin.
In the left navigation bar, click Storage.
In Select View, choose Volumes.
To create a new volume, click Add Volume, provide the following details, and click OK.
Name. Give the volume a unique name so you can find it later.
Availability Zone. Where do you want the storage to reside? This should be close to the Instance that will use the volume.
Disk Offering. Choose the characteristics of the storage.
KMS Key. (Optional) Select a KMS key to enable envelope-based encryption for the volume. Requires KMS to be configured in the zone. See Key Management System (KMS).
The new volume appears in the list of volumes with the state “Allocated.” The volume data is stored in CloudStack, but the volume is not yet ready for use
To start using the volume, continue to Attaching a Volume
Uploading an Existing Volume to an Instance
Existing data can be made accessible to an Instance. This is called uploading a volume to the Instance. For example, this is useful to upload data from a local file system and attach it to an Instance. Root administrators, domain administrators, and end Users can all upload existing volumes to Instances.
The upload is performed using HTTP. The uploaded volume is placed in the zone’s secondary storage
You cannot upload a volume if the preconfigured volume limit has already been reached. The default limit for the cloud is set in the global configuration parameter max.account.volumes, but administrators can also set per-domain limits that are different from the global default. See Setting Usage Limits
To upload a volume:
(Optional) Create an MD5 hash (checksum) of the disk image file that you are going to upload. After uploading the data disk, CloudStack will use this value to verify that no data corruption has occurred.
Log in to the CloudStack UI as an administrator or User
In the left navigation bar, click Storage.
Click Upload Volume.
Provide the following:
Name and Description. Any desired name and a brief description that can be shown in the UI.
Availability Zone. Choose the zone where you want to store the volume. Instances running on hosts in this zone can attach the volume.
Format. Choose one of the following to indicate the disk image format of the volume.
Hypervisor
Disk Image Format
XenServer
VHD
VMware
OVA
KVM
QCOW2
URL. The secure HTTP or HTTPS URL that CloudStack can use to access your disk. The type of file at the URL must match the value chosen in Format. For example, if Format is VHD, the URL might look like the following:
http://yourFileServerIP/userdata/myDataDisk.vhdMD5 checksum. (Optional) Use the hash that you created in step 1.
Wait until the status of the volume shows that the upload is complete. Click Instances - Volumes, find the name you specified in step 5, and make sure the status is Uploaded.
Attaching a Volume
You can attach a volume to a Guest Instance to provide extra disk storage. Attach a volume when you first create a new volume, when you are moving an existing volume from one Instance to another, or after you have migrated a volume from one storage pool to another.
Log in to the CloudStack UI as a user or admin.
In the left navigation, click Storage.
In Select View, choose Volumes.
Click the volume name in the Volumes list, then click the Attach Disk button

In the Instance popup, choose the Instance to which you want to attach the volume. You will only see Instances to which you are allowed to attach volumes; for example, a user will see only Instances created by that user, but the administrator will have more choices.
When the volume has been attached, you should be able to see it by clicking Instances, the Instance name, and View Volumes.
Detaching and Moving Volumes
Note
This procedure is different from moving volumes from one storage pool to another as described in “Instance Storage Migration”.
A volume can be detached from a Guest Instance and attached to another guest. Both CloudStack administrators and users can detach volumes from Instances and move them to other Instances.
If the two Instances are in different clusters, and the volume is large, it may take several minutes for the volume to be moved to the new Instance.
Log in to the CloudStack UI as a user or admin.
In the left navigation bar, click Storage, and choose Volumes in Select View. Alternatively, if you know which Instance the volume is attached to, you can click Instances, click the Instance name, and click View Volumes.
Click the name of the volume you want to detach, then click the Detach Disk button.

To move the volume to another Instance, follow the steps in “Attaching a Volume”.
Instance Storage Migration
Supported in XenServer, KVM, and VMware.
Note
This procedure is different from moving disk volumes from one Instance to another as described in “Detaching and Moving Volumes”.
You can migrate an Instance’s root disk volume or any additional data disk volume from one storage pool to another in the same zone.
You can use the storage migration feature to achieve some commonly desired administration goals, such as balancing the load on storage pools and increasing the reliability of Instances by moving them away from any storage pool that is experiencing issues.
On XenServer and VMware, live migration of Instance storage is enabled through CloudStack support for XenMotion and vMotion. Live storage migration allows Instances to be moved from one host to another, where the Instances are not located on storage shared between the two hosts. It provides the option to live migrate an Instance’s disks along with the Instance itself. It is possible to migrate an Instance from one XenServer resource pool / VMware cluster to another, or to migrate an Instance whose disks are on local storage, or even to migrate an Instance’s disks from one storage repository to another, all while the Instance is running.
Note
Because of a limitation in VMware, live migration of storage for an Instance is allowed only if the source and target storage pool are accessible to the source host; that is, the host where the Instance is running when the live migration operation is requested.
Migrating a Data Volume to a New Storage Pool
There are two situations when you might want to migrate a disk:
Move the disk to new storage, but leave it attached to the same running Instance.
Detach the disk from its current Instance, move it to new storage, and attach it to a new Instance.
Migrating Storage For a Running Instance
(Supported on XenServer, KVM and VMware)
Log in to the CloudStack UI as a user or admin.
In the left navigation bar, click Instances, click the Instance name, and click View Volumes.
Click the volume you want to migrate.
Detach the disk from the Instance. See “Detaching and Moving Volumes” but skip the “reattach” step at the end. You will do that after migrating to new storage.
Click the Migrate Volume button
 and choose the
destination from the dropdown list.
and choose the
destination from the dropdown list.Watch for the volume status to change to Migrating, then back to Ready.
Migrating Storage and Attaching to a Different Instance
Log in to the CloudStack UI as a user or admin.
Detach the disk from the Instance. See “Detaching and Moving Volumes” but skip the “reattach” step at the end. You will do that after migrating to new storage.
Click the Migrate Volume button
and choose the
destination from the dropdown list.Watch for the volume status to change to Migrating, then back to Ready. You can find the volume by clicking Storage in the left navigation bar. Make sure that Volumes is displayed at the top of the window, in the Select View dropdown.
Attach the volume to any desired Instance running in the same cluster as the new storage server. See “Attaching a Volume”
Migrating an Instance Volume to a New Storage Pool
(XenServer, VMware) You can live migrate an Instance’s volumes from one storage pool to another, without stopping the Instance first.
(KVM) KVM does not support volume live migration due to the limited possibility to refresh VM XML domain. Therefore, to live migrate a volume between storage pools, one must migrate the VM to a different host as well to force the VM XML domain update. Use ‘migrateVirtualMachineWithVolumes’ instead or stop the Instance and then migrate the volume.
Log in to the CloudStack UI as a user or admin.
In the left navigation bar, click Instances, and click the Instance name.
(KVM only) Stop the Instance.
Click the Migrate button
and choose the
destination from the dropdown list.Note
If the Instance’s storage has to be migrated along with the Instance, this will be noted in the host list. CloudStack will take care of the storage migration for you.
Watch for the volume status to change to Migrating, then back to Running (or Stopped, in the case of KVM). This can take some time.
(KVM only) Restart the Instance.
Note
In case of KVM and PowerFlex/ScaleIO storage, live migration of Instance’s root disk is allowed from one PowerFlex/ScaleIO storage pool to another, without stopping the Instance.
Finding Primary Storage for Migration
When you click on migrate volume, CloudStack lists the available primary storage. CloudStack uses its storage pool allocators to identify the primary storages that are available and returns a list that is suitable for the selected volume’s migration. The list also could include primary storages that are mentioned as ‘Not suitable’. The criteria for which the primary storages are not suitable are: - Storage tag mismatch with the volume. - Doesn’t have enough capacity. - Reached its disable threshold. - Disabled. - Mismatch in the type of storage such as shared /Local.
Resizing Volumes
CloudStack provides the ability to resize data disks; CloudStack controls volume size by using disk offerings. This provides CloudStack administrators with the flexibility to choose how much space they want to make available to the end users. Volumes within the disk offerings with the same storage tag can be resized. For example, if you only want to offer 10, 50, and 100 GB offerings, the allowed resize should stay within those limits. That implies if you define a 10 GB, a 50 GB and a 100 GB disk offerings, a user can upgrade from 10 GB to 50 GB, or 50 GB to 100 GB. If you create a custom-sized disk offering, then you have the option to resize the volume by specifying a new, larger size.
Additionally, using the resizeVolume API, a data volume can be moved from a static disk offering to a custom disk offering with the size specified. This functionality allows those who might be billing by certain volume sizes or disk offerings to stick to that model, while providing the flexibility to migrate to whatever custom size necessary.
This feature is supported on KVM, XenServer, and VMware hosts. However, shrinking volumes is not supported on VMware hosts.
Before you try to resize a volume, consider the following:
The Instances associated with the volume are stopped.
The data disks associated with the volume are removed.
When a volume is shrunk, the disk associated with it is simply truncated, and doing so would put its content at risk of data loss. Therefore, resize any partitions or file systems before you shrink a data disk so that all the data is moved off from that disk.
To resize a volume:
Log in to the CloudStack UI as a user or admin.
In the left navigation bar, click Storage.
In Select View, choose Volumes.
Select the volume name in the Volumes list, then click the Resize Volume button

In the Resize Volume pop-up, choose desired characteristics for the storage.
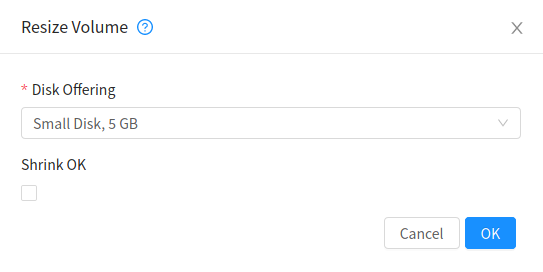
If you select Custom Disk, specify a custom size.
Click Shrink OK to confirm that you are reducing the size of a volume.
This parameter protects against inadvertent shrinking of a disk, which might lead to the risk of data loss. You must sign off that you know what you are doing.
Click OK.
Root Volume size defined via Service Offering
If a Service Offering is created with a root disk size, then resizing the Root volume is possible only by resizing the Instances service offering.
Service offering Root resizing constrains:
Users cannot deploy Instances with custom root disk size when using such offerings
Users cannot resize the Instance root disk size when using such offerings
The Root Volume of such Instances can only be resized when changing to another Service Offering with a Root disk size equals or larger than the current one.
Users can change the Instance offering to a service offering with a Root size of 0GB (default) and then customize the volume size.
The following table shows possible combinations of Service offering supported resizing based on the offering Root disk size:
# |
Service Offering Root size |
new Service Offering Root |
Does support offering resize? |
1 |
0GB (default) |
Any |
YES |
2 |
5GB |
5GB |
YES |
3 |
5GB |
10GB |
YES |
4 |
10GB |
5GB |
NO |
5 |
Any |
0GB |
YES |
Note
Shrinking the Root disk is not supported via the service offering resizing workflow. All the combinations above assume a transition to Root disks with size equals or bigger than the original. Service Offerings with Root size of 0GB do not change the disk size to Zero and indicates that the offering do not enforces a Root disk size.
Change disk offering for volume
There are volume operations like migrate volume and resize volume and both accepts new disk offering to replace the existing disk offering of volume. Instead of using these APIs directly, the operation can be performed in the UI using change offering in the details view for the volume. Upon changing the disk offering the volume will be resized and/or migrated to the suitable storage pool if required according to the new disk offering.
The zone level setting “match.storage.pool.tags.with.disk.offering” gives flexibility or control to choose the new disk offering. If this setting is true, then the new disk offering should have the same storage tags as the exiting disk offering of the volume.
To change the disk offering of a volume:
Log in to the CloudStack UI as a user or admin.
In the left navigation bar, click Storage.
In Select View, choose Volumes.
Select the volume name in the Volumes list, then click the Change Offering for Volume button
In the Change Offering For Volume pop-up, choose desired disk offering for the volume.
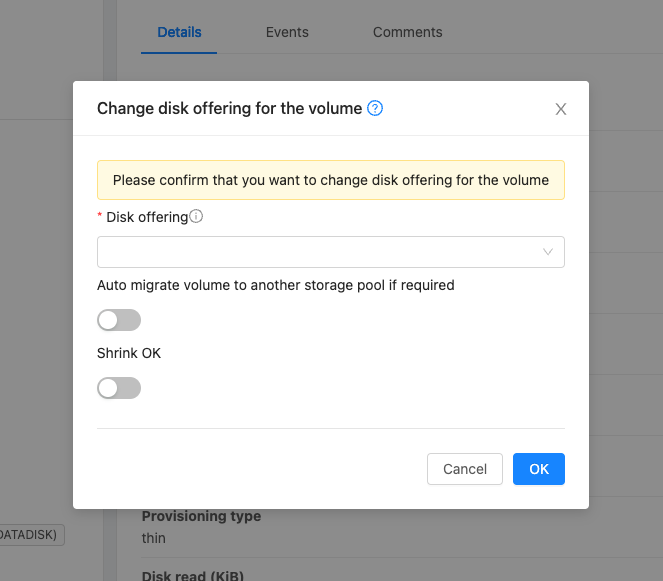
If you select Custom Disk, specify a custom size.
Enable or Disable “Auto migrate to another storage pool if required” as needed
Click OK.
Reset Instance to New Root Disk on Reboot
You can specify that you want to discard the root disk and create a new one whenever a given Instance is rebooted. This is useful for secure environments that need a fresh start on every boot and for desktops that should not retain state. The IP address of the Instance will not change due to this operation.
To enable root disk reset on Instance reboot:
When creating a new service offering, set the parameter isVolatile to True. Instances created from this service offering will have their disks reset upon reboot. See “Creating a New Compute Offering”.
Volume delete protection
CloudStack protects volumes from accidental deletion using a delete protection flag, which is false by default. When delete protection is enabled for a volume, it cannot be deleted through the UI or API. It can only be deleted after removing delete protection from the volume.
Delete protection can be enabled for a volume via updateVirtualMachine API.
cmk update volume id=<volume id> deleteprotection=true
To remove delete protection, use the following command:
cmk update volume id=<volume id> deleteprotection=false
To enable/disable delete protection for a volume using the UI, follow these steps:
Log in to the CloudStack UI as a User or admin.
In the navigation menu on the left, click Volumes under Storage.
Choose the volume for which you want to enable/disable delete protection.
Click on the Edit button

Toggle the Delete Protection switch to enable or disable delete protection.
Click Ok button to save the changes.
Note
The volume delete protection is only considered when the volume is being deleted through the UI or via deleteVolume or destroyVolume API. If the domain/project is deleted, the volumes under the domain/project will be deleted irrespective of the delete protection status.
Volume Deletion and Garbage Collection
The deletion of a volume does not delete the Snapshots that have been created from the volume.
When an Instance is destroyed, data disk volumes that are attached to the Instance are not deleted unless specified.
In managed storage systems such as Solidfire and others, the volume Snapshots are linked entities in the volumes wherein deletion of the volume would delete those Snapshots. In such managed storage systems, the volume Snapshots exist on the primary storage and may not be backed up to the secondary storages. For a volume deleted in CloudStack, it will not be deleted on the managed storage (such as Solidfire and others) until all the volume Snapshots are deleted in CloudStack.
Volumes are permanently destroyed using a garbage collection process. The global configuration variables expunge.delay and expunge.interval determine when the physical deletion of volumes will occur.
expunge.delay: determines how old the volume must be before it is destroyed, in seconds
expunge.interval: determines how often to run the garbage collection check
Administrators should adjust these values depending on site policies around data retention.
Volume Metrics
Volume statistics are collected on a regular interval (defined by global setting volume.stats.interval with a default of 600 seconds). This feature is currently only available for VMware and KVM. Volume stats include include bytes/s and IO/s statistics as shown in the API output below.
[root@mgmt]# cmk list volumesmetrics id=272c3d8b-ef2c-499e-abfb-736b54d3d6b1
{
"count": 1,
"volume": [
   {
      ...
      "diskiopstotal": 30245,
      "diskioread": 22443,
      "diskiowrite": 7802,
      "diskkbsread": 343124,
      "diskkbswrite": 217619,
      ...
Bytes read/write, as well as the total IO/s, are exposed via UI, as shown in the image below.
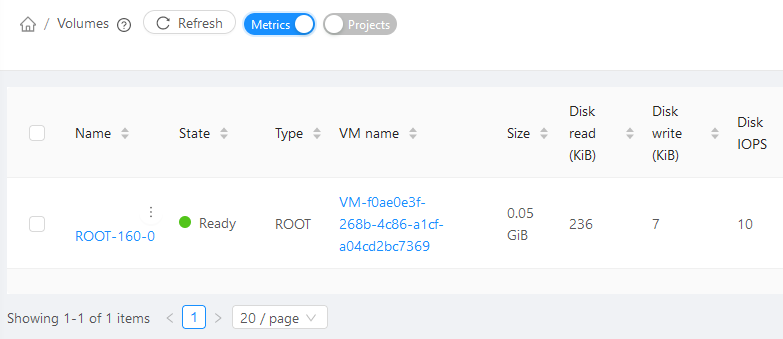
These statistics are obtained from the hypervisor directly and they represent “current” bytes/s and IO/s values at the time of collection.
Check and repair Volume
When there are any leaks or any inconsistencies in the volume, then the checkVolume API can be used to check for any such errors in the volume and helps in repairing them. This feature is currently available only for KVM and volumes with QCOW2 format. This API uses “qemu-img check” command on the KVM host.
Also, a global or storage pool level setting “volume.check.and.repair.leaks.before.use” is available which allows to check and repair any leaks of the volume during instance start and volume attach operations. This will help in repairing any leaks of the volume before using it. This is a blocking operation, meaning instance start or volume attach will be performed only after the check and repair operation is completed. The setting helps in defining whether to allow this operation or not.
checkVolume API takes two parameters as input
“id” for the volume UUID
“repair” an optional parameter whether to repair the volume or not. Parameter takes “leaks” or “all” as the input.
Following is the example for checkVolume API usage and the result in the volume response.
[root@mgmt]# cmk check volume id=55937826-2f08-414a-9eef-4c6b7d6fd3b1 repair=leaks
{
.
.
"volumecheckresult": {
"allocated-clusters": "110",
"check-errors": "0",
"leaks": 73,
"filename": "/mnt/e72364b6-eab0-369f-af0b-2ec8bed9d8ac/55937826-2f08-414a-9eef-4c6b7d6fd3b1",
"format": "qcow2",
"fragmented-clusters": "32",
"image-end-offset": "7995392",
"total-clusters": "131072"
},
"volumerepairresult": {
"allocated-clusters": "110",
"check-errors": "0",
"leaks-fixed": 73,
"filename": "/mnt/e72364b6-eab0-369f-af0b-2ec8bed9d8ac/55937826-2f08-414a-9eef-4c6b7d6fd3b1",
"format": "qcow2",
"fragmented-clusters": "32",
"image-end-offset": "7995392",
"total-clusters": "131072"
},
}
Importing and Unmanaging Volumes from Storage Pools
Since Apache CloudStack 4.19.1.0, importing and unmanaging volumes from primary storage pools are supported.
Note
Currently the supported storage types are: NFS, Ceph and Local storage for KVM hypervisor.
Log in to the CloudStack UI as an administrator.
In the left navigation bar, click Tools > Import DATA Volumes section.
Select the scope of the storage pool (Zone, Cluster, Host).
Select the zone/pod/cluster/host of the storage pool.
Select the storage pool.
The unmanaged volumes on the storage pool are listed on the left panel.
The managed volumes on the storage pool are listed on the right panel.

To import a volume:
select a unmanaged volume from the left panel, click “Import Volume” icon.
In the Import Volume pop-up, select the Account Type, Domain/Account/Project and a disk offering.
Click OK.

Note
The volume to be imported must be placed in the root directory of the storage pool.
The format of the volume must be QCOW2 on NFS/Local storage, and RAW on Ceph storage.
The volume must not be encrypted.
The volume must not be locked.
The volume must not have a backing file.
Note
By default, the volume is imported for the caller if Domain/Account/Project are not set. By default, the imported volumes use the default disk offering “Default Custom Offering for Volume Import” (on Shared storages) or “Default Custom Offering for Volume Import - Local” (on Local storages).
To unmanage volume(s):
select the volumes to be unmanaged from the right panel
click “Unmanage Volume” or “Unmanage Volumes” icon
click OK in the confirmation dialog.

Note
The volume to be unmanaged must not be attached to any VM as ROOT disk or DATA disk.
The volume to be umnanaged must be at Ready state.
The volume must not be encrypted.
The volume must not be locked by another process.
The volume must not have a backing file.
Working with Volume Snapshots
(Supported for the following hypervisors: XenServer, VMware vSphere, and KVM)
CloudStack supports Snapshots of disk volumes. Snapshots are a point-in-time capture of Instance disks. Memory and CPU states are not captured. If you are using the Oracle VM hypervisor, you can not take Snapshots, since OVM does not support them.
Snapshots may be taken for volumes, including both root and data disks (except when the Oracle VM hypervisor is used, which does not support Snapshots). The administrator places a limit on the number of stored Snapshots per user. Users can create new volumes from the Snapshot for recovery of particular files and they can create Templates from Snapshots to boot from a restored disk.
Users can create Snapshots manually or by setting up automatic recurring Snapshot policies. Users can also create disk volumes from Snapshots, which may be attached to an Instance like any other disk volume. Snapshots of both root disks and data disks are supported. However, CloudStack does not currently support booting a Instance from a recovered root disk. A disk recovered from Snapshot of a root disk is treated as a regular data disk; the data on recovered disk can be accessed by attaching the disk to an Instance.
A completed Snapshot is copied from primary storage to secondary storage, where it is stored until deleted or purged by newer Snapshot.
Users can also select the desired zones at the time of taking manual snapshots or while creating a snapshot policy. When additional zone(s) are selected and snapshot backup is allowed, the snapshot will be first copied to the secondary storage of the native zone and then copied to the additional zone(s) from there.
How to Snapshot a Volume
Log in to the CloudStack UI as a user or administrator.
In the left navigation bar, click Storage.
In Select View, be sure Volumes is selected.
Click the name of the volume you want to Snapshot.
Click the Snapshot button.

KVM volume Snapshot specifics
In recent CloudStack versions, by default, creating a Volume Snapshot for a running Instance is disabled due to a possible volume corruption in certain cases. To enable creating a Volume Snapshots while the Instance is running, the global setting ‘kvm.snapshot.enabled’ must be set to ‘True’.
The Volume Snapshot creation has changed in recent versions:
When the VM is running, a disk-only VM snapshot is taken, exclusively for the volume in question.
If the VM is stopped, the volume will be converted (with qemu-img convert). The final storage location is
determined by the snapshot.backup.to.secondary configuration; if it is false the snapshot will be copied
to a different directory in the same primary storage as the volume; if it is true the snapshot will be copied
to the secondary storage. If the snapshot is being taken in a file-based storage (NFS, SharedMountPoint, Local),
it will be copied directly to its final storage location, according to the configuration.
Since 4.21.0.0, ACS supports incremental snapshots for the KVM hypervisor when using file-based storage (NFS, SharedMountPoint, Local),
to enable incremental snapshots the kvm.incremental.snapshot configuration must be enabled. Furthermore, in order to take incremental snapshots
the KVM host must have at least Libvirt version 7.6.0+ and qemu version 6.1+. The size of the snapshot chains
will be determined by the snapshot.delta.max configuration, which affects both KVM and XenServer snapshots.
More information on the incremental snapshot feature for KVM can be found in its specification.
Automatic Snapshot Creation and Retention
(Supported for the following hypervisors: XenServer, VMware vSphere, and KVM)
Users can set up a recurring Snapshot policy to automatically create multiple Snapshots of a disk at regular intervals. Snapshots can be created on an hourly, daily, weekly, or monthly interval. One Snapshot policy can be set up per disk volume. For example, a user can set up a daily Snapshot at 02:30.
With each Snapshot schedule, users can also specify the number of recurring Snapshots to be retained. Older Snapshots that exceed the retention limit are automatically deleted. This user-defined limit must be equal to or lower than the global limit set by the CloudStack administrator. See “Globally Configured Limits”. The limit applies only to those Snapshots that are taken as part of an automatic recurring Snapshot policy. Additional manual Snapshots can be created and retained.
Incremental Snapshots and Backup
Snapshots are created on primary storage where a disk resides. After a Snapshot is created, it is immediately backed up to secondary storage and removed from primary storage for optimal utilization of space on primary storage.
CloudStack does incremental backups for some hypervisors. When incremental backups are supported, every N backup is a full backup.
VMware vSphere |
Citrix XenServer |
KVM |
|
|---|---|---|---|
Support incremental backup |
No |
Yes |
Yes |
Note
Between versions 4.17.x, 4.18.0 and 4.18.1, KVM volume snapshot backups were not full snapshots and they rely on the snapshots on the primary storage. To prevent any loss of data, care must be taken during revert operation and it must be ensured that the source primary storage snapshot file is present.
Volume Status
When a Snapshot operation is triggered by means of a recurring Snapshot policy, a Snapshot is skipped if a volume has remained inactive since its last Snapshot was taken. A volume is considered to be inactive if it is either detached or attached to an Instance that is not running. CloudStack ensures that at least one Snapshot is taken since the volume last became inactive.
When a Snapshot is taken manually, a Snapshot is always created regardless of whether a volume has been active or not.
Snapshot Restore
There are two paths to restoring Snapshots. Users can create a volume from the Snapshot. The volume can then be mounted to an Instance and files recovered as needed. Alternatively, a Template may be created from the Snapshot of a root disk. The user can then boot an Instance from this Template to effect recovery of the root disk.
Some hypervisor and storage combinations also allow for Instances and volumes to be reverted from snapshots. In such cases the Revert to snapshot action for a snapshot in the UI or the revertSnapshot API can be used to restore the volume to a particular snapshot. It should be noted that, when supported by the combination of hypervisor and storage, the snapshot must be available in the zone in which volume to be restored is present.
Note
When creating a volume from a snapshot of a DATA disk, it should be noted that the volume’s disk offering must be accessible in the target zone. In case the disk offering is using storage tags then such tagged storage resources must be available in the target zone.
Snapshot Job Throttling
When a Snapshot of an Instance is requested, the Snapshot job runs on the same host where the Instance is running or, in the case of a stopped Instance, the host where it ran last. If many Snapshots are requested for Instances on a single host, this can lead to problems with too many Snapshot jobs overwhelming the resources of the host.
To address this situation, the cloud’s root administrator can throttle how many Snapshot jobs are executed simultaneously on the hosts in the cloud by using the global configuration setting concurrent.snapshots.threshold.perhost. By using this setting, the administrator can better ensure that Snapshot jobs do not time out and hypervisor hosts do not experience performance issues due to hosts being overloaded with too many Snapshot requests.
Set concurrent.snapshots.threshold.perhost to a value that represents a best guess about how many Snapshot jobs the hypervisor hosts can execute at one time, given the current resources of the hosts and the number of Instances running on the hosts. If a given host has more Snapshot requests, the additional requests are placed in a waiting queue. No new Snapshot jobs will start until the number of currently executing Snapshot jobs falls below the configured limit.
The admin can also set job.expire.minutes to place a maximum on how long a Snapshot request will wait in the queue. If this limit is reached, the Snapshot request fails and returns an error message.
Snapshot Copy
CloudStack allows copying an existing backed-up snapshot to multiple zones. Users can either use the UI in the snapshot details view or the copySnapshot API to copy a snapshot from one zone to other zone(s). Snapshot copies can be used for disastser recovery and creating volumes and templates in the specific zone. Later if not needed, these copies or replicas can be individually deleted without affecting other replicas.
VMware Volume Snapshot Performance
When you take a Snapshot of a data or root volume on VMware, CloudStack uses an efficient storage technique to improve performance.
A Snapshot is not immediately exported from vCenter to a mounted NFS share and packaged into an OVA file format. This operation would consume time and resources. Instead, the original file formats (e.g., VMDK) provided by vCenter are retained. An OVA file will only be created as needed, on demand. To generate the OVA, CloudStack uses information in a properties file (*.ova.meta) which it stored along with the original Snapshot data.
Note
For upgrading customers: This process applies only to newly created Snapshots after upgrade to CloudStack 4.2. Snapshots that have already been taken and stored in OVA format will continue to exist in that format, and will continue to work as expected.
Linstor Primary Storage
LINSTOR is a configuration management system for storage on Linux systems. It manages LVM logical volumes and/or ZFS ZVOLs on a cluster of nodes. It leverages DRBD for replication between different nodes and to provide block storage devices to users and applications. It manages Snapshots, encryption and caching of HDD backed data in SSDs via bcache.
LINSTOR can be used as volume storage provider for Cloudstack, it currently only supports KVM hypervisors. To get started first setup your LINSTOR cluster according to the LINSTOR User Guide
Note
Make sure a LINSTOR-Satellite is running on all nodes where you want to have a storage provided for you Instances and that the nodes have the exact same node names as the nodes in Cloudstack. Also add a resource group to LINSTOR which you intend to use in Cloudstack.
After you are finished with the LINSTOR cluster setup, you can add a Cloudstack primary storage as any other
primary storage see Add Primary Storage.
For protocol choose Linstor and as server specify the controller REST-API URL e.g.: http://127.0.0.1:3370
and use the resource group name you added in the LINSTOR cluster.
Object Storage
This section gives technical details about CloudStack object storage. For more information about the concepts behind object storage see About Object Storage . For information about how to install and configure object storage through the CloudStack UI, see the in the Installation Guide.
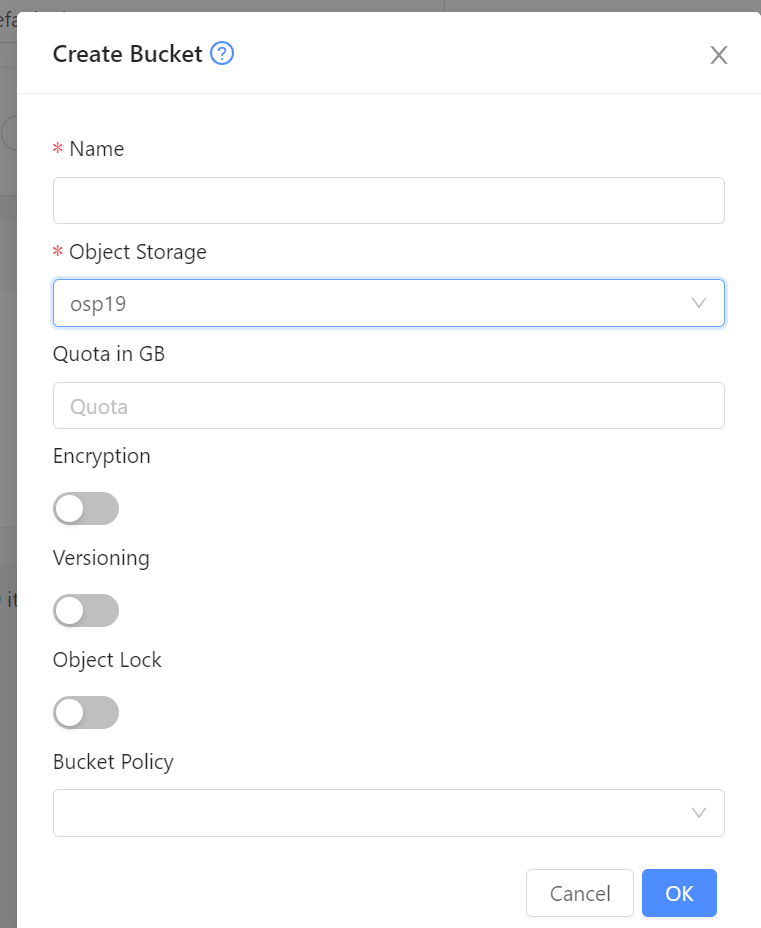
Creating a New Bucket
Buckets are logical containers for storing objects. To create a New Bucket:
Log in to the CloudStack UI as a user or administrator.
In the left navigation bar, click Storage.
In Select View, choose Buckets.
To create a new bucket, click create Bucket, provide the following details, and click OK.
Name: Give the bucket a unique name.
Object Store: Select the object store where you want the Bucket to reside
Quota in GiB: Enforce a quota on the bucket. This is a mandatory field since 4.21 as it is used to enforce resource limit on object store usage.
Based on the selected Object Store, you can specify additional details like quota, encryption, policy.
Browsing objects in a bucket
1. Once a bucket has been created, you can browse the files in the bucket by clicking the bucket name.
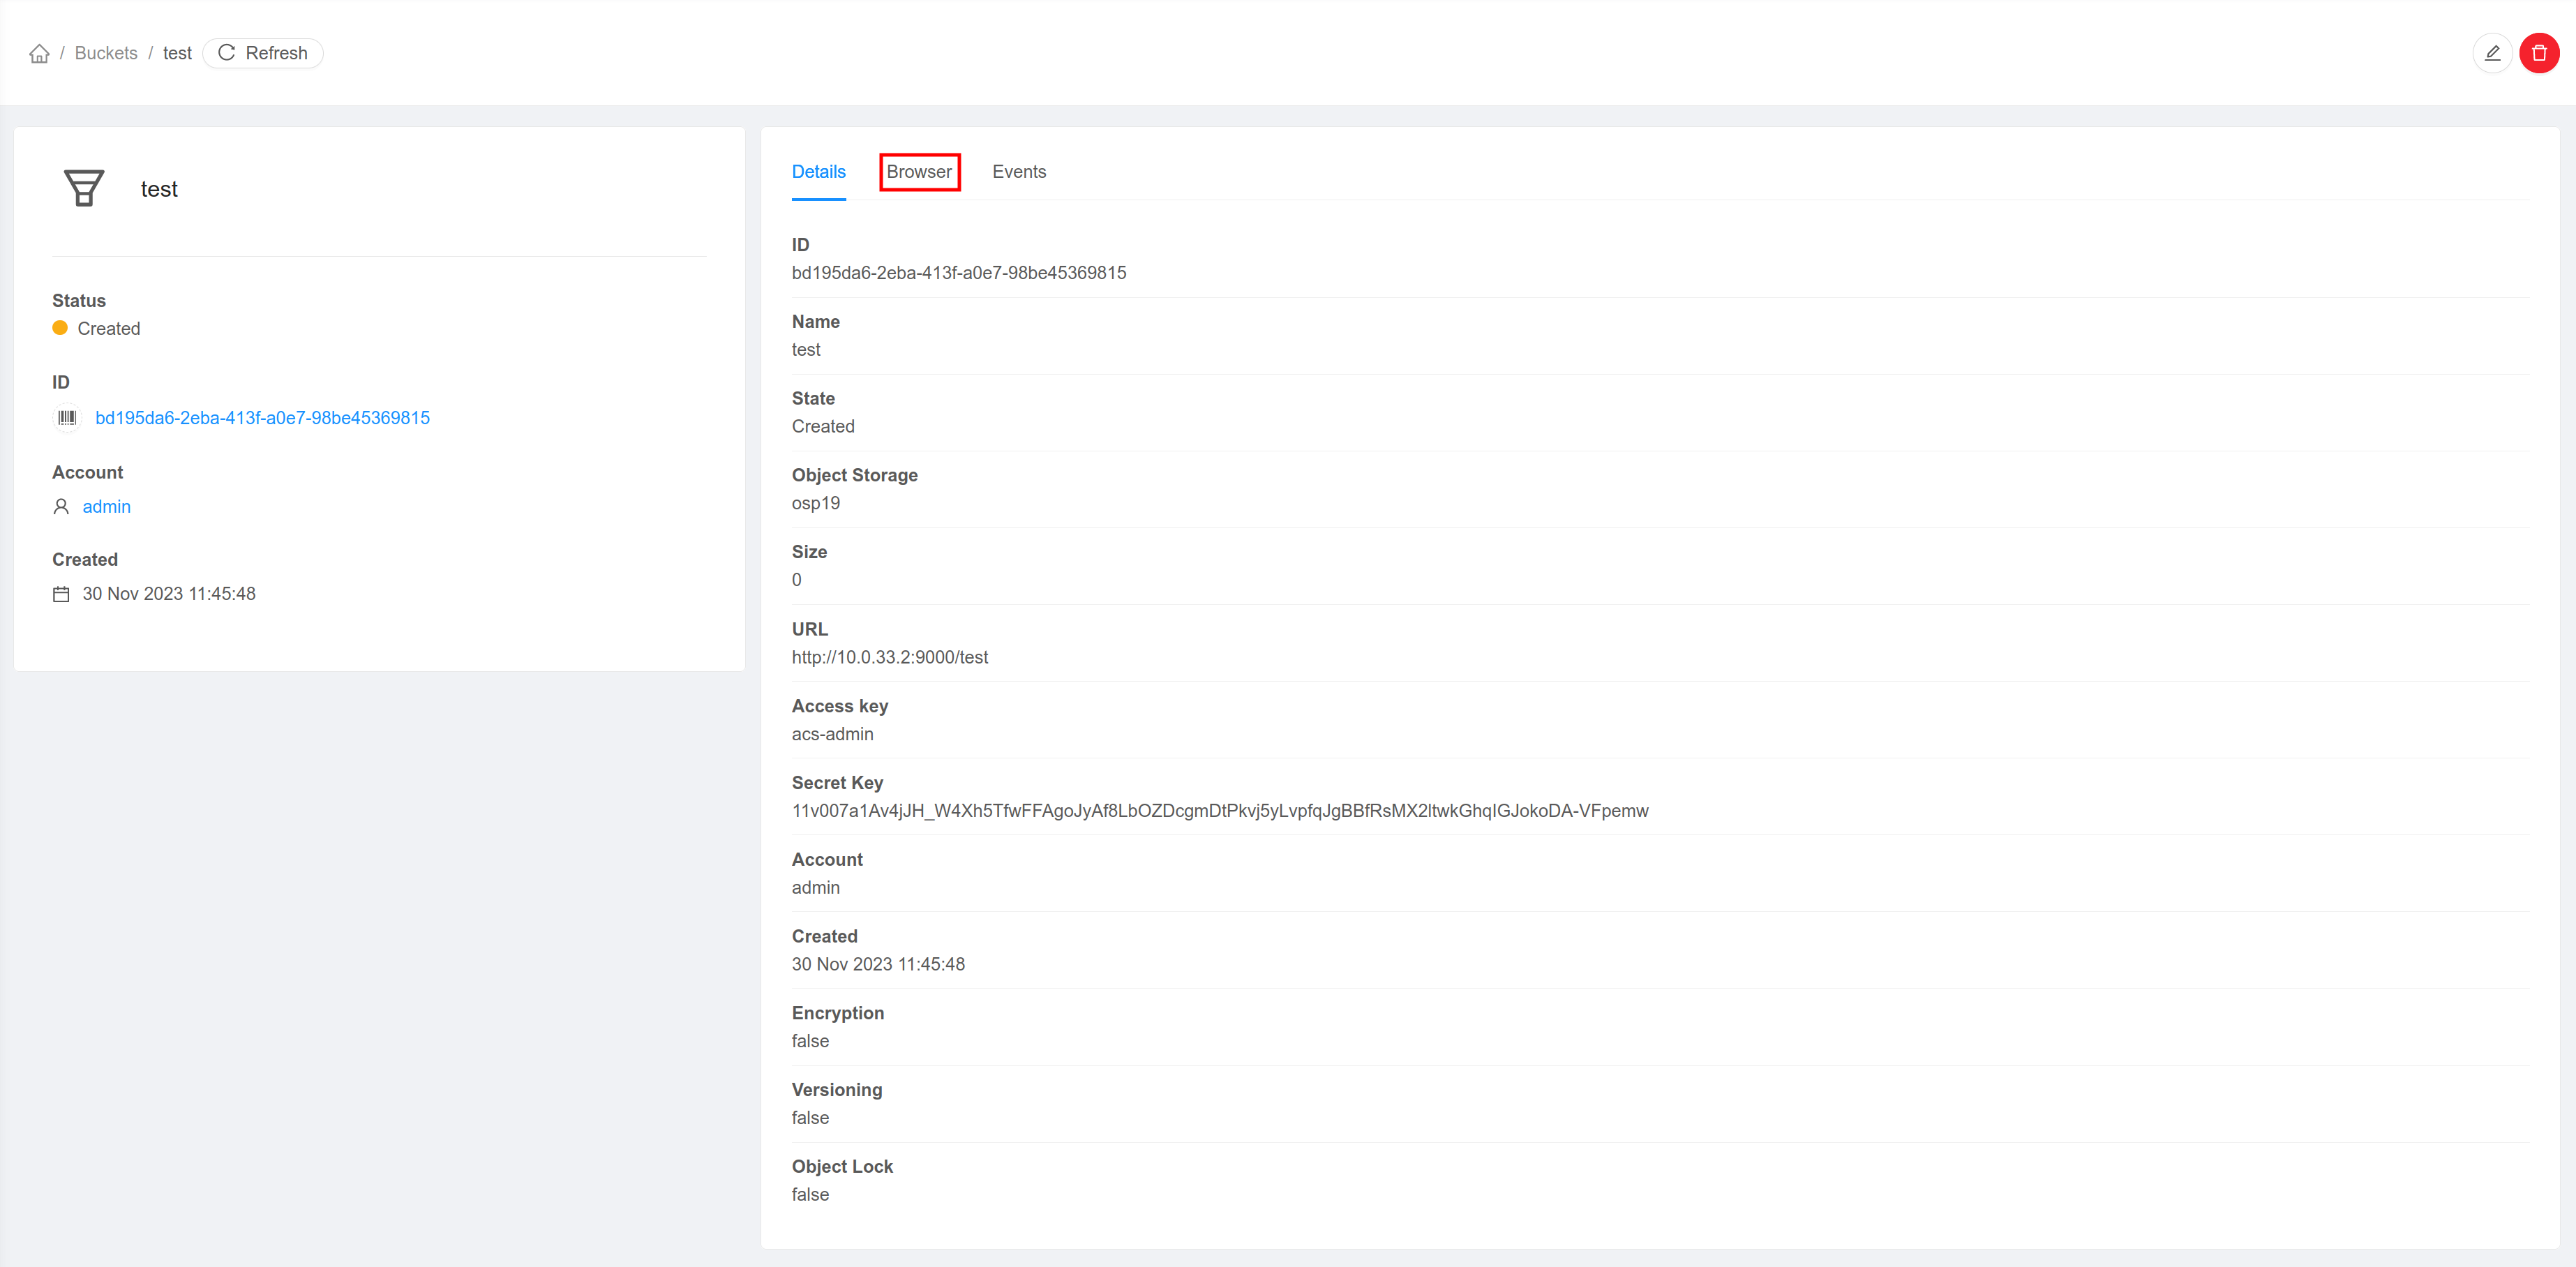
2. Open the Browser tab to list files in the bucket.
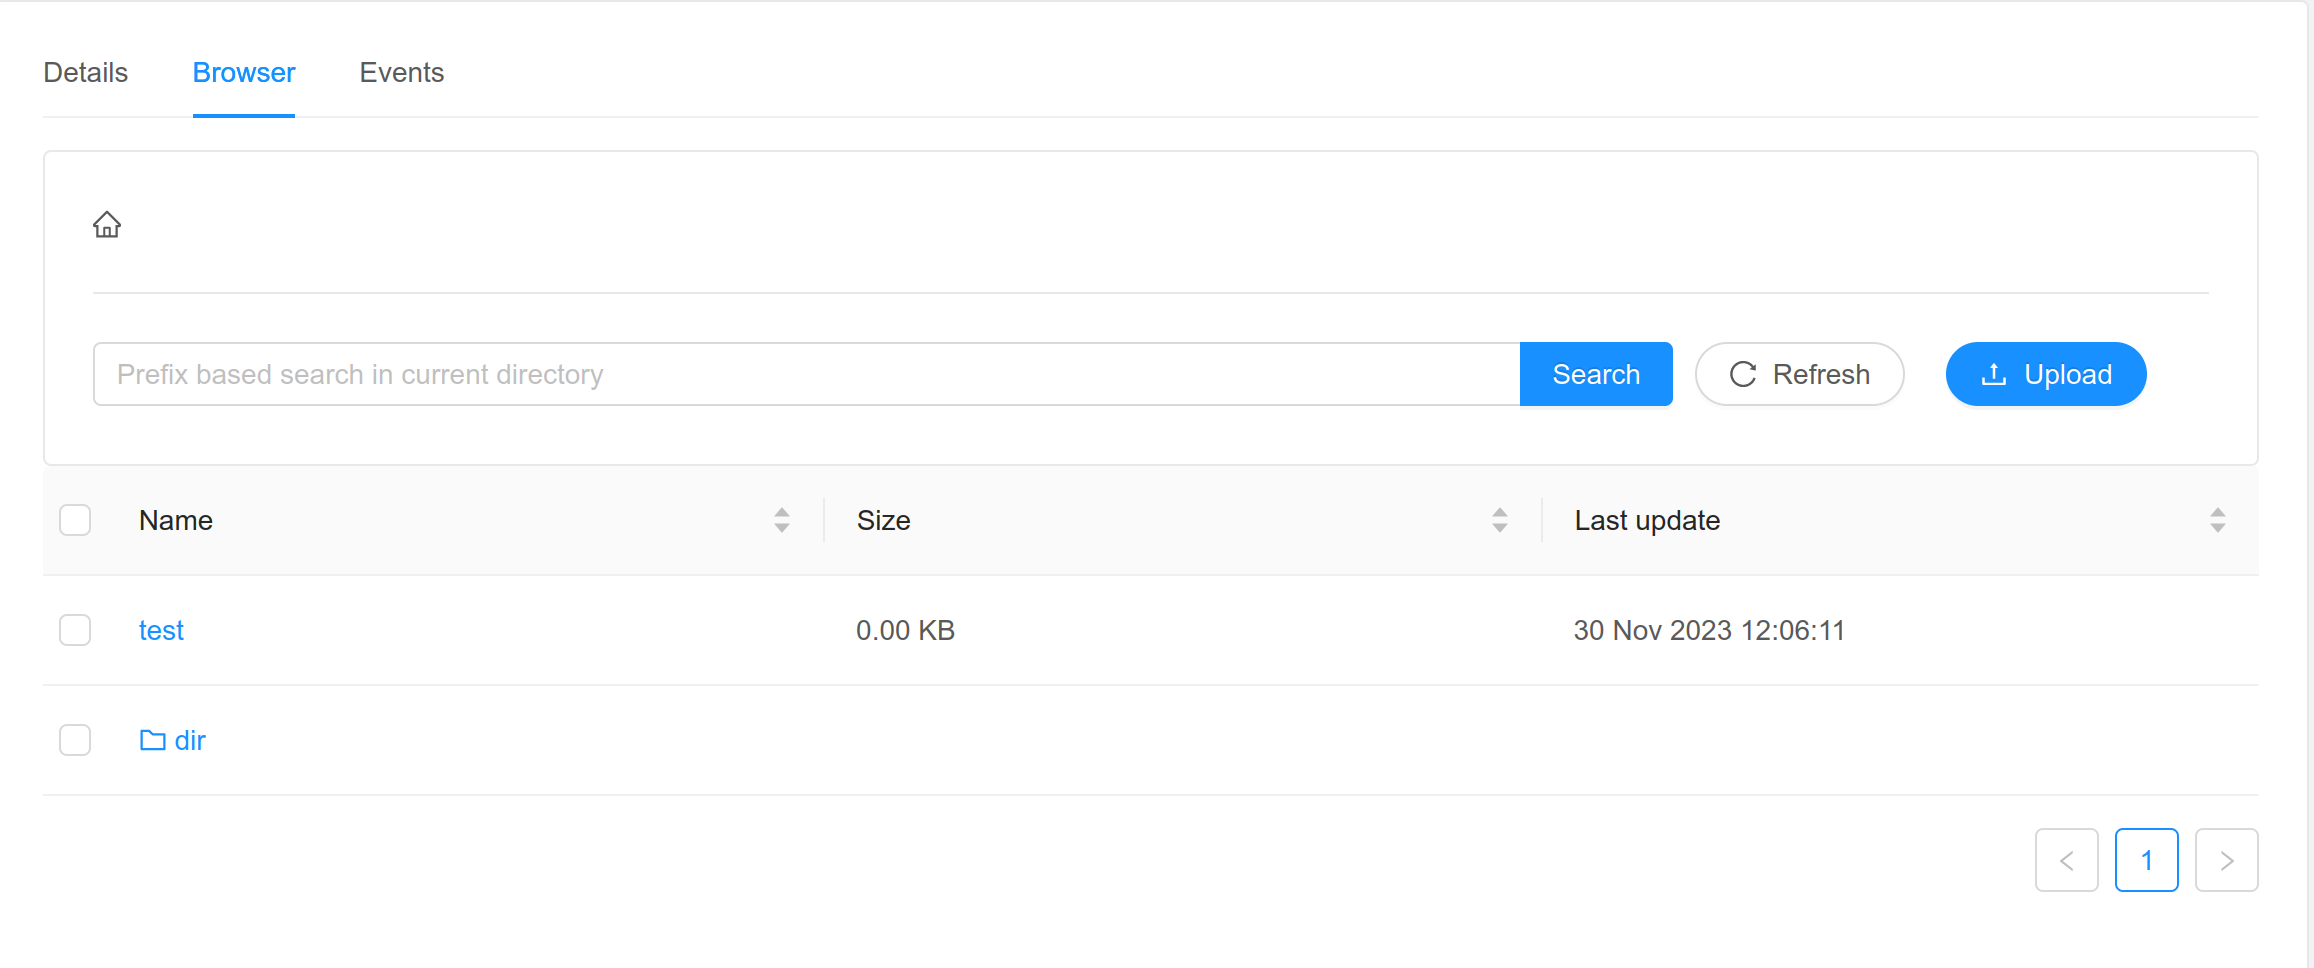
Under Browser tab, clicking a directory on the browser tab will list the objects in that directory.
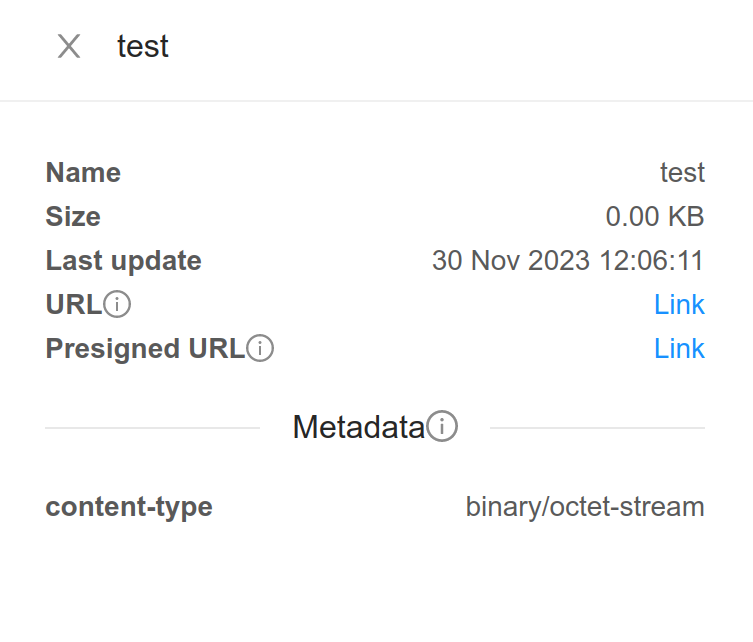
For a file, clicking it list the properties of that file with links to access the file.
Note
To access the bucket, UI uses the URL, access key and secret key from the bucket’s details.
Uploading an object to a bucket
1. On the Browser tab, click the  button to upload a file to the bucket. This will open up a dialog box to select the file to upload.
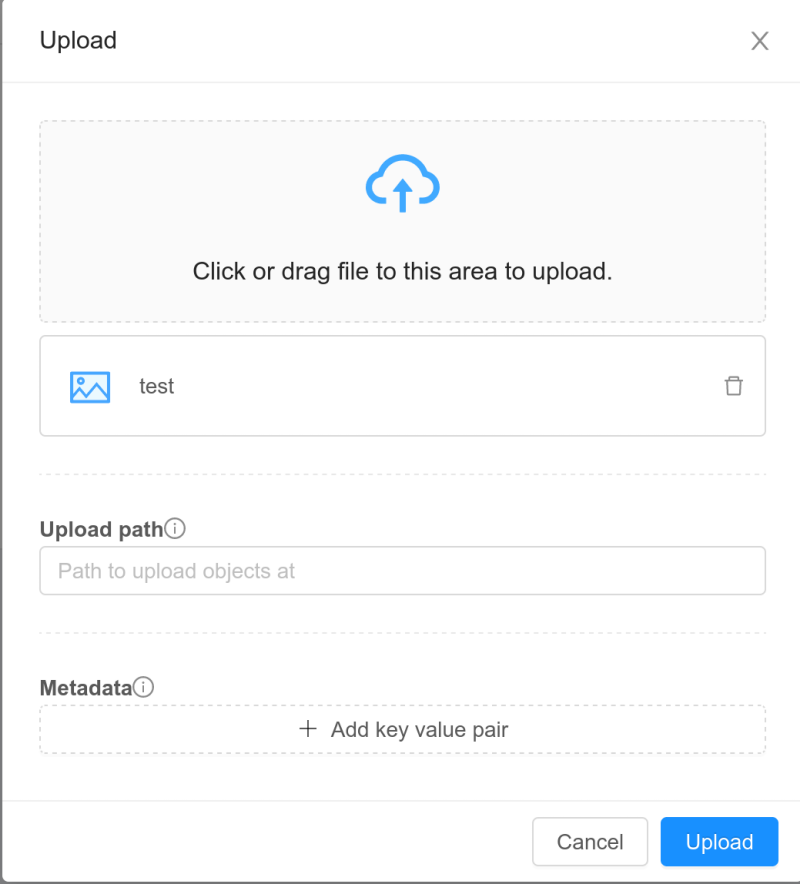
Select the file you want to upload and specify the upload path & metadata for the object as per requirements.
Click on Upload button to upload the file(s) to the bucket.
Deleting objects from a bucket
Select the files you want to remove from the bucket.
Click on the
 button to delete the selected files from the bucket.
Configuring resource limits on buckets and object storage usage
Administrators can enforce limits on the maximum number of buckets they can be created and the total object storage space that can be allocated at an account, domain and project level. Allocated storage is the sum of quota used by all of the buckets. Administrators can do this by going to the configure limits tab in accounts, domains and projects similar to when enforcing resource limits on volumes, primary storage usage etc.
Block Storage
CloudStack offers fully managed block storage to all users. This section gives technical details on how to create and manage Block Storage.
Block Storage is supported with CLVM/CLVM_NG (Clustered Logical Volume Manager).
From CloudStack 4.23 onwards, CloudStack supports two types for Clustered Logical Volume Manager (CLVM) primary storage: - CLVM: LVM volumes with RAW format - CLVM_NG (Next Generation): LVM volumes with QCOW2 format that supports advanced features.
Both use the same underlying infrastructure: - lvmlockd daemon for lock management - sanlock for distributed locking - Shared volume groups across cluster hosts
The key difference is the disk image format used on top of the LVM volumes which enabled different feature sets.
CLVM (RAW format):
Logical volumes are formatted as RAW disk images
Provides basic block storage functionality
Suitable for workloads that do not require advanced features
Advantages:
Slightly better performance (no QCOW2 overhead)
Simpler storage stack
Disadvantages:
No incremental snapshots - always full copy
Larger snapshot storage requirements
Slower snapshot operations
Higher secondary storage bandwidth usage
The original CLVM implementation used the clvmd (Clustered LVM daemon) along with corosync/pacemaker for cluster coordination. This technology has been deprecated in modern Linux distributions (RHEL 8+, Ubuntu 20.04+). CloudStack’s current implementation uses the modern lvmlockd + sanlock stack, which is more reliable. This same modern infrastructure is shared with CLVM_NG - the only difference between CLVM and CLVM_NG is the disk image format (RAW vs QCOW2), not the locking mechanism.
CLVM_NG (QCOW2 format):
Logical volumes are formatted as QCOW2 disk images
QCOW2 layer provides advanced features like: - Incremental snapshots (only changes since last snapshot) - Linked clones
Still benefits from LVM volume management
Advantages:
Incremental snapshots with dirty bitmaps
Reduction in snapshot storage
Faster snapshot operations
Reduced secondary storage bandwidth
Persistent bitmap tracking
Disadvantages:
Slight performance overhead from QCOW2 layer
More complex storage stack
Bitmaps lost during volume migration - hence the next snapshot will be a full snapshot (but subsequent snapshots will be incremental again)
Key features
Incremental Snapshots with QCOW2 bitmaps (CLVM_NG only)
CLVM_NG supports incremental snapshots using QCOW2’s bitmap feature. When a snapshot is taken, a bitmap is created to track which blocks have changed since the last snapshot.
CLVM (RAW format) always performs full snapshots, copying all data regardless of changes, which results in larger snapshot sizes and longer snapshot times.
Exclusive volume locking
CLVM/CLVM_NG use lvmlockd and sanlock to provide exclusive locking of logical volumes across cluster hosts. This ensures data integrity and prevents concurrent access issues.
Active Volumes: Locked exclusively on the host running the VM
Inactive Volumes: Can be in shared mode or deactivated
Lock Transfer: Automatic during VM migration
Lock Tracking: CloudStack tracks which host owns each volume lock
Lightweight Migration
When migrating VMs between pools on the same volume group:
No Data Copy: Volume stays in same VG, only lock is transferred
Zero Network Traffic: No data movement required
Same VG Required: Source and destination pools must use same VG
Physical Extents (PEs) and Size Calculation for CLVM_NG
LVM divides physical volumes into Physical Extents (PEs) - the smallest allocatable unit of storage:
Default PE Size: 4 MiB (4096 KiB)
Configurable Range: 1 KiB to 16 GiB (power of 2)
Impact: All LVM allocations are rounded up to PE boundaries
Example:
Requested: 10.5 GB volume
PE Size: 4 MiB
Calculation: ceil(10.5 GB / 4 MiB) = ceil(2688) = 2688 PEs
Actual Size: 2688 × 4 MiB = 10.5 GB (exactly)
QCOW2 metadata overhead
CLVM_NG uses QCOW2 format on LVM volumes, which adds metadata overhead. The actual disk usage may be higher than the requested size due to QCOW2’s internal structures, especially when snapshots are involved. This is important to consider when planning storage capacity for CLVM_NG pools.
QCOW2 Metadata Components:
QCOW2 Header: 72 bytes minimum (usually one cluster = 64 KiB)
L1 Table: References L2 tables (grows with volume size)
L2 Tables: Map clusters to physical storage
Refcount Tables: Track cluster reference counts
Bitmaps: For incremental snapshots (optional)
When creating CLVM_NG volumes, CloudStack accounts for:
Requested Virtual Size: The size visible to the VM
QCOW2 Metadata: Overhead for QCOW2 structures
PE Alignment: Round up to PE boundaries
# Check LVM volume size (physical)
lvs -o lv_name,lv_size /dev/vgname/volumename

# Check QCOW2 virtual size
qemu-img info /dev/vgname/volumename
Backing File Support in CLVM_NG
CLVM_NG supports QCOW2 backing files for template-based volume creation, enabling efficient template deployment and linked clones:
How It Works: 1. Template Volume: Created as QCOW2 on CLVM_NG pool 2. Backing File: Template volume becomes backing file (base image) 3. Child Volume: New VM volumes reference template, store only differences 4. Copy-on-Write (CoW): Modified blocks stored in child volume, reads fall through to backing file
Benefits: - Space Savings: Multiple VMs share single template image - Fast Deployment: VM creation in seconds (no full copy needed) - Efficient Storage: Only differences (deltas) consume space
When deploying a VM from a template on CLVM_NG:
1. Template registered in CloudStack
   ↓
2. Template stored as QCOW2 in CLVM_NG pool
   /dev/vgname/template-uuid
   ↓
3. User deploys VM from template
   ↓
4. CloudStack creates child volume with backing file
   lvcreate -L <size> -n vm-volume-uuid vgname
   qemu-img create -f qcow2 -F qcow2 -b /dev/vgname/template-uuid /dev/vgname/vm-volume-uuid
   ↓
5. VM starts using child volume
   (reads from template, writes to child)
Global Settings
clvm.secure.zero.fill
Type: Boolean
Default: false
Scope: Storage Pool
Category: Advanced
Description: When enabled, CLVM volumes are zero-filled at deletion time to prevent data recovery by VMs reusing the space, as thick LVM volumes write data linearly
Impact: - Enabled: Volumes are securely wiped on deletion (slower deletion, more secure) - Disabled: Fast deletion, but data may be recoverable
Propagation: Setting is propagated to hosts when they connect to the storage pool. Changing requires disconnecting/reconnecting hosts or restarting KVM agent
Recommendation: Enable for environments with strict security/compliance requirements (PCI-DSS, HIPAA). Disable for performance-critical environments where deletion speed matters more than data security
Use Case: Production environments handling sensitive data, multi-tenant environments with strict data isolation requirements
For incremental snapshots to work with CLVM_NG enabled the kvm.incremental.snapshot global setting must also be set to true.
VM snapshots are currently not supported on CLVM/CLVM_NG volumes.
Setting up Clustered LVM on CloudStack KVM hosts
Configure shared storage using iSCSI, Fibre Channel, or shared SAS/NVMe devices.
Install lvm2 and sanlock packages on all cluster hosts that will access the CLVM storage pool.
``` # Example for OL9 dnf install lvm2-lockd sanlock -y systemctl enable sanlock –now systemctl enable lvmlockd –now
# Update /etc/lvm/lvm.conf to set use_lvmlockd = 1 # Update /etc/lvm/lvmlocal.conf set host_id to a unique value for each host (e.g. hostname or IP or ID (1, 2, 3…)) ```
Just on one of the hosts, initialize the shared physical volume (PV) that will be used for CLVM storage pools and start the VG in shared mode:
`
pvcreate /dev/sdb # Initialize the shared physical volume (replace with actual device)
vgcreate --shared --lock-type sanlock sharedvg /dev/sdb
`
On all other hosts, perform the following:
`
lvmdevices --adddev /dev/sdb # adds the disk to /etc/lvm/devices/system.devices
vgchange lockstart sharedvg # Start the VG in shared mode
`
Note
It is reccommended to add CLVM / CLVM_NG storage pools as a Cluster scoped resource, so as to limited number of hosts that can access the pool for optimal performance and reliability. Due to the lack of support from lvm to provide a centralized way to query which host has the lock for a given volume, CloudStack relies on tracking this information in the database. However, if there is a drift in this information, for example due to a host failure, CloudStack will attempt to query each host for the lock status of the volume. This can lead to performance issues if there are a large number of hosts in the cluster as each host will need to be queried for each volume.
VM snapshots and incremental volume snapshot are not supported for CLVM/CLVM_NG volumes as of CloudStack 4.23.0.0.
Note
In an environment with different Storage Pools, you could leverage the global setting preferred.storage.pool to select which pool you’d want to use for volumes.
Shared FileSystems
CloudStack offers fully managed NFS Shared FileSystems to all users. This section gives technical details on how to create/manage a Shared FileSystem using basic lifecycle operations and also some implementation details.
Note
This feature is available only on advanced zones without security groups.
Creating a New Shared FileSystem
Log in to the CloudStack UI as a user or administrator.
In the left navigation bar, click Storage.
In the Select View, choose Shared FileSystems.
Click on Create Shared FileSystem, provide the following details and then click OK.
Name
Description
Zone
Format: Filesystem format (XFS, EXT4) which will be installed on the Shared FileSystem.
Network: Guest network to which the Shared FileSystem will be attached.
Compute offering: Offering using which the Shared FileSystem Instance will be deployed.
Disk offering: Offering used by the underlying data volume.
Size, MinIops and MaxIos: Displayed only when the disk offering takes custom size and custom iops.

Admins will see extra fields in the create form where they can specify the
account, domain and the project which will be owning the Shared FileSystem.

Access
The Shared FileSystem can be mounted by using the information given on the Access Tab.

Lifecycle Operations
Supported lifecycle operations are :
Update name and description of the Shared FileSystem
Stop/Start Shared FileSystem - This will Stop and Start the Shared FileSystem Instance
Restart Shared FileSystem - Reboots the Shared FileSystem Instance. If Cleanup option is provided then the Instance state is cleaned up and restored to the original template. Configurations related to setting up the NFS export will be done again. This will not affect the data on the volume attached to the Instance.

Change Disk Offering - The disk offering of the underlying volume can be changed. Whether live resize is supported or not depends on the hyervisor. Please note that the size of the Shared FileSystem can only be increased.
Change Service Offering - The service offering of the Shared FileSystem Instance can be changed as required. This can only be done when the Shared FileSystem is in Stopped state.
Add/Remove Network - Guest networks can be added to or removed from the Shared FileSystem. NFS share is exported to all networks. So instances on different networks can mount the same share using the respective IP addresses as given on the Access tab. APIs serving these operations are addNicToVirtualMachine and removeNicToVirtualMachine called with the Shared FileSystem Instance ID. Please note that the added networks must not be on overlapping CIDR ranges.

Destroy Shared FileSystem - The Shared FileSystem will be destroyed. It can be recovered before it automatically gets expunged. Expunge timeout is given by the global setting ‘sharedfs.cleanup.delay’.
Service Offering
There are two global settings that control what should be the minimum RAM size and minimum CPU count for the Shared FileSystem Instance : ‘sharedfsvm.min.cpu.count’ and ‘sharedfsvm.min.ram.size`. Only those offerings which meet these settings and have HA enabled are shown in the create form.