CloudStack Kubernetes Service
The Kubernetes Service plugin adds Kubernetes integration to CloudStack. The plugin is disabled by default and an admin can enable it using a Global Setting. It enables users to run containerized services using Kubernetes clusters.
With CoreOS having reached EOL, from 4.16 the Kubernetes Service Plugin will use the existing SystemVM template for deploying kubernetes clusters. For installation of Kubernetes binaries on the cluster nodes, a binaries ISO is used for each Kubernetes version to be made available via CloudStack. This allows faster, offline installation of Kubernetes binaries and docker images along with support for adding multiple versions of Kubernetes for upgrades and running different clusters.
For deployment and setup of Kubernetes on cluster nodes, the plugin uses the Kubernetes tool, ‘kubeadm’. kubeadm is the command-line tool for easily provisioning a secure Kubernetes cluster on top of physical or cloud servers or virtual machines. Under the hood, control node(s) of the cluster starts a Kubernetes cluster using kubeadm init command with a custom token, and worker nodes join this Kubernetes cluster using kubeadm join command with the same token. More about kubeadm here: https://kubernetes.io/docs/reference/setup-tools/kubeadm/kubeadm/. Weave Net CNI provider plugin is used for cluster networking. More about Weave Net provide plugin here: https://www.weave.works/docs/net/latest/kubernetes/kube-addon/.
To access the Kubernetes dashboard securely, the plugin provides access to kubeconfig file data which uses the Kubernetes tool kubectl to run a local proxy and thereby access the dashboard. More about kubectl here: https://kubernetes.io/docs/reference/kubectl/overview/
The service allows creation of Kubernetes clusters using the UI or API. Both UI and API provide the ability to list, delete, scale, upgrade, stop and start these clusters.
Enabling the Kubernetes Service
The Kubernetes Service plugin is disabled by default. To enable it, go to Global Settings and set the following global configuration to true:
cloud.kubernetes.service.enabled
Restart the Management Server to enable the set configuration values.
# service cloudstack-management restart
Once the Kubernetes service is running the new APIs will become accessible and the UI will show the Kubernetes tab under the Compute section.
NOTE: From ACS 4.16 onwards, if a CKS cluster is to be deployed on VMware, the ‘vmware.create.full.clone’ configuration parameter will need to be set to true, so as to allow resizing of root volumes of the cluster nodes.
Kubernetes Supported Versions
The Kubernetes service provides the functionality to manage multiple supported Kubernetes versions. Management can be via both UI and API. A supported version corresponds to a specific Kubernetes version for which an ISO has been uploaded. Pre-built, community ISOs for different Kubernetes versions are available at:
A script is provided (see below) to add other Kubernetes versions. Once an ISO is created for a Kubernetes version it can be added in the service and other CRUD operations can be performed using both the UI and API. Using a pre-packaged ISO containing required binaries and docker images allows faster provisioning on the node virtual machines of a Kubernetes cluster. Complete offline provisioning of the Kubernetes cluster is not supported at present as the kubeadm init command needs active Internet access.
A script named create-kubernetes-binaries-iso.sh has been provided in the cloudstack-common package for creating a new setup ISO with the desired version of Kubernetes binaries and corresponding docker images.
Usage:
# ./create-kubernetes-binaries-iso.sh OUTPUT_PATH KUBERNETES_VERSION CNI_VERSION CRICTL_VERSION WEAVENET_NETWORK_YAML_CONFIG DASHBOARD_YAML_CONFIG
Eg:
# ./create-kubernetes-binaries-iso.sh ./ 1.12.5 0.7.1 1.12.0 "https://cloud.weave.works/k8s/net?k8s-version=1.12.5" https://raw.githubusercontent.com/kubernetes/dashboard/v2.0.0-beta1/aio/deploy/recommended.yaml
NOTE: From ACS 4.16 onwards, Kubernetes versions >= 1.20.x are only supported (https://endoflife.date/kubernetes).
Working with Kubernetes supported version
Adding supported Kubernetes version
Once the ISO has been built for a desired Kubernetes version, it can be added by the admin in the service for cluster deployment using both the UI and API. The UI provides the following form to add new supported version:
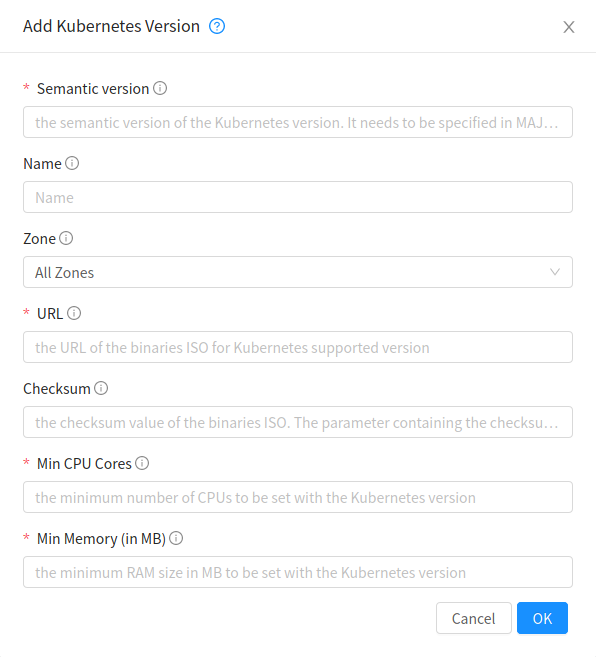
addKubernetesSupportedVersion API can be used by an admin to add a new supported version for the service. It takes following input parameters:
- name (the name of the Kubernetes supported version) · semanticversion (the semantic version of the Kubernetes release in MAJOR.MINOR.PATCH format. More about semantic versioning here: https://semver.org/ Required)
- zoneid (the ID of the zone in which Kubernetes supported version will be available)
- url (the URL of the binaries ISO for Kubernetes supported version)
- checksum (the checksum value of the binaries ISO)
- mincpunumber (the minimum number of CPUs to be set with the Kubernetes supported version)
- minmemory (the minimum RAM size in MB to be set with the Kubernetes supported version)
For example:
> add kubernetessupportedversion name=v1.13.2 semanticversion=1.13.2 url=http://172.20.0.1/files/setup-1.13.2.iso zoneid=34d23dd5-5ced-4e8b-9b0a-835a0b8ae2a6 mincpunumber=2 minmemory=2048
{
   "kubernetessupportedversion": {
   "id": "6668e999-fe6c-4a91-88d8-d10bcf280d02",
   "isoid": "78d45e9b-a482-46f4-8cbc-cf7964564b85",
   "isoname": "v1.13.2-Kubernetes-Binaries-ISO",
   "isostate": "Active",
   "semanticversion": "1.13.2",
   "name": "v1.13.2",
   "supportsha": false,
   "zoneid": "34d23dd5-5ced-4e8b-9b0a-835a0b8ae2a6",
   "zonename": "KVM-advzone1"
   "mincpunumber": 2
   "minmemory": 2048
   }
}
The minimum Kubernetes version that can be added in the service is 1.11. At present, v1.17 and above might not work due to their incompatibility with weave-net plugin.
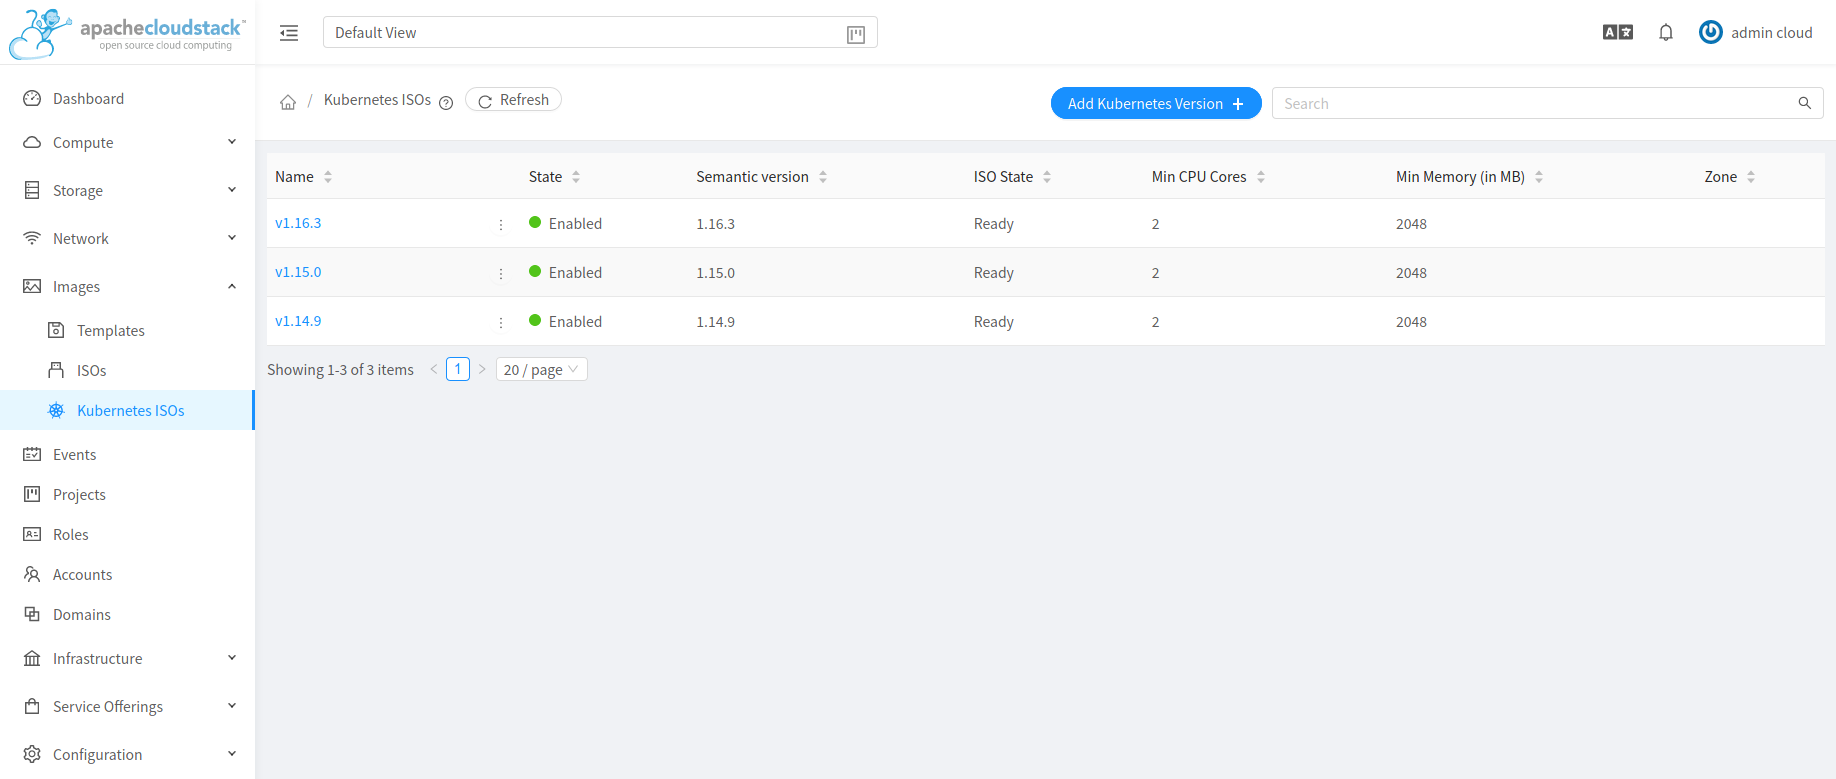
Listing supported Kubernetes versions
listKubernetesSupportedVersion API can be used to list existing supported versions. id parameter can be passed as input to list details of a single supported version.
Updating supported Kubernetes version
updateKubernetesSupportedVersion API can be used by admins to update an existing supported version to set their state enabled or disabled. Supported versions with disabled state cannot be used for deploying Kubernetes clusters. It takes following input parameters,
- id (the ID of the Kubernetes supported version)
- state (the state of the Kubernetes supported version)
Deleting supported Kubernetes version
deleteKubernetesSupportedVersion API has been provided for admins to delete an existing supported version if it is not used by any Kubernetes cluster in the service. id parameter of the API can be used to pass Kubernetes version to be deleted.
Note
addKubernetesSupportedVersion, updateKubernetesSupportedVersion and deleteKubernetesSupportedVersion APIs are available to root admins only
Kubernetes clusters
The Kubernetes service provides the functionality of running and managing Kubernetes clusters. Highly available, scalable Kubernetes clusters can be created to run containerized deployments without having to set up Kubernetes on each container node manually. The service will automatically provision the desired number of virtual machines as per cluster size using the binaries corresponding to the provided Kubernetes version. Additionally, the service provides the functionality to upgrade and scale clusters. Running clusters can be upgraded to a newer minor or patch Kubernetes version at a time. Running clusters can also be scaled up or down based on the number of worker nodes provided and to the service offering used by each node.
This provides functionality to create Kubernetes clusters for Shared, Isolated and VPC networks in CloudStack, but such networks must be accessible to the CloudStack management server for provisioning virtual machines on the cluster. The default network offering must be set in the Global Settings for the service to create Kubernetes clusters.
The following Global Setting value must be set to the name of Network Offering to be used for creating a new network when no network has been selected while creating a Kubernetes cluster:
cloud.kubernetes.cluster.network.offering
A new network offering named DefaultNetworkOfferingforKubernetesService has been added since 4.14.0
Note
- Multi-control nodes, HA cluster can be created for Kubernetes version 1.16 and above only.
- While creating multi-control nodes, HA cluster over a shared network, an external load-balancer must be manually setup. This load-balancer should have port-forwarding rules for SSH, Kubernetes API server access. Service assumes SSH access to cluster nodes is available from port 2222 to (2222 + cluster node count -1). Similarly, for API access 6443 must be forwarded to control nodes. Over the CloudStack isolated network these rules are automatically provisioned.
Managing Kubernetes clusters
For Kubernetes cluster management, the service provides create, stop, start, scale, upgrade and delete APIs and similar features in the UI.
Creating a new Kubernetes cluster
New Kubernetes clusters can be created using the API or via the UI. User will be provided with an ‘Add Kubernetes Cluster’ form as shown below,
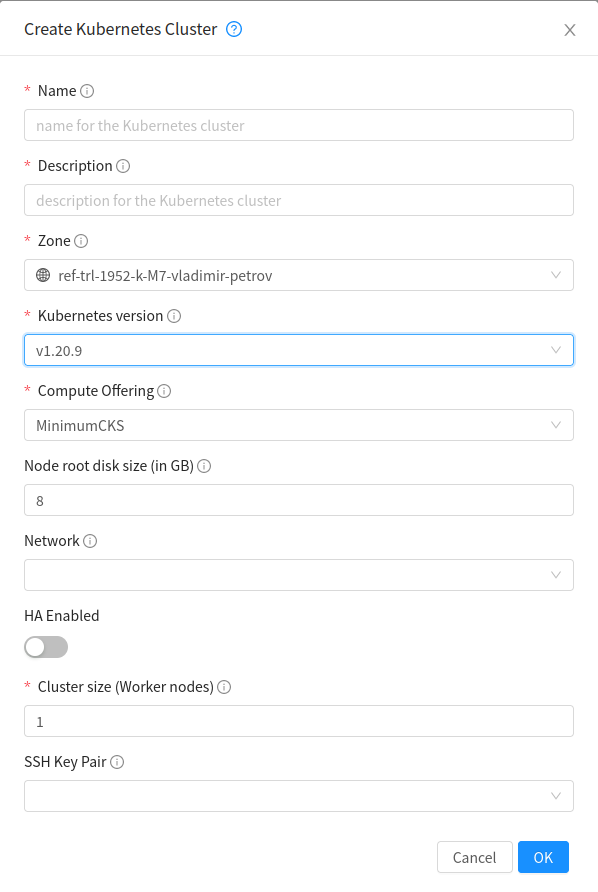
createKubernetesCluster API can be used to create new Kubernetes cluster. It takes following parameters as input,
- name (name for the Kubernetes cluster; Required)
- description (description for the Kubernetes cluster; Required)
- zoneid (availability zone in which Kubernetes cluster to be launched; Required)
- kubernetesversionid (Kubernetes version with which cluster to be launched; Required)
- serviceofferingid (the ID of the service offering for the virtual machines in the cluster; Required)
- account (an optional account for the virtual machine. Must be used with domainId)
- domainid (an optional domainId for the virtual machine. If the account parameter is used, domainId must also be used)
- projectid (Deploy cluster for the project)
- networkid (Network in which Kubernetes cluster is to be launched)
- keypair (name of the ssh key pair used to login to the virtual machines)
- controlnodes (number of Kubernetes cluster control nodes, default is 1) externalloadbalanceripaddress (external load balancer IP address while using shared network with Kubernetes HA cluster)
- size (number of Kubernetes cluster worker nodes; Required)
- noderootdisksize (root disk size of root disk for each node)
- dockerregistryusername (username for the docker image private registry; Experimental)
- dockerregistrypassword (password for the docker image private registry; Experimental)
- dockerregistryurl (URL for the docker image private registry; Experimental)
- dockerregistryemail (email of the docker image private registry user; Experimental)
For example:
> create kubernetescluster name=Test description=Test-Cluster zoneid=34d23dd5-5ced-4e8b-9b0a-835a0b8ae2a6 size=1 noderootdisksize=10 serviceofferingid=a4f280a1-9122-40a8-8f0c-3adb91060f2a kubernetesversionid=6668e999-fe6c-4a91-88d8-d10bcf280d02
{
  "kubernetescluster": {
    "associatednetworkname": "Test-network",
    "cpunumber": "4",
    "description": "Test-Cluster",
    "endpoint": "https://172.20.20.12:6443/",
    "id": "74e3cc02-bbf7-438f-bfb0-9c193e90c1fb",
    "kubernetesversionid": "6668e999-fe6c-4a91-88d8-d10bcf280d02",
    "kubernetesversionname": "v1.13.2",
    "controlnodes": 1,
    "memory": "4096",
    "name": "Test",
    "networkid": "148af2cb-4b94-42a2-b701-3b6aa884cbb0",
    "serviceofferingid": "a4f280a1-9122-40a8-8f0c-3adb91060f2a",
    "serviceofferingname": "CKS Instance",
    "size": 1,
    "state": "Running",
    "templateid": "17607ed6-1756-4ed7-b0f4-dbab5feff5b2",
    "virtualmachineids": [
      "da2cb67e-e852-4ecd-b16f-a8f16eb2c962",
      "4179864a-88ad-4d6d-890c-c9b73c53589b"
    ],
    "zoneid": "34d23dd5-5ced-4e8b-9b0a-835a0b8ae2a6",
    "zonename": "KVM-advzone1"
  }
}
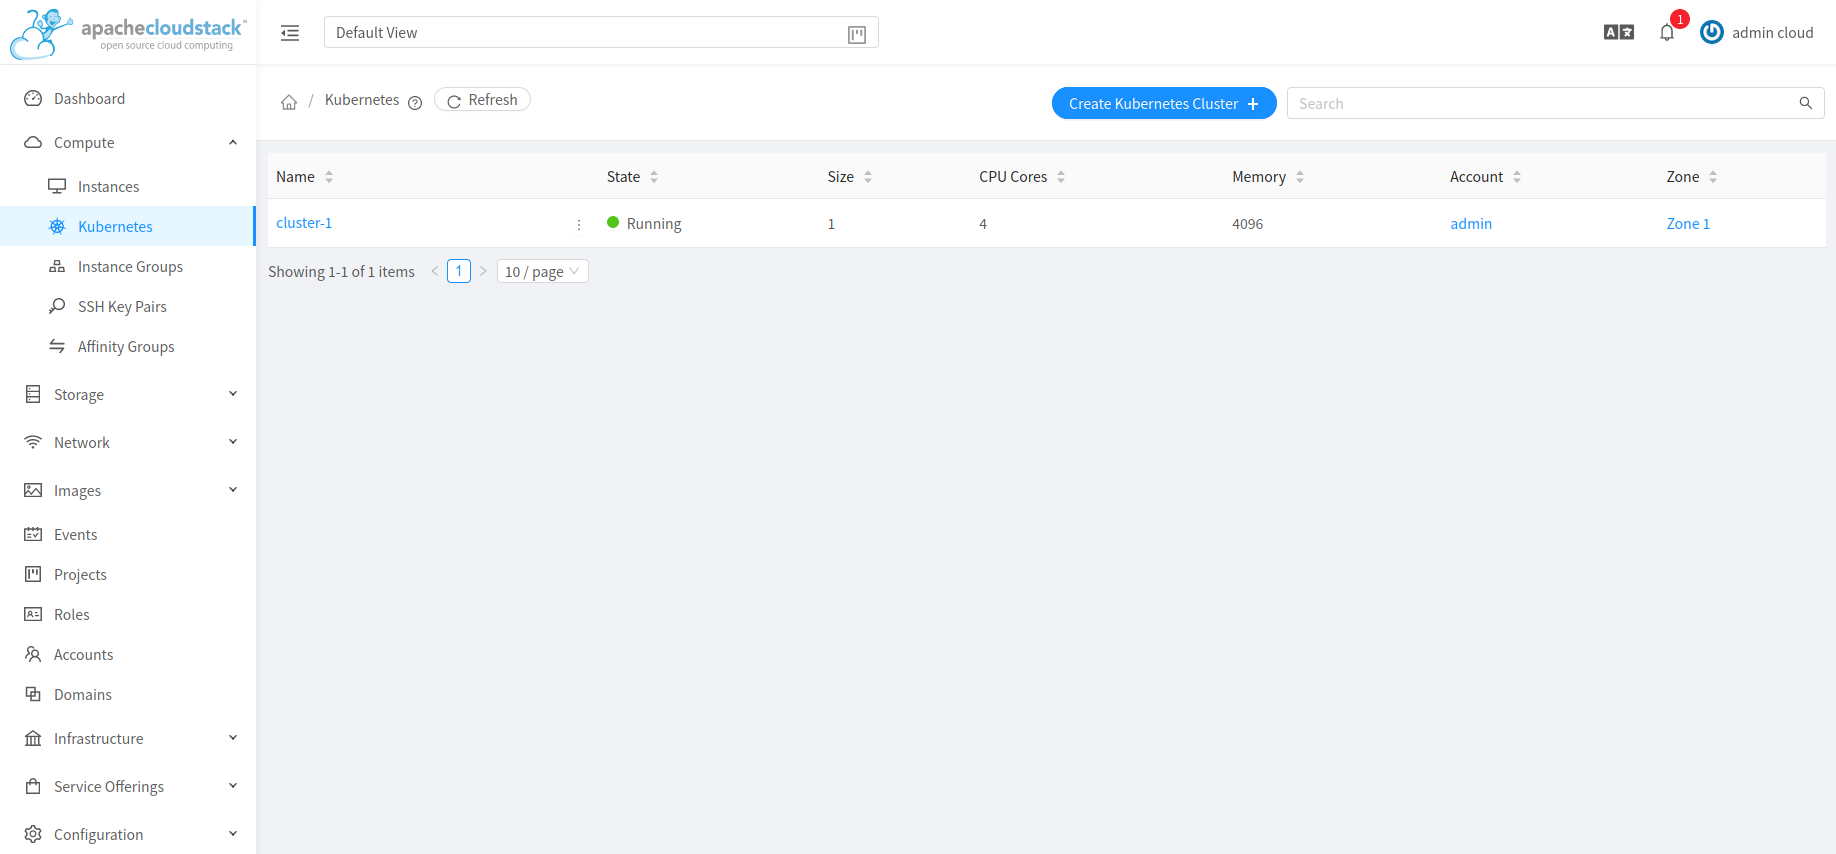
On successful creation, the new cluster will automatically be started and will show up in Running state. If creation of the new cluster fails it can be in following states: - Alert – When node virtual machines were successfully provisioned, and cluster API server is accessible but further provisioning steps could not be completed. - Error – When the service was unable to provision the node virtual machines for the cluster or if the cluster API server is not accessible.
Note
- A minimum of 2 cores of CPU and 2GB of RAM is needed for deployment. Therefore, the serviceofferingid parameter of createKubernetesCluster API must be provided with the ID of such compute offerings that conform to these requirements.
- Private docker registry related parameters of createKubenetesCluster API (dockerregistryusername, dockerregistryusername, dockerregistryurl, dockerregistryemail) provides experimental functionality. To use them during cluster deployment value for global setting, cloud.kubernetes.cluster.experimental.features.enabled, must be set to true by admin beforehand.
Listing Kubernetes clusters
listKubernetesCluster API can be used to list existing Kubernetes clusters. id parameter can be passed as input to list details of a single supported version.
Stopping Kubernetes cluster
A running Kubernetes cluster can be stopped using either the stopKubernetesCluster API which takes id of the cluster as an input parameter or  action icon from UI. action icon is shown for a running cluster in the UI.
Starting a stopped Kubernetes cluster
A stopped Kubernetes cluster can be started using either the startKubernetesCluster API which takes id of the cluster as the input parameter or the  action icon from UI. action icon is shown for a stopped cluster in the UI.
When the service fails to start a stopped cluster, the cluster will show in Alert state else it will show up as Running.
Scaling Kubernetes cluster
A running or stopped Kubernetes cluster can be scaled using both API and UI.  action icon is shown for a running cluster in the UI which opens the form shown below,
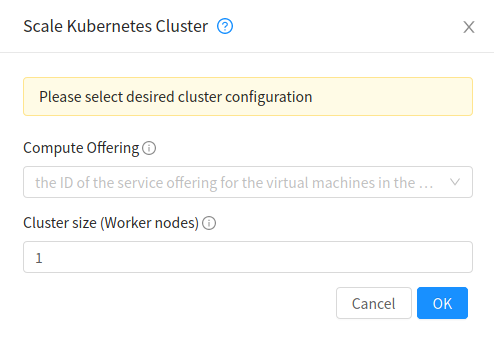
scaleKubernetesCluster API can be used to scale a running (or stopped cluster) to a desired cluster size and service offering. It takes the following parameters as input:
- id (the ID of the Kubernetes cluster to be scaled; Required)
- serviceofferingid (the ID of the new service offering for the virtual machines in the cluster)
- size (number of Kubernetes cluster worker nodes)
Only running Kubernetes clusters can be scaled in size. When the service fails to scale the cluster, the cluster will show in Alert state else if the scaling is successfull cluster will show up in Running state.
Note: Only up scaling is supported while scaling clusters for service offering.
Upgrading Kubernetes cluster
A running Kubernetes cluster can be upgraded using both API and UI.  action icon is shown for a running cluster in the UI which opens the form shown below,
upgradeKubernetesCluster API can be used to upgrade a running cluster. It takes the following parameters as input:
- id (the ID of the Kubernetes cluster to be upgraded; Required)
- kubernetesversionid (Kubernetes version with which cluster to be launched; Required)
When the service fails to upgrade the cluster, the cluster will show up in Alert state, else if successful, the cluster appears Running state.
Note
Kubernetes can be upgraded from one MINOR version to the next MINOR version, or between PATCH versions of the same MINOR. That is, you cannot skip MINOR versions when you upgrade. For example, you can upgrade from 1.y to 1.y+1, but not from 1.y to 1.y+2. Therefore, service can upgrade running clusters in the similar manner only.
Deleting Kubernetes cluster
A kubernetes cluster can be deleted using either the deleteKubernetesCluster API which takes cluster id as the input parameter or the  action icon from the UI.
The Kubernetes service runs a background state scanner process which regularly checks the cluster health. For clusters in Alert state, this background process verifies their state and moves them to Running state if all node virtual machines of the cluster are running and the API server for the cluster is accessible.
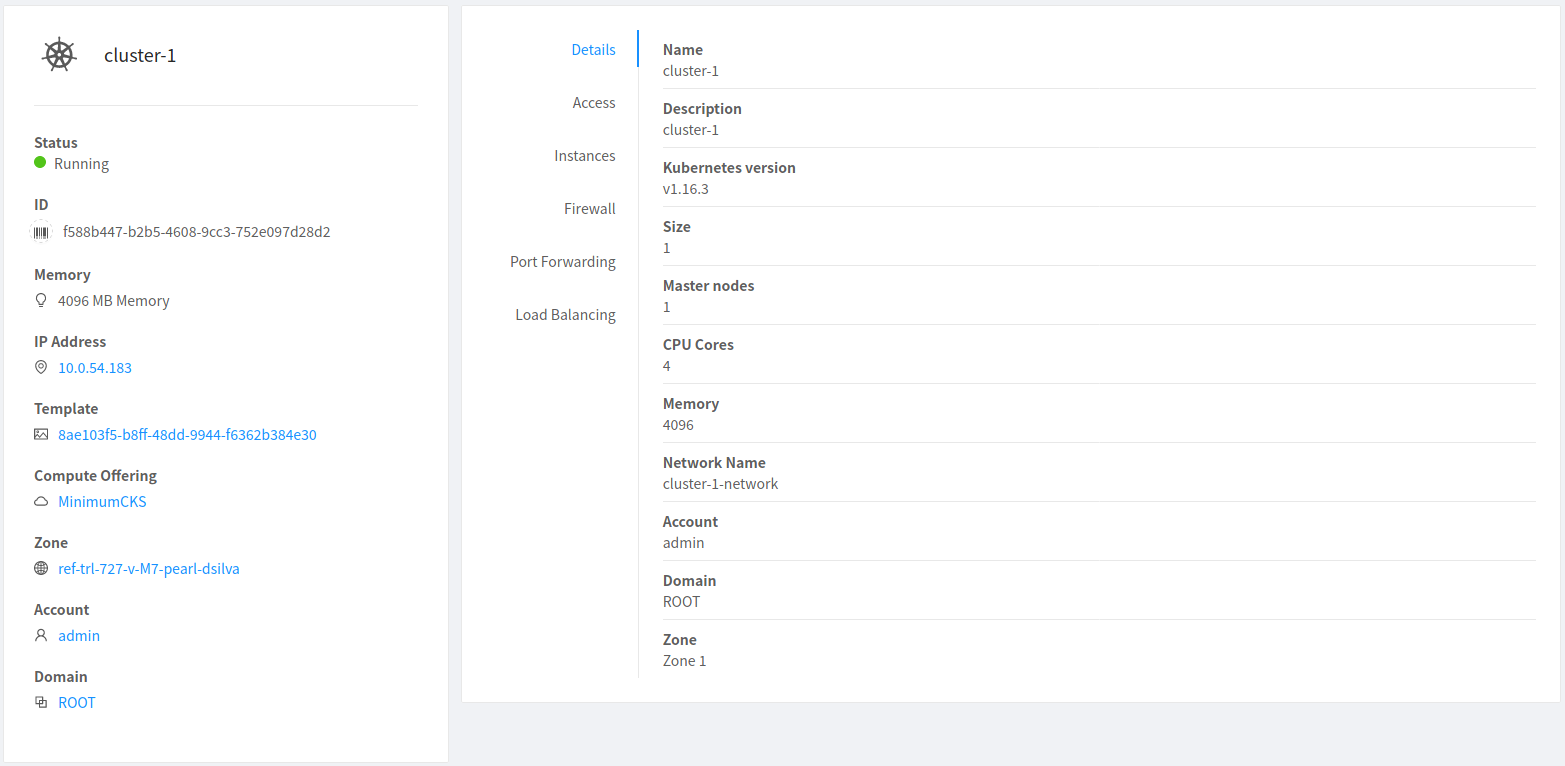
Working with Kubernetes cluster
Once a Kubernetes cluster is created successfully and is in Running state, it can be accessed using the kubectl tool using the cluster’s kubeconfig file. The web dashboard can be accessed by running a local proxy using kubectl. Deployments in the cluster can be done using kubectl or web dashboard. More about deployment in Kubernetes here: https://kubernetes.io/docs/concepts/workloads/controllers/deployment/
Accessing Kubernetes cluster
Instructions for accessing a running cluster will be shown in Access tab in the UI.
The service provides functionality to access kubeconfig file for a running Kubernetes cluster. This can be done using the UI or API. Action icon is shown in cluster detail UI to download kubeconfig file. UI will show download links for kubectl tool for different OS based on the cluster version.
getKubernetesClusterConfig API can be used to retrieve kubeconfig file data for a cluster. It takes id of the cluster as the input parameter.
Kubernetes cluster web dashboard
The service while creating a cluster automatically deploys dashboard for the cluster. More details about Kubernetes dashboard here: https://kubernetes.io/docs/tasks/access-application-cluster/web-ui-dashboard/
Instructions for accessing the dashboard for a running cluster will be shown in the Access tab in the UI. Essentially, the user needs to run a local proxy first using kubectl and kubecofig file for the cluster to access the dashboard. For secure login, the service doesn’t enable kubeconfig based login for the dashboard. Token-based access is enabled and kubectl can be used to access service account secret token.
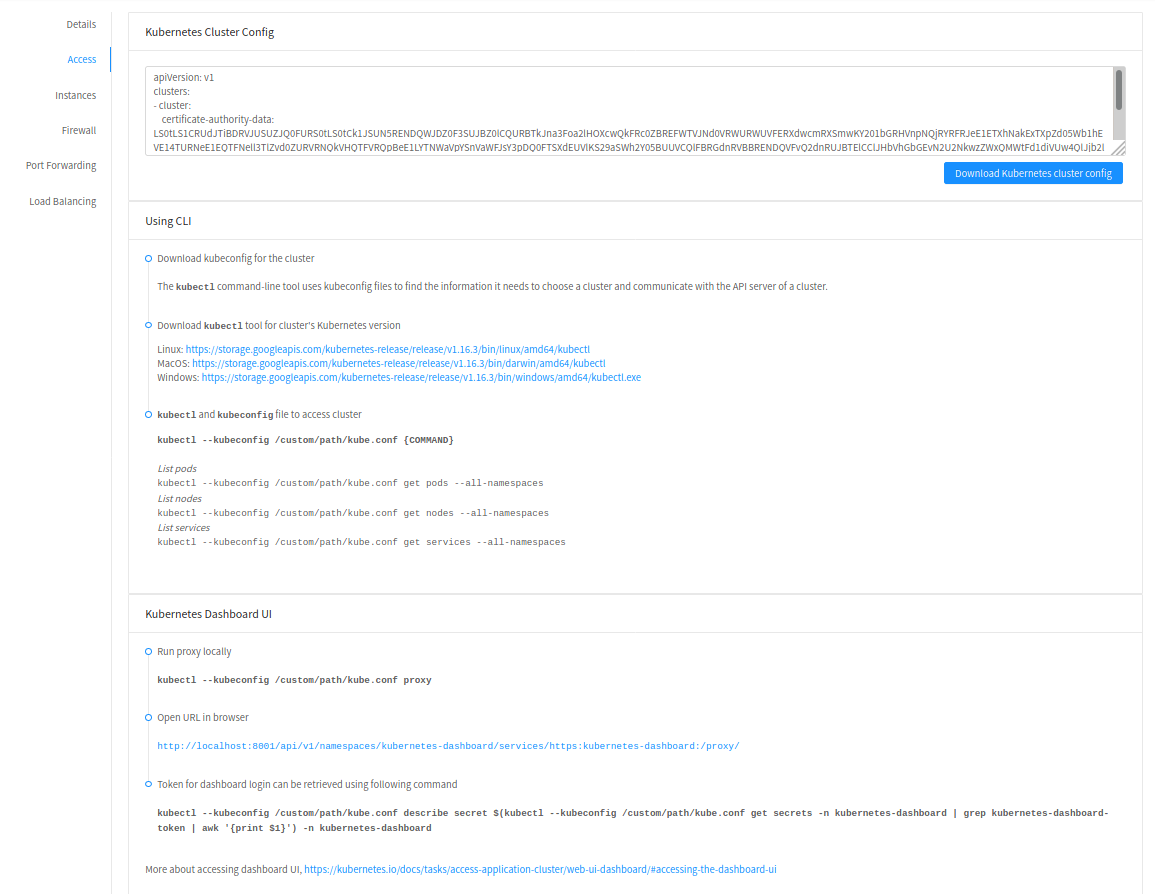
The following command can be used, while passing the correct path to kubeconfig file, to run proxy:
# kubectl --kubeconfig /custom/path/kube.config proxy
Once the proxy is running, users can open the following URL in the browser to access the dashboard,
http://localhost:8001/api/v1/namespaces/kubernetes-dashboard/services/https:kubernetes-dashboard:/proxy/
Token for dashboard login can be retrieved using the following command:
# kubectl --kubeconfig /custom/path/kube.config describe secret $(kubectl --kubeconfig /custom/path/kube.config get secrets -n kubernetes-dashboard | grep kubernetes-dashboard-token | awk '{print $1}') -n kubernetes-dashboard