Veeam Backup and Recovery Plugin
About the Veeam Backup and Recovery Plugin
There are a couple of important concepts to understand before working with the Veeam plugin.
- Backup Provider Offerings for the Veeam B&R plugin are template backup jobs.
- Veeams API does not allow for the creation of backup jobs. Therefore, a backup job must be created which will act as a template for all ‘backups’ which are based on it. You will need to create backup job templates for each of the Backup Offerings which you will be presenting to your users, be they a default template for ad-hoc/scheduled backups or ‘SLA’ specific templates (ie Gold offering). Refer to the general B&R for information regrading the B&R job types.
- The backup job templates will be zone specific as they will contain the backup destination, and this will be different in each zone (unless you have extreamly fat links between zones).
- Veeam backup jobs are not allowed to be empty (i.e. they must backup something); therefore a dummy tag which is not assigned to any VM must be created via vCenter. The initial backup target of the backup job templates is then ‘any VM with the dummy tag assigned’ i.e. no VMs
- Veeam’s API is not complete and therefore a mix of API commands and powershell commands (via SSH) are employed.
- Veeam cannot explicitly reduce the number of backups that are kept, nor can it remove individual partial backups and ‘coalesce’ the remaining image(s)
Installing Veeam Backup and Recovery for use with CloudStack
The B&R Veeam plugin has been tested against Veeam Backup and Recovery 9.5 update 4b (Enterprise version). The enterprise edition is required for the Enterprise Manager API. The final tested version of Veeam was on a Windows Server 2019 (with desktop), although much of the development work was done against a Windows Server 2016 OS (with desktop).
The following steps give a minimal installation, they do not cover Veeam integrations with backup, storage or virtualisation hardware. A number of the steps below may already have been carried out if you are already using Veeam Backup and Replication, however please read the steps below carefully to ensure that your installation meet all requirements for compatibility with the B&R Veeam plug-in.
- Install Backup and Replication 9.5 Manager - inc console - default settings
- Install Enterprise manager
- Install an SSH server on the ‘Veeam Backup and Replication Manager’ server. Windows Server 2019 has ‘OpenSSH Server’ as a builtin optional feature which is compatible.
- Powershell 5.1 is the default version on Windows Server 2019
Once these components are installed, then Veeam services can be configured. Please see the VM documentation for details, but at a high level you need to have done the following;
- License the Enterprise Manager & Backup and Replication servers (this can be done purely through the Enterprise Manager)
- Connect Enterprise Manager to Veeam backup server(s)
- Connect Enterprise Manager to vCenter server
- Add your ‘vSphere’ infrastructure to ‘Managed Servers’ in the Veeam Backup & Replication Console
- Setup your ‘Backup Repositories’ in the Veeam Backup & Replication Console. Remember that you will likely want a different target in each zone.
Creating Template jobs
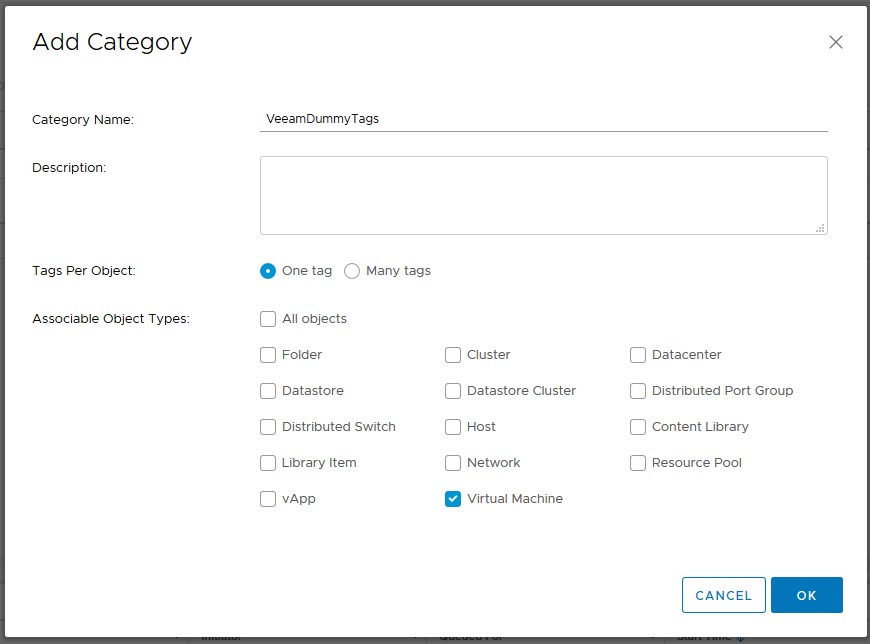
As noted above, a dummy VM tag is required in order to create template jobs which don’t contain any VMs. This is done via vCenter by navigating to the ‘Tags and Custom Attributes’ section, and first creating a category (if you dont already have a suitable one).
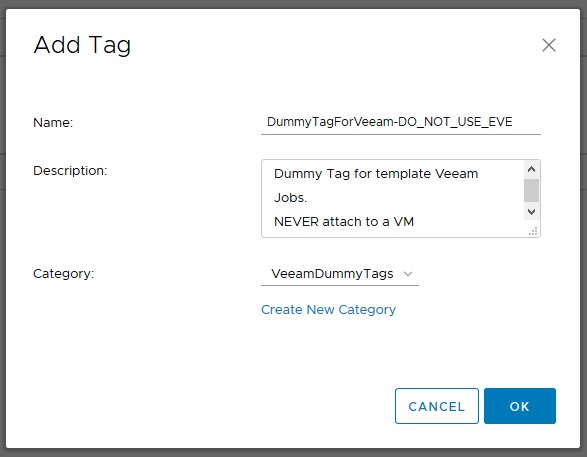
Then, create a dummy tag in that category. Be sure to make it clear that it is not to be used anywhere.
Now create the template job in Veeam Backup and Replication Manager. using the New Backup Job (Virtual Machine) wizard.
Give the job a name that describes what the job does ie template_job_zone1_default or template_daily_job-14_kept (the end user will not see this name).
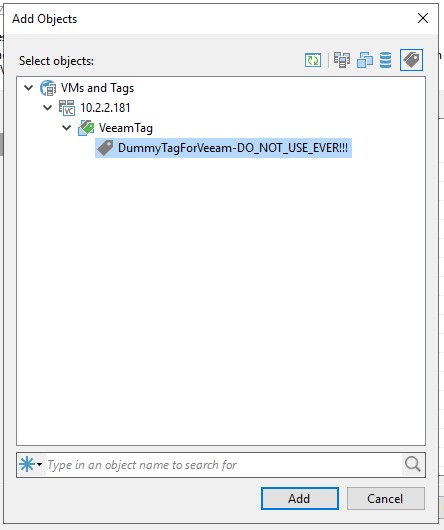
In the Virtual Machines section of the wizard, click ‘Add’ and select the ‘VMs and Tags’ filter (top right of the ‘Add Objects’ dialog box). And then select your dummy tag and click on Add.
In the Storage section is the correct Backup repository for the zone and number of restore points. (note there are a number of other advanaced options which can be set, these are transparent to CloudStack. CloudStack will clone this job ‘as-is’ including all advanced settings. However changing these settings will only effect NEW jobs created from the template, existing jobs will be unchanged.
The same is true for the Guest Processing section.
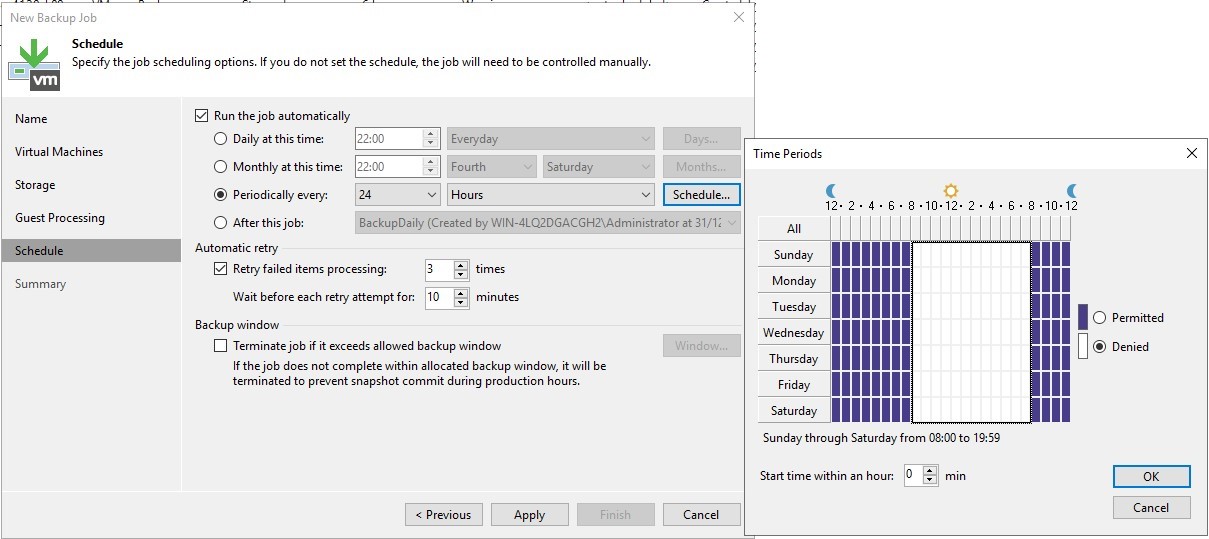
In the Schedule section you, if you are creating an ‘SLA’ based backup template, you would set the job to run automatically and select ‘Periodically every’ 24hrs and then in the ‘Schedule’ dialog set the hours in which the job is allowed to run. This allows Veeam to choose the best time to run the backup within a given window. If you are creating a template for adhoc/scheduled backups, do not tick ‘Run the job automatically’ as CloudStack will trigger jobs as and when required.
Finally, save the job.
Connecting CloudStack to Veeam
Once Veeam is configured with SSH enabled and at least one template job, we can connect CloudStack to your Veeam server.
To do this, you simply update the global settings listed below:
Plug-in specific settings:
(all settings can be global or per-zone)
| Configuration | Description |
|---|---|
| backup.plugin.veeam.url | Veeam B&R server URL. Default: http://<VEEAM_SERVER_IP>:9398/api/ |
| backup.plugin.veeam.username | Veeam B&R server username. Default: administrator |
| backup.plugin.veeam.password | Veeam B&R server password. Default: |
| backup.plugin.veeam.validate.ssl | Whether to validate Veeam B&R server (SSL/TLS) connection while making API requests. Default: false |
| backup.plugin.veeam.request.timeout | Veeam B&R API request timeout in seconds. Default: 300 |