External Firewalls and Load Balancers
CloudStack is capable of moving some of its Virtual Router networking functionality to some of the external network service providers such as e.g. NetScaler.
About Using a NetScaler Load Balancer
Citrix NetScaler is supported as an external Network element for load balancing in zones that use isolated networking in advanced zones. Set up an external load balancer when you want to provide load balancing through means other than CloudStack’s provided virtual router.
Note
In a Basic zone, load balancing service is supported only if Elastic IP or Elastic LB services are enabled.
When NetScaler load balancer is used to provide EIP or ELB services in a Basic zone, ensure that all Guest Instance traffic must enter and exit through the NetScaler device. When inbound traffic goes through the NetScaler device, traffic is routed by using the NAT protocol depending on the EIP/ELB configured on the public IP to the private IP. The traffic that is originated from the Guest Instances usually goes through the layer 3 router. To ensure that outbound traffic goes through NetScaler device providing EIP/ELB, layer 3 router must have a policy-based routing. A policy-based route must be set up so that all traffic originated from the Guest Instance’s are directed to NetScaler device. This is required to ensure that the outbound traffic from the Guest Instance’s is routed to a public IP by using NAT.For more information on Elastic IP, see “About Elastic IP”.
The NetScaler can be set up in direct (outside the firewall) mode. It must be added before any load balancing rules are deployed on Guest Instances in the zone.
The functional behavior of the NetScaler with CloudStack is the same as described in the CloudStack documentation for using an F5 external load balancer. The only exception is that the F5 supports routing domains, and NetScaler does not. NetScaler can not yet be used as a firewall.
To install and enable an external load balancer for CloudStack management, see External Guest Load Balancer Integration in the Installation Guide.
The Citrix NetScaler comes in three varieties. The following summarizes how these variants are treated in CloudStack.
MPX
Physical appliance. Capable of deep packet inspection. Can act as application firewall and load balancer
In advanced zones, load balancer functionality fully supported without limitation. In basic zones, static NAT, elastic IP (EIP), and elastic load balancing (ELB) are also provided.
VPX
Virtual appliance. Can run as instance on XenServer, ESXi, and Hyper-V hypervisors. Same functionality as MPX
Supported on ESXi and XenServer. Same functional support as for MPX. CloudStack will treat VPX and MPX as the same device type.
SDX
Physical appliance. Can create multiple fully isolated VPX instances on a single appliance to support multi-tenant usage
CloudStack will dynamically provision, configure, and manage the life cycle of VPX instances on the SDX. Provisioned instances are added into CloudStack automatically - no manual configuration by the administrator is required. Once a VPX instance is added into CloudStack, it is treated the same as a VPX on an ESXi host.
Configuring SNMP Community String on a RHEL Server
The SNMP Community string is similar to a user id or password that provides access to a Network device, such as router. This string is sent along with all SNMP requests. If the community string is correct, the device responds with the requested information. If the community string is incorrect, the device discards the request and does not respond.
The NetScaler device uses SNMP to communicate with the instances. You must install SNMP and configure SNMP Community string for a secure communication between the NetScaler device and the RHEL machine.
Ensure that you installed SNMP on RedHat. If not, run the following command:
yum install net-snmp-utils
Edit the /etc/snmp/snmpd.conf file to allow the SNMP polling from the NetScaler device.
Map the community name into a security name (local and mynetwork, depending on where the request is coming from):
Note
Use a strong password instead of public when you edit the following table.
#         sec.name   source        community
com2sec   local      localhost     public
com2sec   mynetwork  0.0.0.0       public
Note
Setting to 0.0.0.0 allows all IPs to poll the NetScaler server.
Map the security names into group names:
#       group.name    sec.model  sec.name
group   MyRWGroup     v1         local
group   MyRWGroup     v2c        local
group   MyROGroup     v1         mynetwork
group   MyROGroup     v2c        mynetwork
Create a view to allow the groups to have the permission to:
incl/excl subtree mask view all included .1
Grant access with different write permissions to the two groups to the view you created.
# context     sec.model     sec.level      prefix     read     write    notif
  access      MyROGroup ""  any noauth     exact      all      none     none
  access      MyRWGroup ""  any noauth     exact      all      all      all
Unblock SNMP in iptables.
iptables -A INPUT -p udp --dport 161 -j ACCEPT
Start the SNMP service:
service snmpd start
Ensure that the SNMP service is started automatically during the system startup:
chkconfig snmpd on
Initial Setup of External Firewalls and Load Balancers
When the first instance is created for a new account, CloudStack programs the external firewall and load balancer to work with the instance. The following objects are created on the firewall:
A new logical interface to connect to the account’s private VLAN. The interface IP is always the first IP of the account’s private subnet (e.g. 10.1.1.1).
A source NAT rule that forwards all outgoing traffic from the account’s private VLAN to the public Internet, using the account’s public IP address as the source address
A firewall filter counter that measures the number of bytes of outgoing traffic for the account
The following objects are created on the load balancer:
A new VLAN that matches the account’s provisioned Zone VLAN
A self IP for the VLAN. This is always the second IP of the account’s private subnet (e.g. 10.1.1.2).
Ongoing Configuration of External Firewalls and Load Balancers
Additional user actions (e.g. setting a port forward) will cause further programming of the firewall and load balancer. A user may request additional public IP addresses and forward traffic received at these IPs to specific instances. This is accomplished by enabling static NAT for a public IP address, assigning the IP to an instance, and specifying a set of protocols and port ranges to open. When a static NAT rule is created, CloudStack programs the zone’s external firewall with the following objects:
A static NAT rule that maps the public IP address to the private IP address of an instance.
A security policy that allows traffic within the set of protocols and port ranges that are specified.
A firewall filter counter that measures the number of bytes of incoming traffic to the public IP.
The number of incoming and outgoing bytes through source NAT, static NAT, and load balancing rules is measured and saved on each external element. This data is collected on a regular basis and stored in the CloudStack database.
Load Balancer Rules
A CloudStack user or administrator may create load balancing rules that balance traffic received at a public IP to one or more instances. A user creates a rule, specifies an algorithm, and assigns the rule to a set of instances.
Note
If you create load balancing rules while using a Network service offering that includes an external load balancer device such as NetScaler, and later change the Network service offering to one that uses the CloudStack virtual router, you must create a firewall rule on the virtual router for each of your existing load balancing rules so that they continue to function.
Adding a Load Balancer Rule
Log in to the CloudStack UI as an administrator or end user.
In the left navigation, choose Network.
Click the name of the Network where you want to load balance the traffic.
Click Public IP Addresses.
Click the IP address for which you want to create the rule.
Click the Load Balancing tab.
In a Basic zone, you can also create a load balancing rule without acquiring or selecting an IP address. CloudStack internally assign an IP when you create the load balancing rule, which is listed in the IP Addresses page when the rule is created.
To do that, select the name of the Network, then click Add Load Balancer tab. Continue with #7.
Fill in the following:
Name: A name for the load balancer rule.
Public Port: The port receiving incoming traffic to be balanced.
Private Port: The port that the instances will use to receive the traffic.
Algorithm: Choose the load balancing algorithm you want CloudStack to use. CloudStack supports a variety of well-known algorithms. If you are not familiar with these choices, you will find plenty of information about them on the Internet.
Stickiness: (Optional) Click Configure and choose the algorithm for the stickiness policy. See Sticky Session Policies for Load Balancer Rules.
Protocol: The protocol for the Load Balancer Rule such as tcp, udp, tcp-proxy or ssl.
SSL Certificate: The SSL certificate assigned to the Load Balancer Rule. This is visible only when protocol is ssl. See Configuring SSL Certificate for Load Balancer Rules.
AutoScale: Click Configure and complete the AutoScale configuration as explained in Configuring AutoScale.
Health Check: (Optional; NetScaler load balancers only) Click Configure and fill in the characteristics of the health check policy. See Health Checks for Load Balancer Rules.
Ping path (Optional): Sequence of destinations to which to send health check queries. Default: / (all).
Response time (Optional): How long to wait for a response from the health check (2 - 60 seconds). Default: 5 seconds.
Interval time (Optional): Amount of time between health checks (1 second - 5 minutes). Default value is set in the global configuration parameter lbrule_health check_time_interval.
Healthy threshold (Optional): Number of consecutive health check successes that are required before declaring an instance healthy. Default: 2.
Unhealthy threshold (Optional): Number of consecutive health check failures that are required before declaring an instance unhealthy. Default: 10.
Click Add instances, then select two or more instances that will divide the load of incoming traffic, and click Apply.
The new load balancer rule appears in the list. You can repeat these steps to add more load balancer rules for this IP address.
Sticky Session Policies for Load Balancer Rules
Sticky sessions are used in Web-based applications to ensure continued availability of information across the multiple requests in a user’s session. For example, if a shopper is filling a cart, you need to remember what has been purchased so far. The concept of “stickiness” is also referred to as persistence or maintaining state.
Any load balancer rule defined in CloudStack can have a stickiness policy. The policy consists of a name, stickiness method, and parameters. The parameters are name-value pairs or flags, which are defined by the load balancer vendor. The stickiness method could be load balancer-generated cookie, application-generated cookie, or source-based. In the source-based method, the source IP address is used to identify the user and locate the user’s stored data. In the other methods, cookies are used. The cookie generated by the load balancer or application is included in request and response URLs to create persistence. The cookie name can be specified by the administrator or automatically generated. A variety of options are provided to control the exact behavior of cookies, such as how they are generated and whether they are cached.
There are three stickiness methods that are supported explained with the possible options to configure as below,
1. Lbcookie: In this method, cookie is created by the load balancer and sent to the client. The client sends this cookie back with every subsequent request, and the load balancer uses the cookie information to determine which backend server to route the request to.
Following are the options available to configure,
Cookie name: This is the name of the cookie that the load balancer will create and send to the client.
Mode: This option determines how the load balancer should handle the cookie (default value is insert). The available options are:
Insert: The load balancer will insert the cookie into the client’s request.
Rewrite: The load balancer will rewrite the cookie in the client’s request if it already exists.
Prefix: The load balancer will prefix the cookie name with a specified prefix.
Indirect: The load balancer will insert an indirect cookie, which contains a reference to the actual cookie value.
No cache: This option specifies whether the cookie should be cached by the client’s browser. If this option is enabled, the client’s browser will not cache the cookie.
Indirect: If this is provided, then the cookie value will contain a reference to the actual value, which will be stored on the load balancer.
Post only: This option specifies whether the cookie should be sent only with POST requests.
Domain: This option specifies the domain for which the cookie is valid. You can specify a domain name or IP address.
2. Appcookie: In this method, the application running on the backend servers creates a cookie and sends it to the client. The client sends this cookie back with every subsequent request, and the load balancer uses the cookie information to determine which backend server to route the request to.
Following are the options available to configure,
Cookie name and mode are same as above
Length: This option specifies the length of the cookie value (default value is 52).
Hold time: This option specifies the length of time that the cookie should be held (default value is 3hours). The cookie will be held for this amount of time, after which it will expire.
Request learn: This option specifies whether the load balancer should learn the cookie value from the first request that it receives.
Prefix: This option specifies a prefix to be added to the cookie value.
3. Source-based: In this method, the load balancer uses the source IP address of the client to determine which backend server to route the request to. The load balancer maintains a mapping of client IP addresses to backend servers and uses this mapping to ensure that subsequent requests from the same client are always routed to the same backend server.
Table size: This option specifies the maximum number of entries (default 200k) that can be stored in the source-based stickiness table. The table stores mappings between client IP addresses and backend servers.
Expires: This option specifies the length of time (default 30m) that a mapping between a client IP address and a backend server should be kept in the stickiness table. After this time has elapsed, the mapping will expire and be removed from the table.
None: If None is selected after a sticky policy is already configured then it will be removed.
Load Balancer Configurations
(CloudStack Virtual Router and Vpc Virtual Router only)
CloudStack Virtual Routers use haproxy to provide load balancer.The following is the configurations of haproxy.
Configuration |
Scope |
Description |
|---|---|---|
maxconn |
global |
the maximum per-process number of concurrent connections. The default value is 4096. |
maxpipes |
global |
the maximum per-process number of pipes. The default value is maxconn/4. |
timeout connect |
defaults |
the maximum time to wait for a connection attempt to a server to succeed. The default value is 5 seconds. |
timeout client |
defaults |
the maximum inactivity time on the server side. The default value is 50 seconds. |
timeout server |
defaults |
the maximum inactivity time on the client side. The default value is 50 seconds. |
option |
defaults |
the following options are enabled: redispatch, forwardfor, httpclose |
stats enable |
stats |
Enable statistics reporting with default settings. It listens on <Source NAT IP>:8081. The port can be changed by global setting “network.loadbalancer.haproxy.stats.port”. |
stats uri |
stats |
Enable statistics and define the URI prefix to access them. The default value is “/admin?stats”. The URI can be changed by global setting “network.loadbalancer.haproxy.stats.uri”. |
stats realm |
stats |
Enable statistics and set authentication realm. The default value is “Haproxy\ Statistics”. |
stats auth |
stats |
Enable statistics with authentication and grant access to an account. The default value is “admin1:AdMiN123”. The username/password can be changed by global setting “network.loadbalancer.haproxy.stats.auth”. |
Health Checks for Load Balancer Rules
(NetScaler load balancer only; requires NetScaler version 10.0)
Health checks are used in load-balanced applications to ensure that requests are forwarded only to running, available services. When creating a load balancer rule, you can specify a health check policy. This is in addition to specifying the stickiness policy, algorithm, and other load balancer rule options. You can configure one health check policy per load balancer rule.
Any load balancer rule defined on a NetScaler load balancer in CloudStack can have a health check policy. The policy consists of a ping path, thresholds to define “healthy” and “unhealthy” states, health check frequency, and timeout wait interval.
When a health check policy is in effect, the load balancer will stop forwarding requests to any resources that are found to be unhealthy. If the resource later becomes available again, the periodic health check will discover it, and the resource will once again be added to the pool of resources that can receive requests from the load balancer. At any given time, the most recent result of the health check is displayed in the UI. For any instance that is attached to a load balancer rule with a health check configured, the state will be shown as UP or DOWN in the UI depending on the result of the most recent health check.
You can delete or modify existing health check policies.
To configure how often the health check is performed by default, use the global configuration setting healthcheck.update.interval (default value is 600 seconds). You can override this value for an individual health check policy.
For details on how to set a health check policy using the UI, see Adding a Load Balancer Rule.
Configuring SSL Certificate for Load Balancer Rules
SSL Offloading allows load balancers to handle encryption and decryption of HTTP(s) traffic giving plain text HTTP to the back end servers freeing them from the resource intensive task of handling encryption and decryption. SSL Offloading supports CloudStack Virtual Router since Apache CloudStack 4.22.0.
Upload SSL certificates
SSL certificate is required for SSL offloading feature. As the first step, users need to upload SSL certificates for the accounts or projects.

Click “Upload SSL Certificate” button, input the following fields in the dialog, click “Submit”
Name: the name of the SSL certificate. This is required.
Certificate: the SSL certificate. This is required.
Private Key: the private key of the SSL certificate. This is required.
Certificate chain: the ROOT CA and intermediate certificate(s) of the SSL certificate. Please input if exist, otherwise the SSL certificate might not work.
Password: the password of the private key. Currently it is unsupported when use CloudStack Virtual Router for SSL offloading.
Revocation check: Whether enables revocation checking for certificates. Please do not check if self-signed SSL certificate.

Users can view or remove the SSL certificates on the same page.

For projects, go to the project page and click “Certificates” tab

Create Load balancer rule with SSL Certificate
SSL certificate can be configured only when the protocol of load balancer rule is ssl.

Click “SSL certificate” button, select a SSL certificate, click “OK”

Assign SSL certificate to existing Load balancer rule
If the load balancer rule has been created without SSL certificate, update protocol to SSL if it is not

Click “Manage” button under the “SSL certificate” field, select a SSL certificate, click “Replace” or “Assign” button to assign a new SSL certificate.

User can remove the SSL certificate from load balancer rule by clicking “Remove” button.
Note
Since SSL offloading increases CPU utilization on the load balancer, please allocate more resources to the Virtual Router when expecting high traffic.
Configuring AutoScale
AutoScaling allows you to scale your back-end services or application instances up or down seamlessly and automatically according to the conditions you define. With AutoScaling enabled, you can ensure that the number of instances you are using seamlessly scale up when demand increases, and automatically decreases when demand subsides. Thus it helps you save compute costs by terminating underused instances automatically and launching new instances when you need them, without the need for manual intervention.
NetScaler AutoScaling is designed to seamlessly launch or terminate instances based on user-defined conditions. Conditions for triggering a scaleup or scaledown action can vary from a simple use case like monitoring the CPU usage of a server to a complex use case of monitoring a combination of server’s responsiveness and its CPU usage. For example, you can configure AutoScaling to launch an additional instance whenever CPU usage exceeds 80 percent for 15 minutes, or to remove an instance whenever CPU usage is less than 20 percent for 30 minutes.
CloudStack uses the NetScaler load balancer to monitor all aspects of a system’s health and work in unison with CloudStack to initiate scale-up or scale-down actions.
Note
AutoScale is supported on NetScaler Release 10 Build 74.4006.e and beyond.
Prerequisites
Before you configure an AutoScale rule, consider the following:
Ensure that the necessary template is prepared before configuring AutoScale. When an instance is deployed by using a template and when it comes up, the application should be up and running.
Note
If the application is not running, the NetScaler device considers the instance as ineffective and continues provisioning the instances unconditionally until the resource limit is exhausted.
Deploy the templates you prepared. Ensure that the applications come up on the first boot and is ready to take the traffic. Observe the time requires to deploy the template. Consider this time when you specify the quiet time while configuring AutoScale.
The AutoScale feature supports the SNMP counters that can be used to define conditions for taking scale up or scale down actions. To monitor the SNMP-based counter, ensure that the SNMP agent is installed in the template used for creating the AutoScale instances, and the SNMP operations work with the configured SNMP community and port by using standard SNMP managers. For example, see “Configuring SNMP Community String on a RHELServer” to configure SNMP on a RHEL machine.
Ensure that the endpoint.url parameter present in the Global Settings is set to the Management Server API URL. For example,
http://10.102.102.22:8080/client/api. In a multi-node Management Server deployment, use the virtual IP address configured in the load balancer for the management server’s cluster. Additionally, ensure that the NetScaler device has access to this IP address to provide AutoScale support.If you update the endpoint.url, disable the AutoScale functionality of the load balancer rules in the system, then enable them back to reflect the changes. For more information see Updating an AutoScale Configuration.
If the API Key and Secret Key are regenerated for an AutoScale user, ensure that the AutoScale functionality of the load balancers that the user participates in are disabled and then enabled to reflect the configuration changes in the NetScaler.
In an advanced Zone, ensure that at least one instance should be present before configuring a load balancer rule with AutoScale. Having one instance in the Network ensures that the Network is in implemented state for configuring AutoScale.
Configuration
Specify the following:
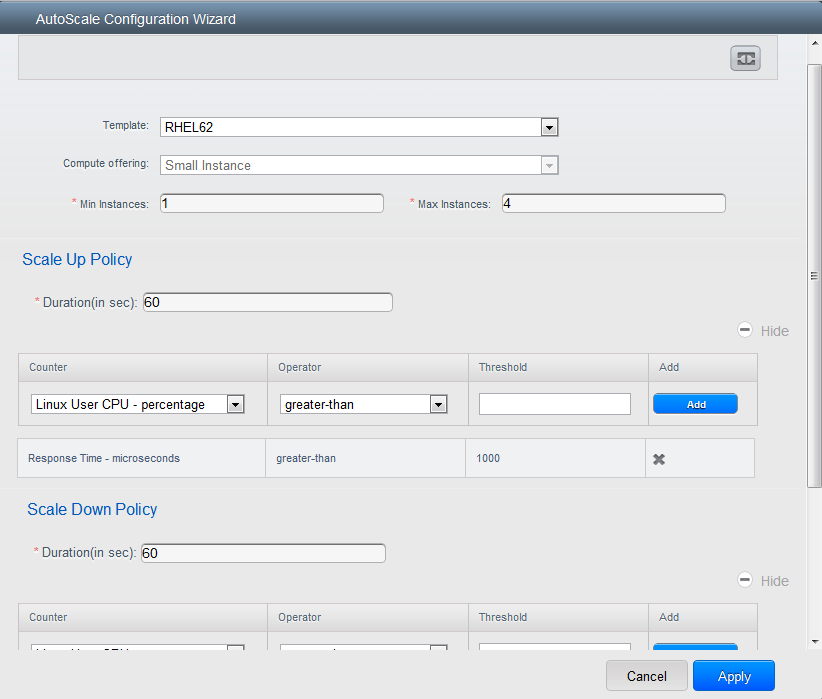
Template: A template consists of a base OS image and application. A template is used to provision the new instance of an application on a scaleup action. When an instance is deployed from a template, the instance can start taking the traffic from the load balancer without any admin intervention. For example, if the instance is deployed for a Web service, it should have the Web server running, the database connected, and so on.
Compute offering: A predefined set of virtual hardware attributes, including CPU speed, number of CPUs, and RAM size, that the user can select when creating a new Instance. Choose one of the compute offerings to be used while provisioning an Instance as part of scaleup action.
Min Instance: The minimum number of active instances that is assigned to a load balancing rule. The active instances are the application instances that are up and serving the traffic, and are being load balanced. This parameter ensures that a load balancing rule has at least the configured number of active instances are available to serve the traffic.
Note
If an application, such as SAP, running on an instance is down for some reason, the instance is then not counted as part of Min Instance parameter, and the AutoScale feature initiates a scaleup action if the number of active instances is below the configured value. Similarly, when an application instance comes up from its earlier down state, this application instance is counted as part of the active instance count and the AutoScale process initiates a scaledown action when the active instance count breaches the Max instance value.
Max Instance: Maximum number of active instances that should be assigned toa load balancing rule. This parameter defines the upper limit of active instances that can be assigned to a load balancing rule.
Specifying a large value for the maximum instance parameter might result in provisioning large number of instances, which in turn leads to a single load balancing rule exhausting the instances limit specified at the account or domain level.
Note
If an application, such as SAP, running on an instance is down for some reason, the instance is not counted as part of Max Instance parameter. So there may be scenarios where the number of instances provisioned for a scaleup action might be more than the configured Max Instance value. Once the application instances in the instances are up from an earlier down state, the AutoScale feature starts aligning to the configured Max Instance value.
Specify the following scale-up and scale-down policies:
Duration: The duration, in seconds, for which the conditions you specify must be true to trigger a scaleup action. The conditions defined should hold true for the entire duration you specify for an AutoScale action to be invoked.
Counter: The performance counters expose the state of the monitored instances. By default, CloudStack offers four performance counters: Three SNMP counters and one NetScaler counter. The SNMP counters are Linux User CPU, Linux System CPU, and Linux CPU Idle. The NetScaler counter is ResponseTime. The root administrator can add additional counters into CloudStack by using the CloudStack API.
Operator: The following five relational operators are supported in AutoScale feature: Greater than, Less than, Less than or equal to, Greater than or equal to, and Equal to.
Threshold: Threshold value to be used for the counter. Once the counter defined above breaches the threshold value, the AutoScale feature initiates a scaleup or scaledown action.
Add: Click Add to add the condition.
Additionally, if you want to configure the advanced settings, click Show advanced settings, and specify the following:
Polling interval: Frequency in which the conditions, combination of counter, operator and threshold, are to be evaluated before taking a scale up or down action. The default polling interval is 30 seconds.
Quiet Time: This is the cool down period after an AutoScale action is initiated. The time includes the time taken to complete provisioning an instance from its template and the time taken by an application to be ready to serve traffic. This quiet time allows the fleet to come up to a stable state before any action can take place. The default is 300 seconds.
Destroy Instance Grace Period: The duration in seconds, after a scaledown action is initiated, to wait before the instance is destroyed as part of scaledown action. This is to ensure graceful close of any pending sessions or transactions being served by the instance marked for destroy. The default is 120 seconds.
Security Groups: Security groups provide a way to isolate traffic to the instances. A security group is a group of instances that filter their incoming and outgoing traffic according to a set of rules, called ingress and egress rules. These rules filter Network traffic according to the IP address that is attempting to communicate with the instance.
Disk Offerings: A predefined set of disk size for primary data storage.
SNMP Community: The SNMP community string to be used by the NetScaler device to query the configured counter value from the provisioned instances. Default is public.
SNMP Port: The port number on which the SNMP agent that run on the provisioned instances is listening. Default port is 161.
User: This is the user that the NetScaler device use to invoke scaleup and scaledown API calls to the cloud. If no option is specified, the user who configures AutoScaling is applied. Specify another user name to override.
Apply: Click Apply to create the AutoScale configuration.
Disabling and Enabling an AutoScale Configuration
If you want to perform any maintenance operation on the AutoScale
instances, disable the AutoScale configuration. When the AutoScale
configuration is disabled, no scaleup or scaledown action is performed.
You can use this downtime for the maintenance activities. To disable the
AutoScale configuration, click the Disable AutoScale  button.
The button toggles between enable and disable, depending on whether
AutoScale is currently enabled or not. After the maintenance operations
are done, you can enable the AutoScale configuration back. To enable,
open the AutoScale configuration page again, then click the Enable
AutoScale button.
Updating an AutoScale Configuration
You can update the various parameters and add or delete the conditions in a scaleup or scaledown rule. Before you update an AutoScale configuration, ensure that you disable the AutoScale load balancer rule by clicking the Disable AutoScale button.
After you modify the required AutoScale parameters, click Apply. To apply the new AutoScale policies, open the AutoScale configuration page again, then click the Enable AutoScale button.
Runtime Considerations
An administrator should not assign an instance to a load balancing rule which is configured for AutoScale.
Before an instance provisioning is completed if NetScaler is shutdown or restarted, the provisioned instance cannot be a part of the load balancing rule though the intent was to assign it to a load balancing rule. To workaround, rename the AutoScale provisioned instances based on the rule name or ID so at any point of time the instances can be reconciled to its load balancing rule.
Making API calls outside the context of AutoScale, such as destroyVM, on an autoscaled instance leaves the load balancing configuration in an inconsistent state. Though instance is destroyed from the load balancer rule, NetScaler continues to show the instance as a service assigned to a rule.