Setting Up a Site-to-Site VPN Connection
A Site-to-Site VPN connection helps you establish a secure connection from an enterprise datacenter to the cloud infrastructure. This allows users to access the Guest Instances by establishing a VPN connection to the virtual router of the account from a device in the datacenter of the enterprise. You can also establish a secure connection between two VPC setups or high availability zones in your environment. Having this facility eliminates the need to establish VPN connections to individual instances.
The difference from Remote VPN is that Site-to-site VPNs connects entire networks to each other, for example, connecting a branch office network to a company headquarters network. In a site-to-site VPN, hosts do not have VPN client software; they send and receive normal TCP/IP traffic through a VPN gateway.
The supported endpoints on the remote datacenters are:
Cisco ISR with IOS 12.4 or later
Juniper J-Series routers with JunOS 9.5 or later
CloudStack virtual routers
Note
In addition to the specific Cisco and Juniper devices listed above, the expectation is that any Cisco or Juniper device running on the supported operating systems are able to establish VPN connections.
To set up a Site-to-Site VPN connection, perform the following:
Create a Virtual Private Cloud (VPC).
Create a VPN Customer Gateway.
Create a VPN gateway for the VPC that you created.
Create VPN connection from the VPC VPN gateway to the customer VPN gateway.
Creating and Updating a VPN Customer Gateway
Note
A VPN Customer Gateway can be connected to only one VPN gateway at a time.
To add a VPN Customer Gateway:
Log in to the CloudStack UI as an administrator or end user.
In the left navigation, choose Network.
In the Select view, select VPN Customer Gateway.
Click Add VPN Customer Gateway.
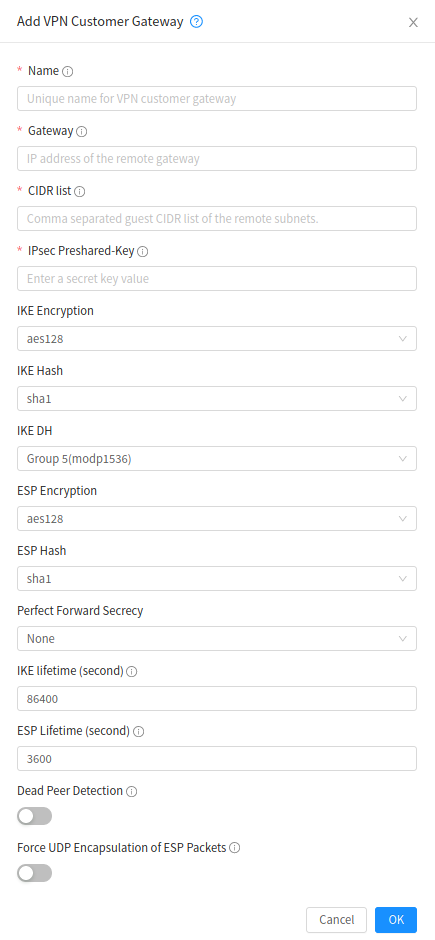
Provide the following information:
Name: A unique name for the VPN Customer Gateway you create.
Gateway: The IP address for the remote gateway.
CIDR list: The guest CIDR list of the remote subnets. Enter a CIDR or a comma-separated list of CIDRs. Ensure that a guest CIDR list is not overlapped with the VPC’s CIDR, or another guest CIDR. The CIDR must be RFC1918-compliant.
IPsec Preshared Key: Preshared keying is a method where the endpoints of the VPN share a secret key. This key value is used to authenticate the customer gateway and the VPC VPN gateway to each other. The sequence cannot contain a newline or double-quote.
Note
The IKE peers (VPN end points) authenticate each other by computing and sending a keyed hash of data that includes the Preshared key. If the receiving peer is able to create the same hash independently by using its Preshared key, it knows that both peers must share the same secret, thus authenticating the customer gateway.
IKE Encryption: The Internet Key Exchange (IKE) policy for phase-1. The supported encryption algorithms are AES128, AES192, AES256, and 3DES. Authentication is accomplished through the Preshared Keys.
Note
The phase-1 is the first phase in the IKE process. In this initial negotiation phase, the two VPN endpoints agree on the methods to be used to provide security for the underlying IP traffic. The phase-1 authenticates the two VPN gateways to each other, by confirming that the remote gateway has a matching Preshared Key.
IKE Hash: The IKE hash for phase-1. The supported hash algorithms are SHA1, SHA256, SHA384 and SHA512 and MD5.
IKE Version: The IKE Version to use between ike (autoselect), ikev1, or ikev2. Connections marked with ‘ike’ will use ‘ikev2’ when initiating, but accept any protocol version when responding. Defaults to ‘ike’.
IKE DH: A public-key cryptography protocol which allows two parties to establish a shared secret over an insecure communications channel. The 1536-bit Diffie-Hellman group is used within IKE to establish session keys. The supported options are None, Group-2 (1024-bit), Group-5 (1536-bit), Group-14 (2048-bit), Group-15 (3072-bit), Group-16 (4096-bit), Group-17 (6144-bit) and Group-18 (8192-bit).
ESP Encryption: Encapsulating Security Payload (ESP) algorithm within phase-2. The supported encryption algorithms are AES128, AES192, AES256, and 3DES.
Note
The phase-2 is the second phase in the IKE process. The purpose of IKE phase-2 is to negotiate IPSec security associations (SA) to set up the IPSec tunnel. In phase-2, new keying material is extracted from the Diffie-Hellman key exchange in phase-1, to provide session keys to use in protecting the VPN data flow.
ESP Hash: Encapsulating Security Payload (ESP) hash for phase-2. Supported hash algorithms are SHA1, SHA256, SHA384 and SHA512 and MD5.
Perfect Forward Secrecy: Perfect Forward Secrecy (or PFS) is the property that ensures that a session key derived from a set of long-term public and private keys will not be compromised. This property enforces a new Diffie-Hellman key exchange. It provides the keying material that has greater key material life and thereby greater resistance to cryptographic attacks. The available options are None, Group-2 (1024-bit), Group-5 (1536-bit), Group-14 (2048-bit), Group-15 (3072-bit), Group-16 (4096-bit), Group-17 (6144-bit) and Group-18 (8192-bit). The security of the key exchanges increase as the DH groups grow larger, as does the time of the exchanges.
Note
When PFS is turned on, for every negotiation of a new phase-2 SA the two gateways must generate a new set of phase-1 keys. This adds an extra layer of protection that PFS adds, which ensures if the phase-2 SA’s have expired, the keys used for new phase-2 SA’s have not been generated from the current phase-1 keying material.
IKE Lifetime (seconds): The phase-1 lifetime of the security association in seconds. Default is 86400 seconds (1 day). Whenever the time expires, a new phase-1 exchange is performed.
ESP Lifetime (seconds): The phase-2 lifetime of the security association in seconds. Default is 3600 seconds (1 hour). Whenever the value is exceeded, a re-key is initiated to provide a new IPsec encryption and authentication session keys.
Dead Peer Detection: A method to detect an unavailable Internet Key Exchange (IKE) peer. Select this option if you want the virtual router to query the liveliness of its IKE peer at regular intervals. It’s recommended to have the same configuration of DPD on both side of VPN connection.
Force UDP Encapsulation of ESP Packets: Force Encapsulation for NAT traversal
Note
If the administrator has configured excluded cryptographic parameters, those options will not appear in the form. If obsolete parameters are configured, those options will be displayed with a warning message indicating they are obsolete and should be avoided.
Click OK.
Configuring Excluded and Obsolete VPN Customer Gateway Parameters
CloudStack provides administrators with configuration settings to enforce modern security standards by marking certain cryptographic algorithms and parameters as excluded or obsolete for VPN Customer Gateway creation.
Excluded Parameters:
These parameters are completely hidden from users and cannot be used while creating or updating VPN Customer Gateways:
vpn.customer.gateway.excluded.encryption.algorithms: Comma-separated list of encryption algorithms to exclude. Applies to both phases.
vpn.customer.gateway.excluded.hashing.algorithms: Comma-separated list of hashing algorithms to exclude. Applies to both phases.
vpn.customer.gateway.excluded.ike.versions: Comma-separated list of IKE versions to exclude.
vpn.customer.gateway.excluded.dh.group: Comma-separated list of Diffie-Hellman groups to exclude. Applies to both phases.
Obsolete Parameters:
These parameters are shown with a warning message, allowing existing deployments to continue functioning while encouraging migration to more secure alternatives:
vpn.customer.gateway.obsolete.encryption.algorithms: Comma-separated list of encryption algorithms marked as obsolete. Applies to both phases.
vpn.customer.gateway.obsolete.hashing.algorithms: Comma-separated list of hashing algorithms marked as obsolete. Applies to phases.
vpn.customer.gateway.obsolete.ike.versions: Comma-separated list of IKE versions marked as obsolete.
vpn.customer.gateway.obsolete.dh.group: Comma-separated list of Diffie-Hellman groups marked as obsolete. Applies to both phases.
Behavior:
Excluded parameters: Not shown in the Create and Update VPN Customer Gateway forms. Users cannot select these options for new gateways.
Obsolete parameters: Shown with a warning message in the Create and Update forms, indicating they are deprecated and should be avoided.
Existing gateways: If a VPN Customer Gateway already uses excluded or obsolete parameters:
A warning icon is displayed next to the gateway name with a message prompting users to change the obsolete or excluded parameters.
The Update VPN Customer Gateway form displays the setting with a warning message encouraging users to change it to a more secure alternative.
The
listVpnCustomerGatewaysAPI response includes two new fields:obsoleteparameters: List of all obsolete parameters used by the gateway
excludedparameters: List of all excluded parameters used by the gateway
The
listCapabilitiesAPI response includes a new field containing the list of excluded and obsolete VPN Customer Gateway parameters, but only if these configuration settings are configured by the operator.
Events and Alerts:
There is a thread that run periodically to check for VPN Customer Gateways which are using excluded or obsolete cryptographic parameters.The interval at which this thread runs is configurable using the setting vpn.customer.gateway.obsolete.check.interval. The unit is in hours and the default value is 0 which means it is disabled by default.
Each time the thread runs, it generates Events for each VPN Customer Gateway which is using excluded or obsolete parameters. It also generates Alerts to the Administrator about the number of VPN Customer Gateways that are using excluded and/or obsolete parameters.
Configuration Scope:
The obsolete and excluded settings support Domain-level configuration. When set at Domain level, the values override global settings for that specific Domain only.
Global Settings: Apply to all Domains without specific overrides
Domain Settings: Override global settings for that specific Domain only
Note: Domain settings do not cascade to child Domains. Each child Domain must be configured individually, or it will inherit from global settings (not from its parent Domain).
To reset a Domain-specific override, navigate to Domains → [Domain Name] → Settings and reset the value. This will cause the Domain to fall back to global settings
Updating and Removing a VPN Customer Gateway
You can update a customer gateway either with no VPN connection, or related VPN connection is in error state.
Note
If a VPN Customer Gateway is using excluded or obsolete cryptographic parameters (as configured by your CloudStack operator), a warning icon will be displayed next to the gateway name. When editing such a gateway, the Update form will display warnings for any obsolete or excluded parameters, encouraging you to change them to more secure alternatives.
Log in to the CloudStack UI as an administrator or end user.
In the left navigation, choose Network.
In the Select view, select VPN Customer Gateway.
Select the VPN Customer Gateway you want to work with.
To modify the required parameters, click the Edit VPN Customer Gateway button

To remove the VPN Customer Gateway, click the Delete VPN Customer Gateway button

Click OK.
Creating a VPN gateway for the VPC
Log in to the CloudStack UI as an administrator or end user.
In the left navigation, choose Network.
In the Select view, select VPC.
All the VPCs that you have created for the account is listed in the page.
Click the Configure button of the VPC to which you want to deploy the instances.
The VPC page is displayed where all the Network Tiers you created are listed in a diagram.
For each Network Tier, the following options are displayed:
Internal LB
Public LB IP
Static NAT
Instances
CIDR
The following router information is displayed:
Private Gateways
Public IP Addresses
Site-to-Site VPNs
Network ACLs
Select Site-to-Site VPN.
If you are creating the VPN gateway for the first time, selecting Site-to-Site VPN prompts you to create a VPN gateway.
In the confirmation dialog, click Yes to confirm.
Within a few moments, the VPN gateway is created. You will be prompted to view the details of the VPN gateway you have created. Click Yes to confirm.
The following details are displayed in the VPN Gateway page:
IP Address
Account
Domain
Creating a VPN Connection
Note
CloudStack supports creating up to 8 VPN connections.
Log in to the CloudStack UI as an administrator or end user.
In the left navigation, choose Network.
In the Select view, select VPC.
All the VPCs that you create for the account are listed in the page.
Click the Configure button of the VPC to which you want to deploy the instances.
The VPC page is displayed where all the Network Tiers you created are listed in a diagram.
Click the Settings icon.
For each Network Tier, the following options are displayed:
Internal LB
Public LB IP
Static NAT
Instances
CIDR
The following router information is displayed:
Private Gateways
Public IP Addresses
Site-to-Site VPNs
Network ACLs
Select Site-to-Site VPN.
The Site-to-Site VPN page is displayed.
From the Select View drop-down, ensure that VPN Connection is selected.
Click Create VPN Connection.
The Create VPN Connection dialog is displayed:
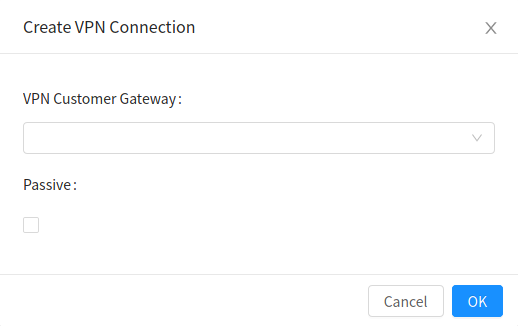
Select the desired customer gateway.
Select Passive if you want to establish a connection between two VPC virtual routers.
If you want to establish a connection between two VPC virtual routers, select Passive only on one of the VPC virtual routers, which waits for the other VPC virtual router to initiate the connection. Do not select Passive on the VPC virtual router that initiates the connection.
Click OK to confirm.
Within a few moments, the VPN Connection is displayed.
The following information on the VPN connection is displayed:
IP Address
Gateway
State
IPSec Preshared Key
IKE Policy
ESP Policy
Site-to-Site VPN Connection Between VPC Networks
CloudStack provides you with the ability to establish a site-to-site VPN connection between CloudStack virtual routers. To achieve that, add a passive mode Site-to-Site VPN. With this functionality, users can deploy applications in multiple Availability Zones or VPCs, which can communicate with each other by using a secure Site-to-Site VPN Tunnel.
This feature is supported on all the hypervisors.
Create two VPCs. For example, VPC A and VPC B.
For more information, see “Configuring a Virtual Private Cloud”.
Create VPN gateways on both the VPCs you created.
For more information, see “Creating a VPN gateway for the VPC”.
Create VPN Customer Gateway for both the VPCs.
For more information, see “Creating and Updating a VPN Customer Gateway”.
Enable a VPN connection on VPC A in passive mode.
For more information, see “Creating a VPN Connection”.
Ensure that the customer gateway is pointed to VPC B. The VPN connection is shown in the Disconnected state.
Enable a VPN connection on VPC B.
Ensure that the customer gateway is pointed to VPC A. Because virtual router of VPC A, in this case, is in passive mode and is waiting for the virtual router of VPC B to initiate the connection, VPC B virtual router should not be in passive mode.
The VPN connection is shown in the Disconnected state.
Creating VPN connection on both the VPCs initiates a VPN connection. Wait for few seconds. The default is 30 seconds for both the VPN connections to show the Connected state.
Restarting and Removing a VPN Connection
Log in to the CloudStack UI as an administrator or end user.
In the left navigation, choose Network.
In the Select view, select VPC.
All the VPCs that you have created for the account is listed in the page.
Click the Configure button of the VPC to which you want to deploy the instances.
The VPC page is displayed where all the Network Tiers you created are listed in a diagram.
Click the Settings icon.
For each Network Tier, the following options are displayed:
Internal LB
Public LB IP
Static NAT
Instances
CIDR
The following router information is displayed:
Private Gateways
Public IP Addresses
Site-to-Site VPNs
Network ACLs
Select Site-to-Site VPN.
The Site-to-Site VPN page is displayed.
From the Select View drop-down, ensure that VPN Connection is selected.
All the VPN connections you created are displayed.
Select the VPN connection you want to work with.
The Details tab is displayed.
To remove a VPN connection, click the Delete VPN connection button

To restart a VPN connection, click the Reset VPN connection button present in the Details tab.
