Configuring a Virtual Private Cloud
About Virtual Private Clouds
CloudStack Virtual Private Cloud is a private, isolated part of CloudStack. A VPC can have its own virtual Network topology that resembles a traditional physical Network. You can launch Instances in the virtual Network that can have private addresses in the range of your choice, for example: 10.0.0.0/16. You can define Network Tiers within your VPC Network range, which in turn enables you to group similar kinds of Instances based on IP address range.
For example, if a VPC has the private range 10.0.0.0/16, its guest Networks can have the Network ranges 10.0.1.0/24, 10.0.2.0/24, 10.0.3.0/24, and so on.
Major Components of a VPC
A VPC is comprised of the following Network components:
VPC: A VPC acts as a container for multiple isolated Networks that can communicate with each other via its virtual router.
Network Tiers: Each Network Tier acts as an isolated Network with its own VLANs and CIDR list, where you can place groups of resources, such as Instances. The Network Tiers are segmented by means of VLANs. The NIC of each Network Tier acts as its gateway.
Virtual Router: A virtual router is automatically created and started when you create a VPC. The virtual router connect the Network Tiers and direct traffic among the public gateway, the VPN gateways, and the NAT Instances. For each Network Tier, a corresponding NIC and IP exist in the virtual router. The virtual router provides DNS and DHCP services through its IP.
Public Gateway: The traffic to and from the Internet routed to the VPC through the public gateway. In a VPC, the public gateway is not exposed to the end user; therefore, static routes are not support for the public gateway.
Private Gateway: All the traffic to and from a private Network routed to the VPC through the private gateway. For more information, see “Adding a Private Gateway to a VPC”.
VPN Gateway: The VPC side of a VPN connection.
Site-to-Site VPN Connection: A hardware-based VPN connection between your VPC and your datacenter, home Network, or co-location facility. For more information, see “Setting Up a Site-to-Site VPN Connection”.
Customer Gateway: The customer side of a VPN Connection. For more information, see “Creating and Updating a VPN Customer Gateway”.
NAT Instance: An Instance that provides Port Address Translation for Instances to access the Internet via the public gateway. For more information, see “Enabling or Disabling Static NAT on a VPC”.
Network ACL: Network ACL is a group of Network ACL items. Network ACL items are nothing but numbered rules that are evaluated in order, starting with the lowest numbered rule. These rules determine whether traffic is allowed in or out of any Network Tier associated with the Network ACL. For more information, see “Configuring Network Access Control List”.
Network Architecture in a VPC
In a VPC, the following four basic options of Network architectures are present:
VPC with a public gateway only
VPC with public and private gateways
VPC with public and private gateways and site-to-site VPN access
VPC with a private gateway only and site-to-site VPN access
Connectivity Options for a VPC
You can connect your VPC to:
The Internet through the public gateway.
The corporate datacenter by using a site-to-site VPN connection through the VPN gateway.
Both the Internet and your corporate datacenter by using both the public gateway and a VPN gateway.
VPC Network Considerations
Consider the following before you create a VPC:
A VPC, by default, is created in the enabled state.
A VPC can be created in Advance zone only, and can’t belong to more than one zone at a time.
The default number of VPCs an Account can create is 20. However, you can change it by using the max.account.vpcs global parameter, which controls the maximum number of VPCs an Account is allowed to create.
The default number of Network Tiers an Account can create within a VPC is 3. You can configure this number by using the vpc.max.networks parameter.
Each Network Tier should have an unique CIDR in the VPC. Ensure that the Network Tier’s CIDR should be within the VPC CIDR range.
A Network Tier belongs to only one VPC.
All Network Tiers inside the VPC should belong to the same Account.
When a VPC is created, by default, a SourceNAT IP is allocated to it. The Source NAT IP is released only when the VPC is removed.
A public IP can be used for only one purpose at a time. If the IP is a sourceNAT, it cannot be used for StaticNAT or port forwarding.
The Instances can only have a private IP address that you provision. To communicate with the Internet, enable NAT to an Instance that you launch in your VPC.
Only new Networks can be added to a VPC. The maximum number of Networks per VPC is limited by the value you specify in the vpc.max.networks parameter. The default value is three.
The load balancing service can be supported by only one Network Tier inside the VPC.
If an IP address is assigned to a Network Tier:
That IP can’t be used by more than one Network Tier at a time in the VPC. For example, if you have Network Tiers A and B, and a public IP1, you can create a port forwarding rule by using the IP either for A or B, but not for both.
That IP can’t be used for StaticNAT, load balancing, or port forwarding rules for another guest Network inside the VPC.
Remote access VPN is not supported in VPC Networks.
Adding a Virtual Private Cloud
When creating the VPC, you simply provide the zone and a set of IP addresses for the VPC Network address space. You specify this set of addresses in the form of a Classless Inter-Domain Routing (CIDR) block.
Log in to the CloudStack UI as an administrator or end User.
In the left navigation, choose Network.
In the Select view, select VPC.
Click Add VPC. The Add VPC page is displayed as follows:
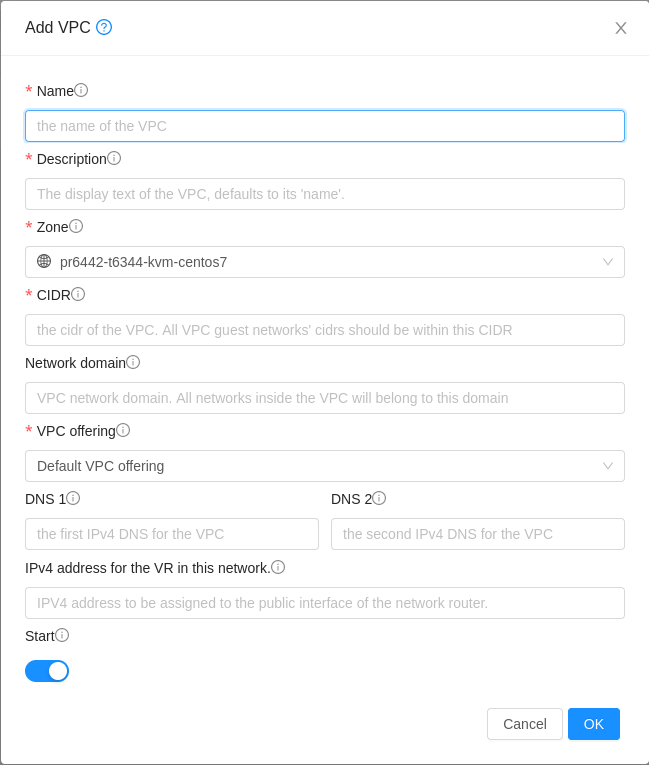
Provide the following information:
Name: A short name for the VPC that you are creating.
Description: A brief description of the VPC.
Zone: Choose the zone where you want the VPC to be available.
CIDR: Defines the CIDR range for all the Network Tiers (guest Networks) within a VPC. When you create a Network Tier, ensure that its CIDR is within the Super CIDR value you enter. The CIDR must be RFC1918 compliant.
Network Domain: If you want to assign a special domain name, specify the DNS suffix. This parameter is applied to all the Network Tiers within the VPC. That implies, all the Network Tiers you create in the VPC belong to the same DNS domain. If the parameter is not specified, a DNS domain name is generated automatically.
VPC Offering: If the administrator has configured multiple VPC offerings, select the one you want to use for this VPC.
Note
VPC Offerings can now be created with Conserve mode. When Conserve mode is off, the public IP can only be used for a single VPC Network Tier (e.g. you can add VMs from only a single VPC tier/network to the Load Balancer). But when the Conserve mode is on, you can define services (use VMS as targets) from more than one VPC Network Tier on the same public IP (e.g. add VMs1 from Tier1 and VM2 from Tier2 to a single Load Balancer.
Note
If StaticNAT is enabled, irrespective of the status of the conserve mode, no port forwarding or load balancing rule can be created for the IP. However, you can add the firewall rules by using the createFirewallRule command.
Note
In case Conserve Mode is enabled on VPC Offering and VPC Network Tier Offerings, then the Source NAT IP address of the VPC can be reused for multiple services.
DNS: A set of custom DNS that will be used by this VPC. If not provided then DNS specified for the zone will be used. Available only when the selected VPC offering supports DNS service.
IPv6 DNS: A set of custom IPv6 DNS that will be used by this VPC. If not provided then IPv6 DNS specified for the zone will be used. Available only when the selected VPC offering is IPv6 enabled and supports DNS service.
IPv4 address for the VR in this VPC: The source NAT address or primary public Network address to use by the guest Networks. If not provided then a random address from the available pool of addresses will be used.
- Public MTU: The MTU to be configured on the public interfaces of the
VPC Network’s VR
Click OK.
Note
In security groups-enabled Advanced zones and Basic zones, creation of VPC and isolated Networks are not supported.
Public MTU option will be shown in the UI and considered only when zone configuration - allow.end.users.to.specify.vr.mtu is set to true. Maximum allowed value for public MTU can be controlled by zone-level configuration - vr.public.interface.max.mtu.
Adding Network Tiers
Network Tiers are distinct locations within a VPC that act as isolated Networks, which do not have access to other Network Tiers by default. Network Tiers are set up on different VLANs that can communicate with each other by using a virtual router. Network Tiers provide inexpensive, low latency Network connectivity to other Network Tiers within the VPC.
Log in to the CloudStack UI as an administrator or end User.
In the left navigation, choose Network.
In the Select view, select VPC.
All the VPC that you have created for the Account is listed in the page.
Note
The end Users can see their own VPCs, while root and domain admin can see any VPC they are authorized to see.
Click the Configure button of the VPC for which you want to set up Network Tiers.
Click Create Network.
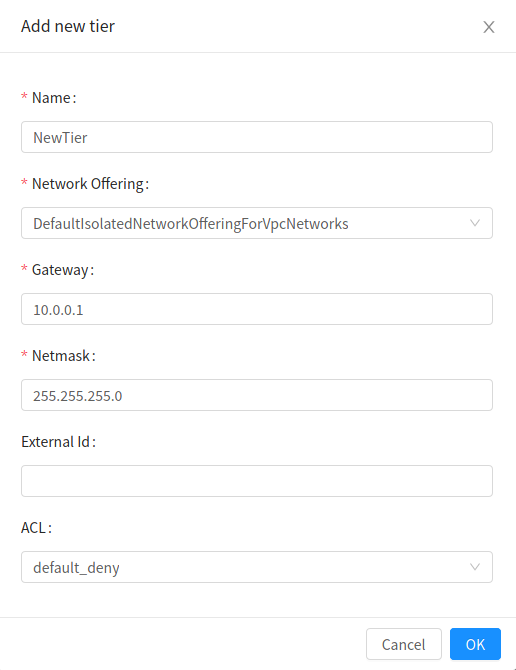
The Add new Network Tier dialog is displayed, as follows:
If you have already created Network Tiers, the VPC diagram is displayed. Click Create Network Tier to add a new Network Tier.
Specify the following:
All the fields are mandatory.
Name: A unique name for the Network Tier you create.
Note
Admins can choose to automatically prepend the VPC name to the Tier name during creation using global configurations “vpc.tier.name.prepend” and “vpc.tier.name.prepend.delimiter”.
Network Offering: The following default Network offerings are listed: Internal LB, DefaultIsolatedNetworkOfferingForVpcNetworksNoLB, DefaultIsolatedNetworkOfferingForVpcNetworks
In a VPC, only one Network Tier can be created by using LB-enabled Network offering.
Gateway: The gateway for the Network Tier you create. Ensure that the gateway is within the Super CIDR range that you specified while creating the VPC, and is not overlapped with the CIDR of any existing Network Tier within the VPC.
VLAN: The VLAN ID for the Network Tier that the root admin creates.
This option is only visible if the Network offering you selected is VLAN-enabled.
For more information, see “Assigning VLANs to Isolated Networks”.
Netmask: The netmask for the Network Tier you create.
For example, if the VPC CIDR is 10.0.0.0/16 and the Network Tier CIDR is 10.0.1.0/24, the gateway of the Network Tier is 10.0.1.1, and the netmask of the Network Tier is 255.255.255.0.
Click OK.
Continue with configuring access control list for the Network Tier.
Configuring Network Access Control List
Note
Network Access Control Lists can only be created if the service “NetworkACL” is supported by the created VPC.
Define a Network Access Control List (ACL) to control incoming (ingress) and outgoing (egress) traffic between the associated Network Tier and external Networks (other Network Tiers of the VPC as well as public Networks).
About Network ACLs
In CloudStack terminology, a Network ACL is a group of Network ACL rules. Network ACL rules are processed by their order, starting with the lowest numbered rule. Each rule defines at least an affected protocol, traffic type, action and affected destination / source Network. The following table shows a exemplary content of a “default_deny” ACL.
Rule |
Protocol |
Traffic type |
Action |
CIDR |
|---|---|---|---|---|
1 |
All |
Ingress |
Deny |
0.0.0.0/0 |
2 |
All |
Egress |
Deny |
0.0.0.0/0 |
Each Network ACL is associated with a VPC and can be assigned to multiple VPC Network Tiers. Every Network Tier needs to be associated with a Network ACL. Only one ACL can be associated with a Network Tier at a time. If no custom Network ACL is available at the time of Network Tier creation, a default Network ACL has to be used instead. Currently two default ACL are available. The “default_allow” ACL allows in- and egress traffic while the “default_deny” blocks all in- and egress traffic. Default Network ACL cannot be removed or modified. Newly created ACLs, while showing empty, deny all incoming traffic to the associated tier and allow all outgoing traffic. To change the defaults add a “deny all egress destination” and / or “allow all ingress source” rule to the ACL. Afterwards traffic can be white- or blacklisted.
Note
ACL Rules in Cloudstack are stateful
Source / Destination CIDRs are always external Networks
ACL rules can also been seen on the virtual router of the VPC. Ingress rules are listed in the table iptables table “filter” while egress rules are placed in the “mangle” table
ACL rules for ingress and egress are not correlating. For example a egress “deny all” won’t affect traffic in response to an allowed ingress connection
Creating ACLs
Log in to the CloudStack UI as an administrator or end User.
In the left navigation, choose Network.
In the Select view, select VPC.
All the VPCs that you have created for the Account is listed in the page.
Click the Configure button of the VPC.
For each tier, the following options are displayed:
Internal LB
Public LB IP
Static NAT
Instances
CIDR
The following router information is displayed:
Private Gateways
Public IP Addresses
Site-to-Site VPNs
Network ACLs
Select Network ACLs.
The following default rules are displayed in the Network ACLs page: default_allow, default_deny.
Click Add Network ACL, and specify the following:
ACL Name: A name for the ACL.
Description: A short description of the ACL that can be displayed to users.
Creating an ACL Rule
Log in to the CloudStack UI as an administrator or end user.
In the left navigation, choose Network.
In the Select view, select VPC.
All the VPCs that you have created for the Account is listed in the page.
Click the Configure button of the VPC.
Select Network ACLs.
In addition to the custom ACLs you have created, the following default rules are displayed in the Network ACLs page: default_allow, default_deny.
Select the desired ACL.
Select the ACL Rules tab.
To add an ACL rule, fill in the following fields to specify what kind of network traffic is allowed in the VPC.
Rule Number: The order in which the rules are evaluated.
CIDR: The CIDR acts as the Source CIDR for the Ingress rules, and Destination CIDR for the Egress rules. To accept traffic only from or to the IP addresses within a particular address block, enter a CIDR or a comma-separated list of CIDRs. The CIDR is the base IP address of the incoming traffic. For example, 192.168.0.0/22. To allow all CIDRs, set to 0.0.0.0/0.
Action: What action to be taken. Allow traffic or block.
Protocol: The networking protocol that sources use to send traffic to the tier. The TCP and UDP protocols are typically used for data exchange and end-user communications. The ICMP protocol is typically used to send error messages or network monitoring data. All supports all the traffic. Other option is Protocol Number.
Start Port, End Port (TCP, UDP only): A range of listening ports that are the destination for the incoming traffic. If you are opening a single port, use the same number in both fields.
Protocol Number: The protocol number associated with IPv4 or IPv6. For more information, see Protocol Numbers.
ICMP Type, ICMP Code (ICMP only): The type of message and error code that will be sent.
Traffic Type: The type of traffic: Incoming or outgoing.
Click Add. The ACL rule is added.
You can edit the tags assigned to the ACL rules and delete the ACL rules you have created. Click the appropriate button in the Details tab.
Creating a Tier with Custom ACL
Create a VPC.
Create a custom ACL.
Add ACL rules to the ACL.
Create a tier in the VPC.
Select the desired ACL while creating a tier.
Click OK.
Assigning a Custom ACL to a Tier
Create a VPC.
Create a tier in the VPC.
Associate the tier with the default ACL rule.
Create a custom ACL.
Add ACL rules to the ACL.
Select the tier for which you want to assign the custom ACL.
Click the Replace ACL icon.

The Replace ACL dialog is displayed.
Select the desired ACL.
Click OK.
Adding a Private Gateway to a VPC
A private gateway can be added by the root admin and Users. The VPC private network has 1:1 relationship with the NIC of the physical network. You can configure multiple private gateways to a single VPC. No gateways with duplicated VLAN and IP are allowed in the same data center.
Log in to the CloudStack UI as an administrator or end User.
In the left navigation, choose Network.
In the Select view, select VPC.
All the VPCs that you have created for the Account is listed in the page.
Click the Configure button of the VPC to which you want to configure load balancing rules.
The VPC page is displayed where all the tiers you created are listed in a diagram.
Click the Settings icon.
The following options are displayed.
Internal LB
Public LB IP
Static NAT
Instances
CIDR
The following router information is displayed:
Private Gateways
Public IP Addresses
Site-to-Site VPNs
Network ACLs
Select Private Gateways.
The Gateways page is displayed.
Click Add new gateway:
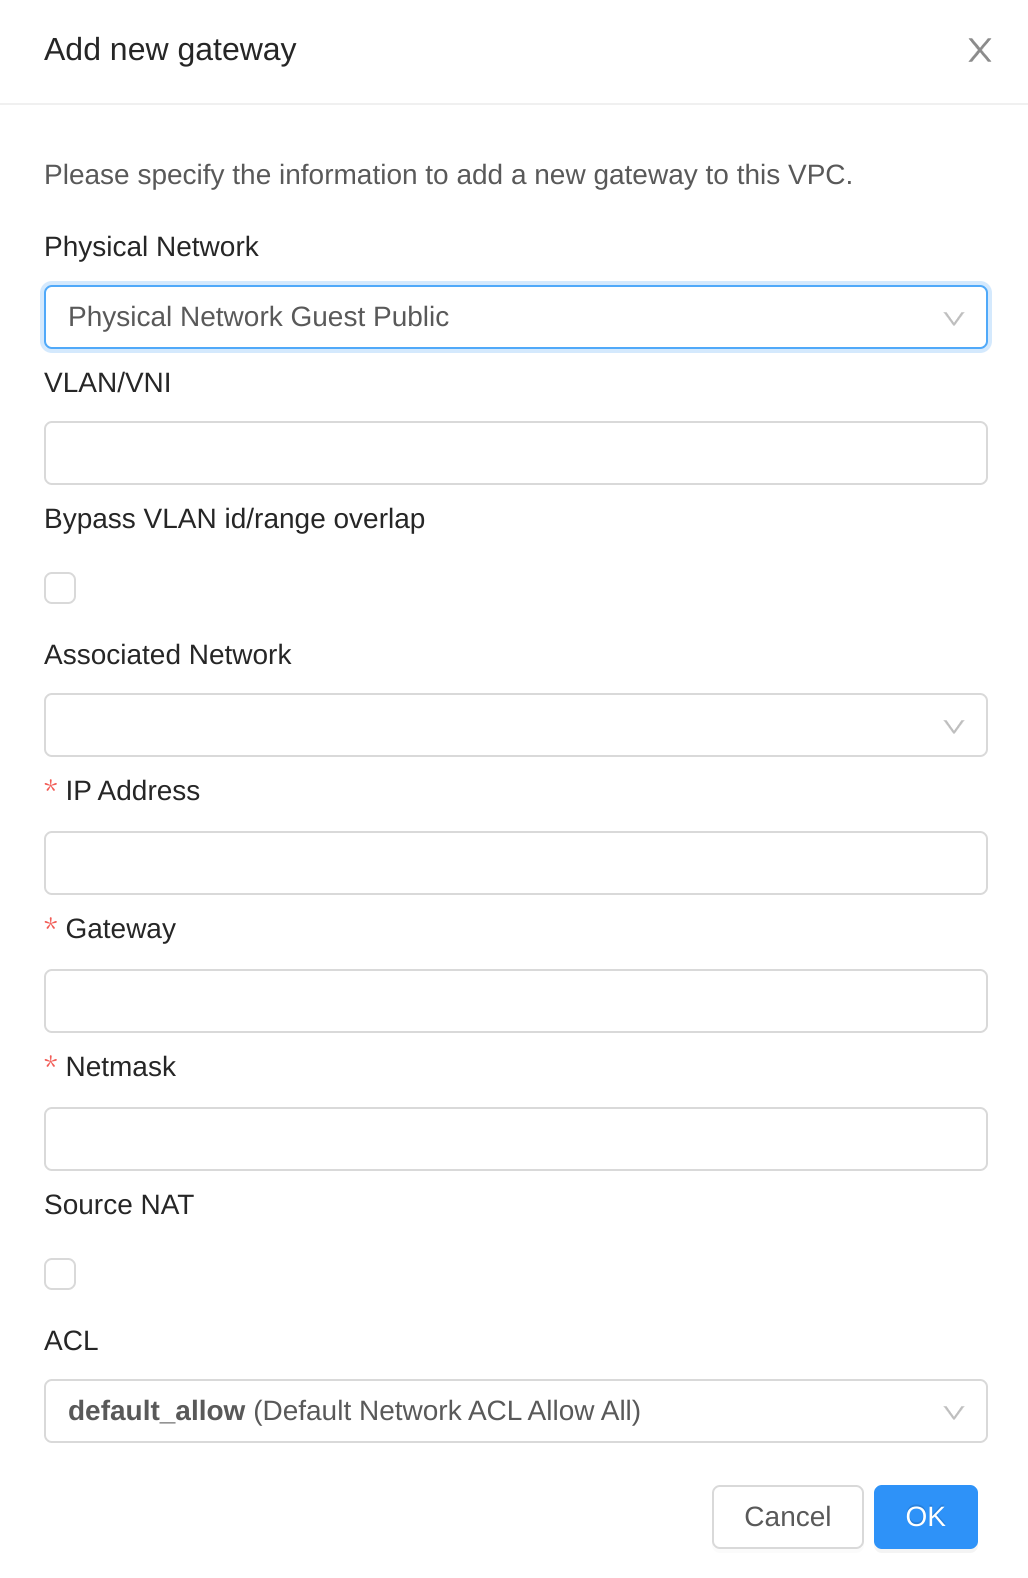
Specify the following:
Physical Network: (Administrators only) The physical network you have created in the zone.
VLAN: (Administrators only) The VLAN associated with the VPC gateway.
IP Address: The IP address associated with the VPC gateway.
Gateway: The gateway through which the traffic is routed to and from the VPC.
Netmask: The netmask associated with the VPC gateway.
Source NAT: Select this option to enable the source NAT service on the VPC private gateway.
Bypass VLAN id/range overlap: (Administrators only) Bypasses the check for a VLAN overlap. This way multiple networks with the same VLAN can be created
Associated Network: The L2 or Isolated network this private gateway is associated to. This private network will use the same VLAN as the associated network.
ACL: Controls both ingress and egress traffic on a VPC private gateway. By default, all the traffic is blocked.
See “ACL on Private Gateway”.
The new gateway appears in the list. You can repeat these steps to add more gateway for this VPC.
Source NAT on Private Gateway
You might want to deploy multiple VPCs with the same super CIDR and guest tier CIDR. Therefore, multiple Guest Instances from different VPCs can have the same IPs to reach a enterprise data center through the private gateway. In such cases, a NAT service need to be configured on the private gateway to avoid IP conflicts. If Source NAT is enabled, the Guest Instances in VPC reaches the enterprise network via private gateway IP address by using the NAT service.
The Source NAT service on a private gateway can be enabled while adding the private gateway. On deletion of a private gateway, source NAT rules specific to the private gateway are deleted.
To enable source NAT on existing private gateways, delete them and create afresh with source NAT.
ACL on Private Gateway
The traffic on the VPC private gateway is controlled by creating both ingress and egress network ACL rules. The ACLs contains both allow and deny rules. As per the rule, all the ingress traffic to the private gateway interface and all the egress traffic out from the private gateway interface are blocked.
You can change this default behaviour while creating a private gateway. Alternatively, you can do the following:
In a VPC, identify the Private Gateway you want to work with.
In the Private Gateway page, do either of the following:
Use the Quickview. See 3.
Use the Details tab. See 4 through .
In the Quickview of the selected Private Gateway, click Replace ACL, select the ACL rule, then click OK
Click the IP address of the Private Gateway you want to work with.
In the Detail tab, click the Replace ACL button.
The Replace ACL dialog is displayed.
select the ACL rule, then click OK.
Wait for few seconds. You can see that the new ACL rule is displayed in the Details page.
Creating a Static Route
CloudStack enables you to specify routing for the VPN connection you create. You can enter one or CIDR addresses to indicate which traffic is to be routed back to the gateway.
In a VPC, identify the Private Gateway you want to work with.
In the Private Gateway page, click the IP address of the Private Gateway you want to work with.
Select the Static Routes tab.
Specify the CIDR of destination network.
Click Add.
Wait for few seconds until the new route is created.
Denylisting Routes
CloudStack enables you to block a list of routes so that they are not
assigned to any of the VPC private gateways. Specify the list of routes
that you want to denylist in the denied.routes global
parameter. Note that the parameter update affects only new static route
creations. If you block an existing static route, it remains intact and
continue functioning. You cannot add a static route if the route is
denied for the zone.
Deploying Instances to the Tier
Log in to the CloudStack UI as an administrator or end User.
In the left navigation, choose Network.
In the Select view, select VPC.
All the VPCs that you have created for the Account is listed in the page.
Click the Configure button of the VPC to which you want to deploy the Instances.
The VPC page is displayed where all the tiers you have created are listed.
Click Instances tab of the tier to which you want to add an Instance.
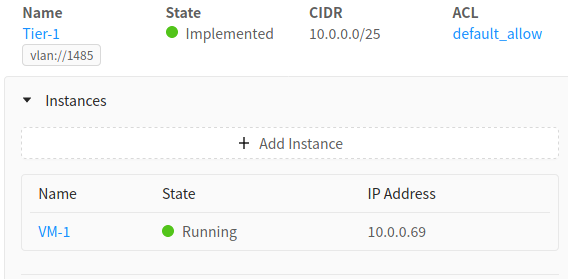
The Add Instance page is displayed.
Follow the on-screen instruction to add an Instance. For information on adding an Instance, see the Installation Guide.
Deploying Instances to VPC Tier and Shared Networks
CloudStack allows you deploy Instances on a VPC tier and one or more shared networks. With this feature, Instances deployed in a multi-tier application can receive monitoring services via a shared network provided by a service provider.
Log in to the CloudStack UI as an administrator.
In the left navigation, choose Instances.
Click Add Instance.
Select a zone.
Select a Template or ISO, then follow the steps in the wizard.
Ensure that the hardware you have allows starting the selected service offering.
Under Networks, select the desired networks for the Instance you are launching.
You can deploy an Instance to a VPC tier and multiple shared networks.
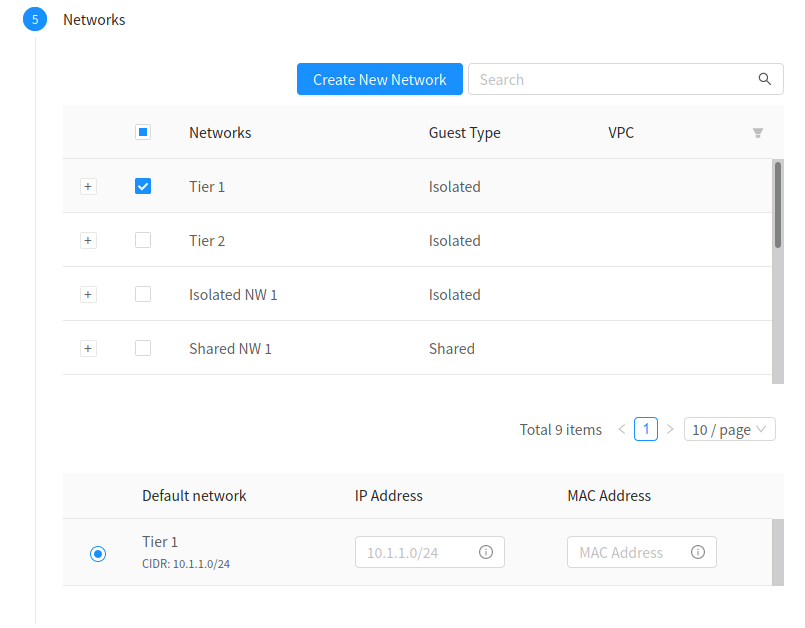
Click Next, review the configuration and click Launch.
Your Instance will be deployed to the selected VPC tier and shared network.
Acquiring a New IP Address for a VPC
When you acquire an IP address, all IP addresses are allocated to VPC, not to the guest networks within the VPC. The IPs are associated to the guest network only when the first port-forwarding, load balancing, or Static NAT rule is created for the IP or the network. IP can’t be associated to more than one network at a time.
Log in to the CloudStack UI as an administrator or end User.
In the left navigation, choose Network.
In the Select view, select VPC.
All the VPCs that you have created for the Account is listed in the page.
Click the Configure button of the VPC to which you want to deploy the Instances.
The VPC page is displayed where all the tiers you created are listed in a diagram.
The following options are displayed.
Internal LB
Public LB IP
Static NAT
Instances
CIDR
The following router information is displayed:
Private Gateways
Public IP Addresses
Site-to-Site VPNs
Network ACLs
Select IP Addresses.
The Public IP Addresses page is displayed.
Click Acquire New IP, and click Yes in the confirmation dialog.
You are prompted for confirmation because, typically, IP addresses are a limited resource. Within a few moments, the new IP address should appear with the state Allocated. You can now use the IP address in port forwarding, load balancing, and static NAT rules.
Releasing an IP Address Allotted to a VPC
The IP address is a limited resource. If you no longer need a particular IP, you can disassociate it from its VPC and return it to the pool of available addresses. An IP address can be released from its tier, only when all the networking ( port forwarding, load balancing, or StaticNAT ) rules are removed for this IP address. The released IP address will still belongs to the same VPC.
Log in to the CloudStack UI as an administrator or end User.
In the left navigation, choose Network.
In the Select view, select VPC.
All the VPCs that you have created for the Account is listed in the page.
Click the Configure button of the VPC whose IP you want to release.
The VPC page is displayed where all the tiers you created are listed in a diagram.
The following options are displayed.
Internal LB
Public LB IP
Static NAT
Instances
CIDR
The following router information is displayed:
Private Gateways
Public IP Addresses
Site-to-Site VPNs
Network ACLs
Select Public IP Addresses.
The IP Addresses page is displayed.
Click the IP you want to release.
In the Details tab, click the Release IP button

Enabling or Disabling Static NAT on a VPC
A static NAT rule maps a public IP address to the private IP address of an Instance in a VPC to allow Internet traffic to it. This section tells how to enable or disable static NAT for a particular IP address in a VPC.
If port forwarding rules are already in effect for an IP address, you cannot enable static NAT to that IP.
If a Guest Instance is part of more than one network, static NAT rules will function only if they are defined on the default network.
Log in to the CloudStack UI as an administrator or end User.
In the left navigation, choose Network.
In the Select view, select VPC.
All the VPCs that you have created for the Account is listed in the page.
Click the Configure button of the VPC to which you want to deploy the Instances.
The VPC page is displayed where all the tiers you created are listed in a diagram.
For each tier, the following options are displayed.
Internal LB
Public LB IP
Static NAT
Instances
CIDR
The following router information is displayed:
Private Gateways
Public IP Addresses
Site-to-Site VPNs
Network ACLs
In the Router node, select Public IP Addresses.
The IP Addresses page is displayed.
Click the IP you want to work with.
In the Details tab,click the Static NAT button.
 The button toggles between Enable and
Disable, depending on whether static NAT is currently enabled for the
IP address.
The button toggles between Enable and
Disable, depending on whether static NAT is currently enabled for the
IP address.If you are enabling static NAT, a dialog appears as follows:
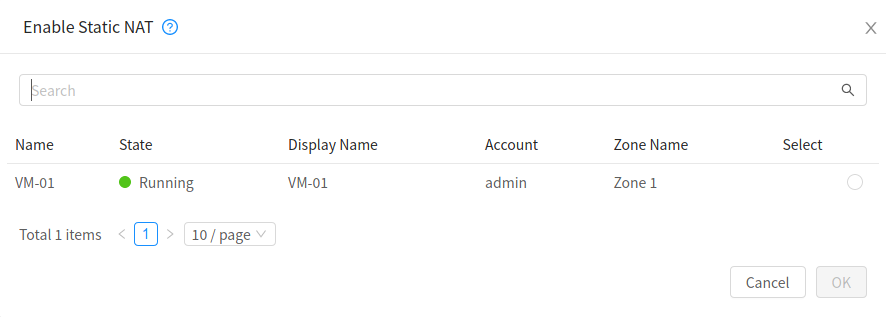
Select the tier and the destination Instance, then click Apply.
Adding Firewall rules on a public IP address in a VPC
In a VPC, once the public IP address is acquired, you can create firewall rules for the public IP address. Firewall rules are created to allow traffic from specified source CIDRs to a tier through the selected public IP address. For example, you can create a firewall rule to allow SSH or HTTP traffic to the Web tier.
Firewall rule management in a VPC depends on the Firewall service capability configured in the VPC offering. When creating the VPC, use a VPC offering that includes the Firewall service with VpcVirtualRouter as its provider.
Steps to add a firewall rule on a public IP address in a VPC are as follows:
Log in to the CloudStack UI.
In the left navigation, choose Network.
In the Select view, select VPC.
Enter Public IP addresses section and click on the Public IP Address to which you want to add firewall rules.
Click the Firewall Rules tab, which will appear only if the public IP address is associated with a tier.
Click Add Firewall Rule and specify the following:
Source CIDR - The CIDR that defines the source of the traffic.
Protocol - The protocol that defines the type of traffic.
Start Port and End Port - The port range that defines the destination of the traffic. If you are opening a single port, use the same number in both fields.

Adding Load Balancing Rules on a VPC
In a VPC, you can configure two types of load balancing: external LB and internal LB. External LB is nothing but a LB rule created to redirect the traffic received at a public IP of the VPC virtual router. The traffic is load balanced within a tier based on your configuration. Citrix NetScaler and VPC virtual router are supported for external LB. When you use internal LB service, traffic received at a tier is load balanced across different Instances within that tier. For example, traffic reached at Web tier is redirected to another Instance in that tier. External load balancing devices are not supported for internal LB. The service is provided by a internal LB Instance configured on the target tier.
Load Balancing Within a Tier (External LB)
A CloudStack user or administrator may create load balancing rules that balance traffic received at a public IP to one or more Instances that belong to a Network Tier that provides load balancing service in a VPC. A user creates a rule, specifies an algorithm, and assigns the rule to a set of Instances within a tier.
Enabling NetScaler as the LB Provider on a VPC Tier
Add and enable Netscaler VPX in dedicated mode.
Netscaler can be used in a VPC environment only if it is in dedicated mode.
Create a network offering, as given in “Creating a Network Offering for External LB”.
Create a VPC with Netscaler as the Public LB provider.
For more information, see “Adding a Virtual Private Cloud”.
For the VPC, acquire an IP.
Create an external load balancing rule and apply, as given in Creating an External LB Rule.
Creating a Network Offering for External LB
To have external LB support on VPC, create a network offering as follows:
Log in to the CloudStack UI as a user or admin.
Navigate to Service Offerings and choose Network Offering.
Click Add Network Offering.
In the dialog, make the following choices:
Name: Any desired name for the network offering.
Description: A short description of the offering that can be displayed to users.
Network Rate: Allowed data transfer rate in MB per second.
Traffic Type: The type of network traffic that will be carried on the network.
Guest Type: Choose whether the guest network is isolated or shared.
Persistent: Indicate whether the guest network is persistent or not. The network that you can provision without having to deploy an Instance on it is termed persistent network.
VPC: This option indicate whether the guest network is Virtual Private Cloud-enabled. A Virtual Private Cloud (VPC) is a private, isolated part of CloudStack. A VPC can have its own virtual network topology that resembles a traditional physical network. For more information on VPCs, see :ref: about-vpc.
Specify VLAN: (Isolated guest networks only) Indicate whether a VLAN should be specified when this offering is used.
Supported Services: Select Load Balancer. Use Netscaler or VpcVirtualRouter.
Load Balancer Type: Select Public LB from the drop-down.
LB Isolation: Select Dedicated if Netscaler is used as the external LB provider.
System Offering: Choose the system service offering that you want virtual routers to use in this network.
Conserve mode: Indicate whether to use conserve mode. In this mode, network resources are allocated only when the first virtual machine starts in the network.
Click OK and the network offering is created.
Creating an External LB Rule
Log in to the CloudStack UI as an administrator or end user.
In the left navigation, choose Network.
In the Select view, select VPC.
All the VPCs that you have created for the Account is listed in the page.
Click the Configure button of the VPC, for which you want to configure load balancing rules.
The VPC page is displayed where all the tiers you created listed in a diagram.
For each tier, the following options are displayed:
Internal LB
Public LB IP
Static NAT
Instances
CIDR
The following router information is displayed:
Private Gateways
Public IP Addresses
Site-to-Site VPNs
Network ACLs
In the Router node, select Public IP Addresses.
The IP Addresses page is displayed.
Click the IP address for which you want to create the rule, then click the Configuration tab.
In the Load Balancing node of the diagram, click View All.
Select the tier to which you want to apply the rule.
Specify the following:
Name: A name for the load balancer rule.
Public Port: The port that receives the incoming traffic to be balanced.
Private Port: The port that the Instances will use to receive the traffic.
Algorithm. Choose the load balancing algorithm you want CloudStack to use. CloudStack supports the following well-known algorithms:
Round-robin
Least connections
Source
Stickiness. (Optional) Click Configure and choose the algorithm for the stickiness policy. See Sticky Session Policies for Load Balancer Rules.
Protocol: The protocol for the Load Balancer Rule such as tcp, udp, tcp-proxy or ssl.
SSL Certificate: The SSL certificate assigned to the Load Balancer Rule. This is visible only when protocol is ssl. see “Configuring SSL Certificate for Load Balancer Rules”.
Add Instances: Click Add Instances, then select two or more Instances that will divide the load of incoming traffic, and click Apply.
The new load balancing rule appears in the list. You can repeat these steps to add more load balancing rules for this IP address.
Load Balancing Across Tiers
CloudStack supports sharing workload across different tiers within your VPC. Assume that multiple tiers are set up in your environment, such as Web tier and Application tier. Traffic to each tier is balanced on the VPC virtual router on the public side, as explained in “Adding Load Balancing Rules on a VPC”. If you want the traffic coming from the Web tier to the Application tier to be balanced, use the internal load balancing feature offered by CloudStack.
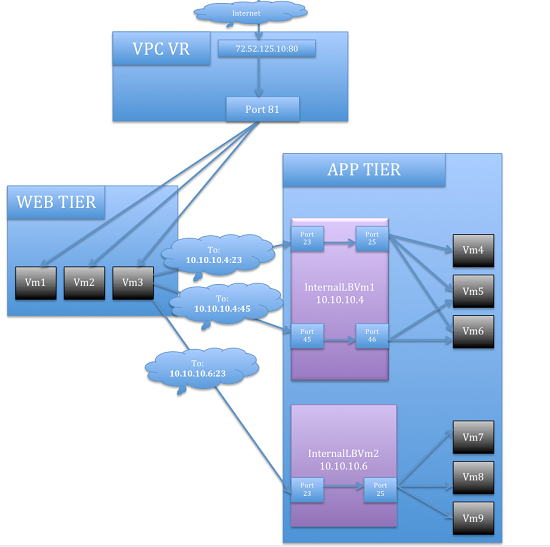
How Does Internal LB Work in VPC?
In this figure, a public LB rule is created for the public IP 72.52.125.10 with public port 80 and private port 81. The LB rule, created on the VPC virtual router, is applied on the traffic coming from the Internet to the Instances on the Web tier. On the Application tier two internal load balancing rules are created. An internal LB rule for the guest IP 10.10.10.4 with load balancer port 23 and Instance port 25 is configured on the Instance, InternalLBVM1. Another internal LB rule for the guest IP 10.10.10.4 with load balancer port 45 and Instance port 46 is configured on the Instance, InternalLBVM1. Another internal LB rule for the guest IP 10.10.10.6, with load balancer port 23 and Instance port 25 is configured on the Instance, InternalLBVM2.
Guidelines
Internal LB and Public LB are mutually exclusive on a tier. If the tier has LB on the public side, then it can’t have the Internal LB.
Internal LB is supported just on VPC networks in CloudStack 4.2 release.
Only Internal LB Instance can act as the Internal LB provider in CloudStack 4.2 release.
Network upgrade is not supported from the network offering with Internal LB to the network offering with Public LB.
Multiple tiers can have internal LB support in a VPC.
Only one tier can have Public LB support in a VPC.
Enabling Internal LB on a VPC Tier
Create a network offering, as given in Creating a Network Offering for Internal LB.
Create an internal load balancing rule and apply, as given in Creating an Internal LB Rule.
Creating a Network Offering for Internal LB
To have internal LB support on VPC, either use the default offering, DefaultIsolatedNetworkOfferingForVpcNetworksWithInternalLB, or create a network offering as follows:
Log in to the CloudStack UI as a user or admin.
Navigate to Service Offerings and choose Network OfferingPublic IP Addresses.
Click Add Network Offering.
In the dialog, make the following choices:
Name: Any desired name for the network offering.
Description: A short description of the offering that can be displayed to users.
Network Rate: Allowed data transfer rate in MB per second.
Traffic Type: The type of network traffic that will be carried on the network.
Guest Type: Choose whether the guest network is isolated or shared.
Persistent: Indicate whether the guest network is persistent or not. The network that you can provision without having to deploy an Instance on it is termed persistent network.
VPC: This option indicate whether the guest network is Virtual Private Cloud-enabled. A Virtual Private Cloud (VPC) is a private, isolated part of CloudStack. A VPC can have its own virtual network topology that resembles a traditional physical network. For more information on VPCs, see “About Virtual Private Clouds”.
Specify VLAN: (Isolated guest networks only) Indicate whether a VLAN should be specified when this offering is used.
Supported Services: Select Load Balancer. Select
InternalLbVMfrom the provider list.Load Balancer Type: Select Internal LB from the drop-down.
System Offering: Choose the system service offering that you want virtual routers to use in this network.
Conserve mode: Indicate whether to use conserve mode. In this mode, network resources are allocated only when the first virtual machine starts in the network.
Click OK and the network offering is created.
Creating an Internal LB Rule
When you create the Internal LB rule and applies to an Instance, an Internal LB Instance, which is responsible for load balancing, is created.
You can view the created Internal LB Instance in the Instances page if you navigate to Infrastructure > Zones > <zone_ name> > <physical_network_name> > Network Service Providers > Internal LB Instance. You can manage the Internal LB Instances as and when required from the location.
Log in to the CloudStack UI as an administrator or end user.
In the left navigation, choose Network.
In the Select view, select VPC.
All the VPCs that you have created for the Account is listed in the page.
Locate the VPC for which you want to configure internal LB, then click Configure.
The VPC page is displayed where all the tiers you created listed in a diagram.
Locate the Tier for which you want to configure an internal LB rule, click Internal LB.
In the Internal LB page, click Add Internal LB.
In the dialog, specify the following:
Name: A name for the load balancer rule.
Description: A short description of the rule that can be displayed to users.
Source IP Address: (Optional) The source IP from which traffic originates. The IP is acquired from the CIDR of that particular tier on which you want to create the Internal LB rule. If not specified, the IP address is automatically allocated from the network CIDR.
For every Source IP, a new Internal LB Instance is created for load balancing.
Source Port: The port associated with the source IP. Traffic on this port is load balanced.
Instance Port: The port of the internal LB Instance.
Algorithm. Choose the load balancing algorithm you want CloudStack to use. CloudStack supports the following well-known algorithms:
Round-robin
Least connections
Source
Adding a Port Forwarding Rule on a VPC
Log in to the CloudStack UI as an administrator or end user.
In the left navigation, choose Network.
In the Select view, select VPC.
All the VPCs that you have created for the Account is listed in the page.
Click the Configure button of the VPC to which you want to deploy the Instances.
The VPC page is displayed where all the tiers you created are listed in a diagram.
For each tier, the following options are displayed:
Internal LB
Public LB IP
Static NAT
Instances
CIDR
The following router information is displayed:
Private Gateways
Public IP Addresses
Site-to-Site VPNs
Network ACLs
In the Router node, select Public IP Addresses.
The IP Addresses page is displayed.
Click the IP address for which you want to create the rule, then click the Configuration tab.
In the Port Forwarding node of the diagram, click View All.
Select the tier to which you want to apply the rule.
Specify the following:
Public Port: The port to which public traffic will be addressed on the IP address you acquired in the previous step.
Private Port: The port on which the Instance is listening for forwarded public traffic.
Protocol: The communication protocol in use between the two ports.
TCP
UDP
Add Instance: Click Add Instance. Select the name of the Instance to which this rule applies, and click Apply.
You can test the rule by opening an SSH session to the Instance.
Removing Tiers
You can remove a tier from a VPC. A removed tier cannot be revoked. When a tier is removed, only the resources of the tier are expunged. All the network rules (port forwarding, load balancing and staticNAT) and the IP addresses associated to the tier are removed. The IP address still be belonging to the same VPC.
Log in to the CloudStack UI as an administrator or end user.
In the left navigation, choose Network.
In the Select view, select VPC.
All the VPC that you have created for the Account is listed in the page.
Click the Configure button of the VPC for which you want to set up tiers.
The Configure VPC page is displayed. Locate the tier you want to work with.
Select the tier you want to remove.
In the Network Details tab, click the Delete Network button.

Click Yes to confirm. Wait for some time for the tier to be removed.
Editing, Restarting, and Removing a Virtual Private Cloud
Note
Ensure that all the tiers are removed before you remove a VPC.
Log in to the CloudStack UI as an administrator or end user.
In the left navigation, choose Network.
In the Select view, select VPC.
All the VPCs that you have created for the Account is listed in the page.
Select the VPC you want to work with.
In the Details tab, click the Remove VPC button

You can remove the VPC by also using the remove button in the Quick View.
You can edit the name and description of a VPC. To do that, select the VPC, then click the Edit button.

To restart a VPC, select the VPC, then click the Restart button.

Working with Domain VPCs
The functionality of domain VPCs allows operators to aggregate multiple Network Tiers from distinct users on the same VPC, reducing the number of virtual routers necessary in the environment, and consequently, decreasing the amount of public IP addresses consumed. All Network Tiers added to the VPC share the same VR, but each one has their own broadcast domain and features implemented by the VPC, such as DHCP, NAT, and so on.
In order to utilize this functionality, a new Network Tier must be included to an existing VPC by inputing the respective data for the account and the VPC on the ‘createNetwork’ API. It is important to note that, in order for a Network Tier of a different account to be created on the VPC, the account that creates the Network Tier must have access to both the account that owns the VPC and the account that owns the Network Tier. The owner of the VPC must also have access to the account that owns the Network Tier, however, the opposite is not required.