警告
NOTICE: THIS DOCUMENTATION SITE HAS BEEN SUPERSEDED.
For the current documentation site goto: http://docs.cloudstack.apache.org
附加安装选项
除了基本的部署选项之外,接下来的几节将描述CloudStack的特性。
安装Usage服务(可选)
管理服务器配置完毕后,你可以选择安装Usage服务器。Usage服务器从系统事件中提取数据,便于对账户进行使用计费。
当存在多台管理服务器时,可以选择在它们上面安装任意数量的Usage服务器。Usage服务器会协调处理。考虑到高可用性,所以最少在两台管理服务器中安装Usage服务器。
安装Usage服务器的要求
- Usage服务器安装时,管理服务器必须在运行状态。
- Usage服务器必须与管理服务器安装在同一台服务器中。
安装Usage服务器的步骤
Package repository should already being configured. Refer to Configure Package Repository
Install package cloudstack-usage
On RHEL/CentOS systems, use:
# yum install cloudstack-usage如果是Debian/Ubuntu系统,命令为:
# apt-get install cloudstack-usage安装成功后,使用如下命令启动Usage服务器。
# service cloudstack-usage startEnable the service at boot
On RHEL/CentOS systems, use:
# chkconfig cloudstack-usage on如果是Debian/Ubuntu系统,命令为:
# update-rc.d cloudstack-usage defaults
The Administration Guide discusses further configuration of the Usage Server.
SSL (可选)
CloudStack默认提供HTTP的访问方式。有许多的技术和网站选择使用SSL。因此,我们先抛下CloudStack所使用的HTTP,假设站点使用SSL是一个典型实践。
CloudStack使用Tomcat作为服务容器。由于CloudStack网站中断SSL会话,可能会开启Tomcatde的SSL访问。Tomcat的SSL配置描述请查阅: http://tomcat.apache.org/tomcat-6.0-doc/ssl-howto.html.
数据库复制(可选)
CloudStack支持MySQL节点间的数据库复制。这个通过标准的MySQL复制功能来实现。你这样做可能希望防止MySQL服务器或者存储损坏。MySQL复制使用master/slave的模型。master节点是直接为管理服务器所使用。slave节点为备用,接收来自master节点的所有写操作,并将它应用于本地冗余数据库。以下是实施数据库复制的步骤。
注解
创建复制并不等同于备份策略,你需要另外开发一个有别于复制的MySQL数据的备份机制。
确保这是一个全新安装且没有数据的master数据库节点。
编辑master数据库的my.cnf,在[mysqld]的datadir下增加如下部分。
log_bin=mysql-bin
server_id=1
考虑到其他的服务器,服务器id必须是唯一的。推荐的方式是将master的ID设置为1,后续的每个slave节点序号大于1,使得所有服务器编号如:1,2,3等。
重启MySQL服务。如果是RHEL/CentOS系统,命令为:
# service mysqld restart如果是Debian/Ubuntu系统,命令为:
# service mysql restart在master上创建一个用于复制的账户,并赋予权限。我们创建用户”cloud-repl”,密码为”password”。假设master和slave都运行在172.16.1.0/24网段。
# mysql -u root
mysql> create user 'cloud-repl'@'172.16.1.%' identified by 'password';
mysql> grant replication slave on *.* TO 'cloud-repl'@'172.16.1.%';
mysql> flush privileges;
mysql> flush tables with read lock;
离开当前正在运行的MySQL会话。
在新的shell中打开第二个MySQL会话。
检索当前数据库的位置点。
# mysql -u root
mysql> show master status;
+------------------+----------+--------------+------------------+
| File             | Position | Binlog_Do_DB | Binlog_Ignore_DB |
+------------------+----------+--------------+------------------+
| mysql-bin.000001 |      412 |              |                  |
+------------------+----------+--------------+------------------+
注意你数据库实例所返回的文件及位置点。
退出该会话。
完成master安装。返回到master的第一个会话,取消锁定并退出MySQL。
mysql> unlock tables;安装并配置slave节点。在slave服务器上,运行如下命令。
# yum install mysql-server
# chkconfig mysqld on
编辑my.cnf,在[mysqld]的datadir下增加如下部分。
server_id=2
innodb_rollback_on_timeout=1
innodb_lock_wait_timeout=600
重启MySQL。对于RHEL/CentOS系统,使用”mysqld”
# service mysqld restart对于Ubuntu/Debian系统,使用”mysql.”
# service mysql restart引导slave连接master并进行复制。使用上面步骤中得到数据来替换IP地址,密码,日志文件,以及位置点。
mysql> change master to
    -> master_host='172.16.1.217',
    -> master_user='cloud-repl',
    -> master_password='password',
    -> master_log_file='mysql-bin.000001',
    -> master_log_pos=412;
在slave上启动复制功能。
mysql> start slave;在slave上可能需要开启3306端口,就像之前在master上所做的一样。
这对复制来说不是必须的。但如果没有做,当需要进行数据库切换时,你仍然需要去做。
故障切换
这将为管理服务器提供一个复制的数据库,用于实现手动故障切换。管理员将CloudStack从一个故障MySQL实例切换到另一个。当数据库失效发生时,你应该:
停止管理服务器(通过命令:service cloudstack-management stop)
将数据库的复本服务器修改为master并重启
确保数据库的副本服务器的3306端口开放给管理服务器。
更改使得管理服务器使用这个新的数据库。最简单的操作是在管理服务器的/etc/cloudstack/management/db.properties文件中写入新的数据库IP地址。
重启管理服务器:
# service cloudstack-management start
Amazon Web Services 接口
Amazon Web Services 兼容接口
CloudStack可将AWS API调用转换为CloudStack本地调用,使得用户可以继续使用已有的AWS兼容工具。这个转换服务作为单独的web应用,就像在tomcat上的CloudStack管理服务一样,只是监听不同的端口。AWS兼容接口除了提供S3 REST API外,还提供EC2 SOAP和Query APIs。
注解
这项服务,之前是由CloudBridge独立软件实现的。现在已经完全集成到CloudStack管理服务中。
警告
The compatible interface for the EC2 Query API and the S3 API are Work In Progress. The S3 compatible API offers a way to store data on the management server file system, it is not an implementation of the S3 backend.
局限性
- 只支持使用基本网络的zone。
- 仅对全新安装的CloudStack可用。通过旧版本升级的不可用。
- 如弹性IP(EIP)和弹性负载均衡(ELB)这些特性,仅对有Citrix NetScaler设备的架构可用。用户接入有NetScaler设备的zone时,需要使用NetScaler-enabled网络方案(DefaultSharedNetscalerEIP和ELBNetworkOffering)。
支持的API版本
- 遵守亚马逊WDSL版本的EC2接口将于2010-11-15过期。可在 `http://ec2.amazonaws.com/doc/2010-11-15/ <http://ec2.amazonaws.com/doc/2010-11-15/>`获取。
- 接口与EC2命令行工具*EC2 tools v.1.3.6230*是兼容的。可在 http://s3.amazonaws.com/ec2-downloads/ec2-api-tools-1.3-62308.zip.
注解
支持更新版本的EC2 API的工作正在进行
使能EC2和S3兼容接口
提供AWS API兼容性的软件随CloudStack一起安装。在使用之前,你必须使能服务并操作一些安装步骤。
将全局配置参数中的每项服务设置为true。详看 *Setting Global Configuration Parameters*.
创建一组匹配亚马逊服务方案的名称。这个可以按照管理员操作手册在CloudStack界面上进行操作。
警告
除了可能使用的EC2实例类型,确保已包含亚马逊默认服务方案,m1.small。
如果按照步骤1设置了配置参数后,没有重启,那么重启管理服务器。
# service cloudstack-management restart
以下内容提供了这些步骤的细节
开启服务
为了使能EC2和S3兼容服务,你需要将 enable.ec2.api *和 *enable.s3.api 的值设置为true。以使能你所需要的服务。这个可以在CloudStack的界面上的*Global Settings*或者API来实现。
下面的截图展示如何通过GUI使能这些服务。
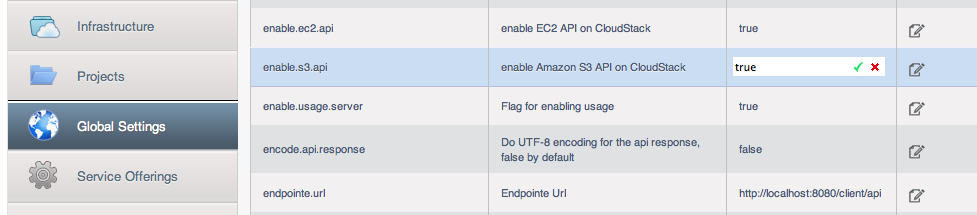
使用CloudStack API最简单的方法是使用集成接口,这个接口可以使用无验证调用。在全局设置中将这个接口设置为8096,然后调用 updateConfiguration 。下面的URL展示如何使用。
http://localhost:8096/client/api?command=updateConfiguration&name=enable.ec2.api&value=true
http://localhost:8096/client/api?command=updateConfiguration&name=enable.ec2.api&value=true
一旦使能这些服务,重启服务器。
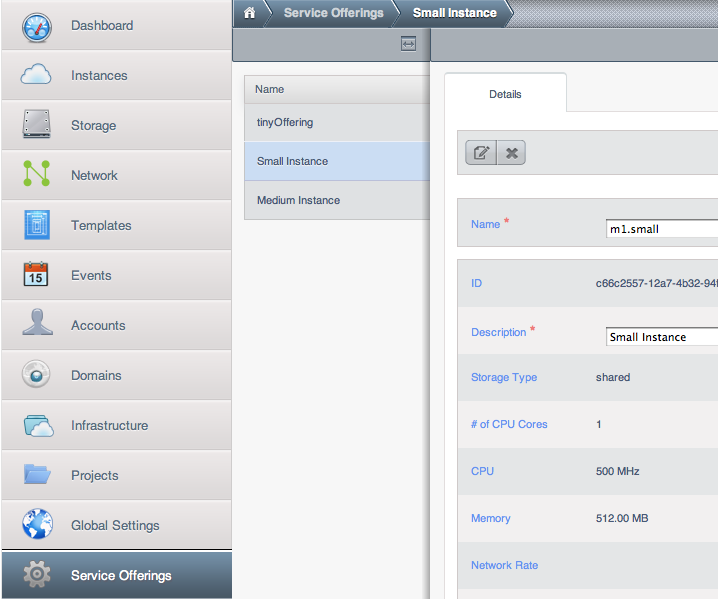
创建EC2兼容服务方案
可以定义兼容 Amazon EC2实例类型 <http://aws.amazon.com/ec2/instance-types/> API名称的计算服务方案。(例如m1.small,m1.large),这个可以通过CloudStack界面进行操作。在 Service Offerings 中选择 Compute offering ,创建一个新的计算方案或者修改已存在的皆可。确保名称与EC2实例类型API名称匹配。下面的截图将展示如何操作。
AWS API用户安装
总的来说,用户不需要察觉CloudStack所提供的翻译服务。只需将AWS API调用发送到CloudStack端,然后被转换为CloudStack API。Amazon EC2兼容接口用户可继续使用已有的EC2工具和脚本,并通过指定管理服务器的端及合适的用户证书,将它们用于CloudStack部署。为此,用户需要进行如下步骤的操作:
- 生成用户证书
- 向服务注册。
- 为了方便,设置关于EC2 SOAP命令行工具的环境变量。
AWS API命令行工具安装
为了使用EC2命令行工具,用户需要操作以下步骤:
- 确定你具有正确版本的EC2工具。所支持的版本可以在 `http://s3.amazonaws.com/ec2-downloads/ec2-api-tools-1.3-62308.zip <http://s3.amazonaws.com/ec2-downloads/ec2-api-tools-1.3-62308.zip>`_获取。
- 设置EC2环境变量。可在每次使用服务时设置或者写入合适的shell profile文件中。将端(如EC2_URL)替换为合适的CloudStack管理服务器地址和端口。可在bash文件中做如下操作。
$ export EC2_CERT=/path/to/cert.pem
$ export EC2_PRIVATE_KEY=/path/to/private_key.pem
$ export EC2_URL=http://localhost:7080/awsapi
$ export EC2_HOME=/path/to/EC2_tools_directory
使用超时设定确保AWS API命令完成
Amazon EC2命令行工具有默认的连接超时。在CloudStack中使用时,某些命令可能需要更长的超时。如果你发现命令在超时的时间内未完成,你可以指定用户定制超时。你可以将下面的可选命令行参数添加到任何支持CloudStack的EC2命令。
指定连接超时(秒)
--connection-timeout TIMEOUT
指定请求超时(秒)
--request-timeout TIMEOUT
例如:
ec2-run-instances 2 –z us-test1 –n 1-3 --connection-timeout 120 --request-timeout 120
注解
CloudStack中的超时可选参数并非特定
支持AWS API调用
AWS API接口被使能后,CloudStack可支持下面的Amazon EC2命令。对于少数命令,CloudStack与Amazon EC2版本间有一些差异,差异已被标识。对于使用SOAP调用建立工具的用户,与之相关的命令也已给出。
表 1.弹性IP API对应表
| EC2命令 | SOAP调用 | CloudStack API调用 |
|---|---|---|
| ec2-allocate-address | AllocateAddress | associateIpAddress |
| ec2-associate-address | AssociateAddress | enableStaticNat |
| ec2-describe-addresses | DescribeAddresses | listPublicIpAddresses |
| ec2-diassociate-address | DisassociateAddress | disableStaticNat |
| ec2-release-address | ReleaseAddress | disassociateIpAddress |
表 2.可用Zone API对应表
| EC2命令 | SOAP调用 | CloudStack API调用 |
|---|---|---|
| ec2-describe-availability-zones | DescribeAvailabilityZones | listZones |
表 3.镜像API对应表
| EC2命令 | SOAP调用 | CloudStack API调用 |
|---|---|---|
| ec2-create-image | CreateImage | createTemplate |
| ec2-deregister | DeregisterImage | DeleteTemplate |
| ec2-describe-images | DescribeImages | listTemplates |
| ec2-register | RegisterImage | registerTemplate |
表 4.镜像属性API对应表
| EC2命令 | SOAP调用 | CloudStack API调用 |
|---|---|---|
| ec2-describe-image-attribute | DescribeImageAttribute | listTemplatePermissions |
| ec2-modify-image-attribute | ModifyImageAttribute | updateTemplatePermissions |
| ec2-reset-image-attribute | ResetImageAttribute | updateTemplatePermissions |
表 5.实例API对应表
| EC2命令 | SOAP调用 | CloudStack API调用 |
|---|---|---|
| ec2-describe-instances | DescribeInstances | listVirtualMachines |
| ec2-run-instances | RunInstances | deployVirtualMachine |
| ec2-reboot-instances | RebootInstances | rebootVirtualMachine |
| ec2-start-instances | StartInstances | startVirtualMachine |
| ec2-stop-instances | StopInstances | stopVirtualMachine |
| ec2-terminate-instances | TerminateInstances | destroyVirtualMachine |
表 6 实例属性对应表
| EC2命令 | SOAP调用 | CloudStack API调用 |
|---|---|---|
| ec2-describe-instance-attribute | DescribeInstanceAttribute | listVirtualMachines |
表 7 密钥对应表
| EC2命令 | SOAP调用 | CloudStack API调用 |
|---|---|---|
| ec2-add-keypair | CreateKeyPair | createSSHKeyPair |
| ec2-delete-keypair | DeleteKeyPair | deleteSSHKeyPair |
| ec2-describe-keypairs | DescribeKeyPairs | listSSHKeyPairs |
| ec2-import-keypair | ImportKeyPair | registerSSHKeyPair |
表 8.密码API对应表
| EC2命令 | SOAP调用 | CloudStack API调用 |
|---|---|---|
| ec2-get-password | GetPasswordData | getVMPassword |
表 9.安全组API对应表
| EC2命令 | SOAP调用 | CloudStack API调用 |
|---|---|---|
| ec2-authorize | AuthorizeSecurityGroupIngress | authorizeSecurityGroupIngress |
| ec2-add-group | CreateSecurityGroup | createSecurityGroup |
| ec2-delete-group | DeleteSecurityGroup | deleteSecurityGroup |
| ec2-describe-group | DescribeSecurityGroups | listSecurityGroups |
| ec2-revoke | RevokeSecurityGroupIngress | revokeSecurityGroupIngress |
表 10.快照API对应表
| EC2命令 | SOAP调用 | CloudStack API调用 |
|---|---|---|
| ec2-create-snapshot | CreateSnapshot | createSnapshot |
| ec2-delete-snapshot | DeleteSnapshot | deleteSnapshot |
| ec2-describe-snapshots | DescribeSnapshots | listSnapshots |
表 11.卷API对应表
| EC2命令 | SOAP调用 | CloudStack API调用 |
|---|---|---|
| ec2-attach-volume | AttachVolume | attachVolume |
| ec2-create-volume | CreateVolume | createVolume |
| ec2-delete-volume | DeleteVolume | deleteVolume |
| ec2-describe-volume | DescribeVolume | listVolumes |
| ec2-detach-volume | DetachVolume | detachVolume |
示例
有很多工具可以提供接入AWS兼容API。本节中将提供CloudStack用户一些使用用例。
Boto示例
Boto是其中一个。Python包可以在 https://github.com/boto/boto 获取。本节中提供两个使用Boto并已被CloudStack AWS API接口测试过的Python脚本示例。
第一个是EC2示例,将访问和加密密钥改成你自己的,并更新端。
示例1.EC2 Boto示例
#!/usr/bin/env python

import sys
import os
import boto
import boto.ec2

region = boto.ec2.regioninfo.RegionInfo(name="ROOT",endpoint="localhost")
apikey='GwNnpUPrO6KgIdZu01z_ZhhZnKjtSdRwuYd4DvpzvFpyxGMvrzno2q05MB0ViBoFYtdqKd'
secretkey='t4eXLEYWw7chBhDlaKf38adCMSHx_wlds6JfSx3z9fSpSOm0AbP9Moj0oGIzy2LSC8iw'

def main():
    '''Establish connection to EC2 cloud'''
    conn = boto.connect_ec2(aws_access_key_id=apikey,
                            aws_secret_access_key=secretkey,
                            is_secure=False,
                            region=region,
                            port=7080,
                            path="/awsapi",
                            api_version="2010-11-15")

    '''Get list of images that I own'''
    images = conn.get_all_images()
    print images
    myimage = images[0]
    '''Pick an instance type'''
    vm_type='m1.small'
    reservation = myimage.run(instance_type=vm_type,security_groups=['default'])

if __name__ == '__main__':
     main()
第二个是S3示例。S3接口在CloudStack中已被废弃。如果要使用,需要考察下RiakCS,Ceph或者GlusterFS系统。这个示例已完成并可用于其他S3端。
示例2.S3 Boto示例
#!/usr/bin/env python

import sys
import os
from boto.s3.key import Key
from boto.s3.connection import S3Connection
from boto.s3.connection import OrdinaryCallingFormat

apikey='ChOw-pwdcCFy6fpeyv6kUaR0NnhzmG3tE7HLN2z3OB_s-ogF5HjZtN4rnzKnq2UjtnHeg_yLA5gOw'
secretkey='IMY8R7CJQiSGFk4cHwfXXN3DUFXz07cCiU80eM3MCmfLs7kusgyOfm0g9qzXRXhoAPCH-IRxXc3w'

cf=OrdinaryCallingFormat()

def main():
    '''Establish connection to S3 service'''
    conn = S3Connection(aws_access_key_id=apikey,aws_secret_access_key=secretkey, \
                        is_secure=False, \
                        host='localhost', \
                        port=7080, \
                        calling_format=cf, \
                        path="/awsapi/rest/AmazonS3")

    try:
        bucket=conn.create_bucket('cloudstack')
        k = Key(bucket)
        k.key = 'test'
        try:
            k.set_contents_from_filename('/Users/runseb/Desktop/s3cs.py')
        except:
            print 'could not write file'
            pass
    except:
        bucket = conn.get_bucket('cloudstack')
        k = Key(bucket)
        k.key = 'test'
        try:
            k.get_contents_to_filename('/Users/runseb/Desktop/foobar')
        except:
            print 'Could not get file'
            pass

    try:
        bucket1=conn.create_bucket('teststring')
        k=Key(bucket1)
        k.key('foobar')
        k.set_contents_from_string('This is my silly test')
    except:
        bucket1=conn.get_bucket('teststring')
        k = Key(bucket1)
        k.key='foobar'
        k.get_contents_as_string()

if __name__ == '__main__':
    main()
Adding new Guest Physical Network to existing Zone
In some cases it might be necessary to add additional Guest Physical Network to already existing Advanced Zone. One example might be that we have been running Zone with Guest Physical Network that uses VXLAN as isolation method (i.e. KVM traffic label set to “bond.150), and we also need to start using Private Gateway functionality, which would not work with current Guest Physical Network Traffic Label (for explanation why this would not work, please see “adding-priv-gw-vpc”.
So in example below, we would like to create new Guest Physical Network (Traffic Label set to “bond0” in this example) and later use this Guest Physical Network for other purposes (to provision Private Gateways on top of it)
Depending on the CloudStack version, we can probably accomplish this only by API commands (i.e. CloudMonkey) and direct database changes.
First obtain Zone ID, and then create Physical Network command:
cloudmonkey> list zones filter=id | grep id | head -n1
cloudmonkey> create physicalnetwork name="bond0 Private Gateways" broadcastdomainrange=zone zoneid=xxxxxx isolationmethod=VLAN
where “xxxxxxx” is the proper zone ID (output from the first command above).
Here we created new Physical Network (not yet of any type…) inside given zone.
Please note that new Physical Network can not be added, while Zone is in Enabled state!
It is safe to disable Zone (for few seconds) which will just prevent users from provisioning new resources in this Zone, then create Physical Network per instructions from above, and then enable the Zone (this can be done via GUI or CloudMonkey).
Since Physical Network is in Disabled state by default, we need to enable it by:
cloudmonkey> list physicalnetworks name="bond0 Private Gateways" | grep id | head -n1
cloudmonkey> update physicalnetwork state=Enabled id=xxxxx
where xxxxx is the correct ID of Physical Network (output from the first command above).
After Physical Network is created, although we selected VLAN as isolation method, it may happen (depending on CloudStack version) that there will be no DB record created (which defines VLAN as isolation method for this new network), so we need to check this and fix it:
cloudmonkey> list physicalnetworks name="bond0 Private Gateways" | grep isolationmethods
If above commands gives no output, that means that VLAN was not set as Isolation Method inside DB, in cloud.physical_network_isolation_methods table, so we need to set it:
mysql> select id from cloud.physical_network where name="bond0 Private Gateways"
mysql> select max(id) from cloud.physical_network_isolation_methods;
Write down the id and max(id) values (i.e. 204, 10)
mysql> INSERT INTO cloud.physical_network_isolation_methods (id, physical_network_id, isolation_method) VALUES ('11', '204', 'VLAN');
where 11 is actually the next number after the max(id) value, and 204 is the ID of the Physical Network (check the image below)
Now, that we have set correct Isolation Method for the new Physical Network, and enabled it, we also need to do most critical part, to define that this Physical Network caries Guest traffic. This action is also done via database change.
We want to effectively clone the existing Guest network row from cloud.physical_network_traffic_types table, and then change needed values: ID, UUID, PHYSICAL_NETWORK_ID and KVM_NETWORK_LABEL (in our case, we are using KVM, but same goes for other HyperVisor types)
After this last step, we are ready to tag these 2 Guest Physical Networks and Network Offerings (regular ones for VPC Guest networks, and the special one used for Private Gateways) and then use these two Guest Networks as originally planned.
For more details on Network tagging, please see “adding-priv-gw-vpc”.