Working With Templates
A Template is a reusable configuration for Instances. When Users launch Instances, they can choose from a list of Templates in CloudStack.
Specifically, a Template is a virtual disk image that includes one of a variety of operating systems, optional additional software such as office applications, and settings such as access control to determine who can use the Template. Each Template is associated with a particular type of hypervisor, which is specified when the Template is added to CloudStack.
CloudStack ships with a default Template. In order to present more choices to Users, CloudStack administrators and Users can create Templates and add them to CloudStack.
Creating Templates: Overview
CloudStack ships with a default Template for the CentOS operating system. There are a variety of ways to add more Templates. Administrators and end Users can add Templates. The typical sequence of events is:
Launch an Instance that has the operating system you want. Make any other desired configuration changes to the Instance.
Stop the Instance.
Convert the volume into a Template.
There are other ways to add Templates to CloudStack. For example, you can take a Snapshot of the Instance’s volume and create a Template from the Snapshot, or import a VHD from another system into CloudStack.
The various techniques for creating Templates are described in the next few sections.
Requirements for Templates
For XenServer, install PV drivers / Xen tools on each Template that you create. This will enable live migration and clean guest shutdown.
For vSphere, install VMware Tools on each Template that you create. This will enable console view to work properly.
Best Practices for Templates
If you plan to use large Templates (100 GB or larger), be sure you have a 10-gigabit Network to support the large Templates. A slower Network can lead to timeouts and other errors when large Templates are used.
The Default Template
CloudStack includes a CentOS Template. This Template is downloaded by the Secondary Storage VM after the primary and secondary storage are configured. You can use this Template in your production deployment or you can delete it and use custom Templates.
The root password for the default Template is “password”.
A default Template is provided for each of XenServer, KVM, and vSphere. The Templates that are downloaded depend on the hypervisor type that is available in your cloud. Each Template is approximately 2.5 GB physical size.
The default Template includes the standard iptables rules, which will block most access to the Template excluding ssh.
# iptables --list
Chain INPUT (policy ACCEPT)
target     prot opt source               destination
RH-Firewall-1-INPUT  all  --  anywhere             anywhere

Chain FORWARD (policy ACCEPT)
target     prot opt source               destination
RH-Firewall-1-INPUT  all  --  anywhere             anywhere

Chain OUTPUT (policy ACCEPT)
target     prot opt source               destination

Chain RH-Firewall-1-INPUT (2 references)
target     prot opt source               destination
ACCEPT     all  --  anywhere             anywhere
ACCEPT     icmp --  anywhere        anywhere       icmp any
ACCEPT     esp  --  anywhere        anywhere
ACCEPT     ah   --  anywhere        anywhere
ACCEPT     udp  --  anywhere        224.0.0.251    udp dpt:mdns
ACCEPT     udp  --  anywhere        anywhere       udp dpt:ipp
ACCEPT     tcp  --  anywhere        anywhere       tcp dpt:ipp
ACCEPT     all  --  anywhere        anywhere       state RELATED,ESTABLISHED
ACCEPT     tcp  --  anywhere        anywhere       state NEW tcp dpt:ssh
REJECT     all  --  anywhere        anywhere       reject-with icmp-host-
Private and Public Templates
When a User creates a Template, it can be designated private or public.
Private Templates are only available to the User who created them. By default, an uploaded Template is private.
When a User marks a Template as “public,” the Template becomes available to all Users in all Accounts in the User’s domain, as well as Users in any other domains that have access to the Zone where the Template is stored. This depends on whether the Zone, in turn, was defined as private or public. A private Zone is assigned to a single domain, and a public Zone is accessible to any domain. If a public Template is created in a private Zone, it is available only to Users in the domain assigned to that Zone. If a public Template is created in a public Zone, it is available to all Users in all domains.
Creating a Template from an Existing Instance
Once you have at least one Instance set up in the way you want, you can use it as the prototype for other Instances.
Create and start an Instance using any of the techniques given in “Creating Instances”.
Make any desired configuration changes on the running Instance, then click Stop.
Wait for the Instance to stop. When the status shows Stopped, go to the next step.
Go into “View Volumes” and select the Volume having the type “ROOT”.
Click Create Template and provide the following:
Name and Display Text. These will be shown in the UI, so choose something descriptive.
OS Type. (Except for VMware). This helps CloudStack and the hypervisor perform certain operations and make assumptions that improve the performance of the guest. Select one of the following.
If the operating system of the stopped Instance is listed, choose it.
If the OS type of the stopped Instance is not listed, choose Other.
If you want to boot from this Template in PV mode, choose Other PV (32-bit) or Other PV (64-bit). This choice is available only for XenServer:
Note
Generally you should not choose an older version of the OS than the version in the image. For example, choosing CentOS 5.4 to support a CentOS 6.2 image will in general not work. In those cases you should choose Other.
Public. Choose Yes to make this Template accessible to all Users of this CloudStack installation. The Template will appear in the Community Templates list. See “Private and Public Templates”.
Password Enabled. Choose Yes if your Template has the CloudStack password change script installed. See Adding Password Management to Your Templates.
Click Add.
The new Template will be visible in the Templates section when the Template creation process has been completed. The Template is then available when creating a new Instance.
Note
Since version 4.15, CloudStack obtains information from the VMware Templates automatically at registration time. If a Template contains different deployment options (or configurations) as in the case of virtual appliances, then CloudStack display the information required by the Template, allowing Users or administrators to configure their Instances.
Creating a Template from a Snapshot
If you do not want to stop the Instance in order to use the Create Template menu item (as described in “Creating a Template from an Existing Instance”), you can create a Template directly from any Snapshot through the CloudStack UI.
Uploading Templates from a remote HTTP server
vSphere Templates and ISOs
Warning
If you are uploading a Template that was created using vSphere Client, be sure the OVA file does not contain an ISO. If it does, the deployment of Instances from the Template will fail
Templates are uploaded based on a URL. HTTP is the supported access protocol. Templates are frequently large files. You can optionally gzip them to decrease upload times.
To upload a Template:
In the left navigation bar, click Templates.
Click Register Template.
Provide the following:
Name and Description. These will be shown in the UI, so choose something descriptive.
URL. The Management Server will download the file from the specified URL, such as
http://my.web.server/filename.vhd.gz.Zone. Choose the zone where you want the Template to be available, or All Zones to make it available throughout CloudStack.
Read Instance settings from OVA. (VMware only) If selected, the registered Template will allow Users to deploy Instances as clones of the Template, including all their properties, configurations, end-user license agreements, disks, os type, etc. This option allows Users to register virtual appliances. See Support for Virtual Appliances.
Note
When this option is selected the following fields are hidden: Root disk controller, Keyboard type and OS Type.
OS Type: This helps CloudStack and the hypervisor perform certain operations and make assumptions that improve the performance of the guest. Select one of the following:
If the operating system of the stopped Instance is listed, choose it.
If the OS type of the stopped Instance is not listed, choose Other.
Note
You should not choose an older version of the OS than the version in the image. For example, choosing CentOS 5.4 to support a CentOS 6.2 image will in general not work. In those cases you should choose Other.
Note
Since version 4.15.1, VMware Templates do not allow Users or administrators selecting an OS Type when registering a Template if the option ‘Read Instance settings from OVA’ is selected. In this case, the OS Type is obtained from the Template after it is registered.
Tag: The tag for the template. This tag can be used with host tags to allow deployment of Instances on specific hosts.
User Data: The registered User Data entries are listed. Select the desired one.
User Data link policy: Select the User Data override policy as required. For more information on User Data and override link policy, please check User Data section.
Hypervisor: The supported hypervisors are listed. Select the desired one.
Arch: The supported arch types are listed. Select the desired one.
Format. The format of the Template upload file, such as VHD or OVA.
Extractable. Choose Yes if the Template is available for extraction. If this option is selected, end Users can download a full image of a Template.
Public. Choose Yes to make this Template accessible to all Users of this CloudStack installation. The Template will appear in the Community Templates list. See “Private and Public Templates”.
Featured. Choose Yes if you would like this Template to be more prominent for Users to select. The Template will appear in the Featured Templates list. Only an administrator can make a Template Featured.
Note that uploading multi-disk Templates is also supported.
Note
VMware only: If the Template is registered with the option ‘Read Instance settings from OVA’ then the Instance deployment wizard will display all the available OVF properties, different deployment options or configurations, multiple NICs or end-user license agreements.
Bypassing Secondary Storage For KVM Templates
CloudStack provides an additional way to register and use Templates on KVM.
Instead of registering a Template and storing it on secondary storage, the user can opt to skip downloading the Template to secondary storage for KVM at Template registration. At deployment time, the Template is downloaded directly to primary storage from the registered source, instead of being copied from secondary storage.
Supported protocols: HTTP/HTTPS, NFS and metalinks. The protocol is obtained from the Template URL.
To enable this option for a Template:
In the left navigation bar, click Templates.
Click Register Template.
Select KVM as hypervisor:
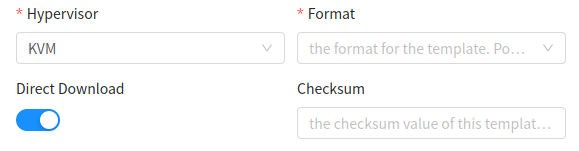
Direct Download. This option will be shown in the UI when KVM is selected as the hypervisor. Choose Yes to enable the bypassing secondary storage option.
Checksum. Optional field. If this field is populated, the checksum is compared to the downloaded Template checksum when the Template is downloaded to primary storage at deployment time.
After the Template is registered, it is automatically available for instance deployments.
From CloudStack 4.14.0, system VM Templates also support direct download. An administrator can register a new system VM Template as ROUTING or USER type with the direct download flag, and it can be changed to SYSTEM type during the upgrade or by out-of-band database changes. Type of newly registered Template can be changed to SYSTEM in the database using a SQL query similar to:
UPDATE cloud.vm_template SET type=’SYSTEM’ WHERE uuid=’UUID_OF_NEW_TEMPLATE’;
Uploading Certificates for Direct Downloads
For direct downloads over HTTPS, the KVM hosts must have valid certificates. These certificates can be either self-signed or signed and will allow the KVM hosts to access the Templates/ISOs and download them.
CloudStack provides some APIs to handle certificates for direct downloads:
Upload a certificate to hosts in ‘Up’ state in a zone with id = ZONE_ID:
upload templatedirectdownloadcertificate hypervisor=KVM name=CERTIFICATE_ALIAS zoneid=ZONE_ID certificate=CERTIFICATE_FORMATTED
- where:
CERTIFICATE_FORMATTED is the string format of a X509 certificate
CERTIFICATE_ALIAS is the alias which will be used to import the certificate on each KVM host
Note:. These certificates are imported into the /etc/cloudstack/agent/cloud.jks keystore on each KVM host.
Revoke a certificate from every host in ‘Up’ state in a zone with id = ZONE_ID:
revoke templatedirectdownloadcertificate hypervisor=KVM name=CERTIFICATE_ALIAS zoneid=ZONE_ID
It is also possible to revoke a certificate from a specific host within a zone:
revoke templatedirectdownloadcertificate hypervisor=KVM name=CERTIFICATE_ALIAS zoneid=ZONE_ID hostid=HOST_ID
After a certificate is revoked from a host within a zone, it can be re-uploaded to the host:
upload templatedirectdownloadcertificate hypervisor=KVM name=CERTIFICATE_ALIAS zoneid=ZONE_ID certificate=CERTIFICATE_FORMATTED hostid=HOST_ID
Synchronising Certificates for Direct Downloads
As new hosts may be added to a zone which do not include a certificate which was previously uploaded to pre-existing hosts.
CloudStack provides a way to synchronize certificates across all the connected hosts in each zone. The global setting ‘direct.download.certificate.background.task.interval’ defines the interval in which the synchronization task will run. This task will:
Iterate through each enabled zone
Enumerate the connected hosts in a zone
Check which hosts are missing the certificates which have been already uploaded to other hosts
Upload missing certificates to hosts
Direct Download Timeouts
With 4.14.0, ability to configure different timeout values for the direct downloading of Templates has been added. Three new global settings have been added for this:
direct.download.connect.timeout - Connection establishment timeout in milliseconds for direct download. Default value: 5000 milliseconds.
direct.download.socket.timeout - Socket timeout (SO_TIMEOUT) in milliseconds for direct download. Default value: 5000 milliseconds.
direct.download.connection.request.timeout - Requesting a connection from connection manager timeout in milliseconds for direct download. Default value: 5000 milliseconds. This setting is hidden and not visible in UI.
Uploading Templates and ISOs from a local computer
It’s also possible to upload an already prepared Template or an ISO from your local computer. The steps are similar as when Uploading a Template/ISO from a remote HTTP server, except that you need to choose a local Template/ISO file from your PC. For this feature to work, your SSVMs must be supporting HTTPS (for more info please visit “Using a SSL Certificate for the Console Proxy”).
Example GUI dialog of uploading Template/ISO from local (browser) is given below:
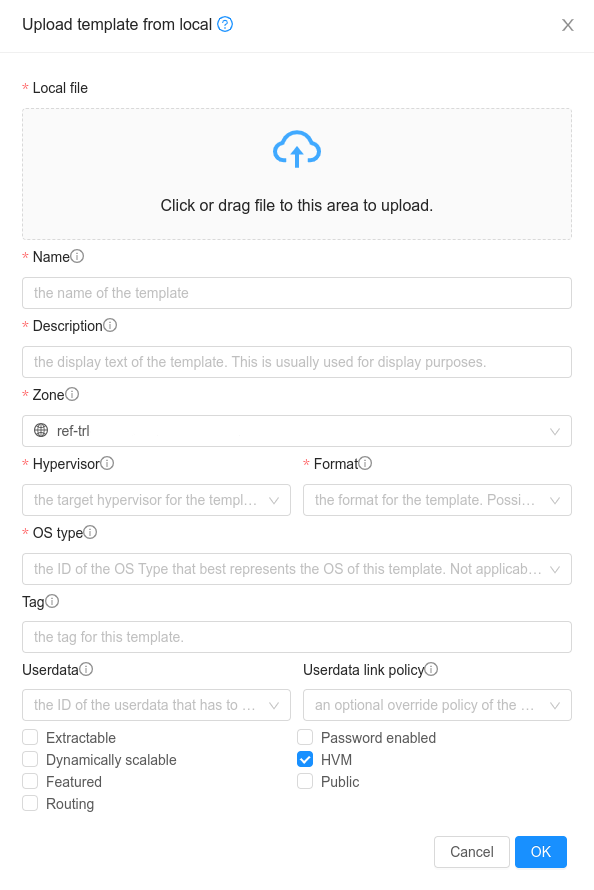
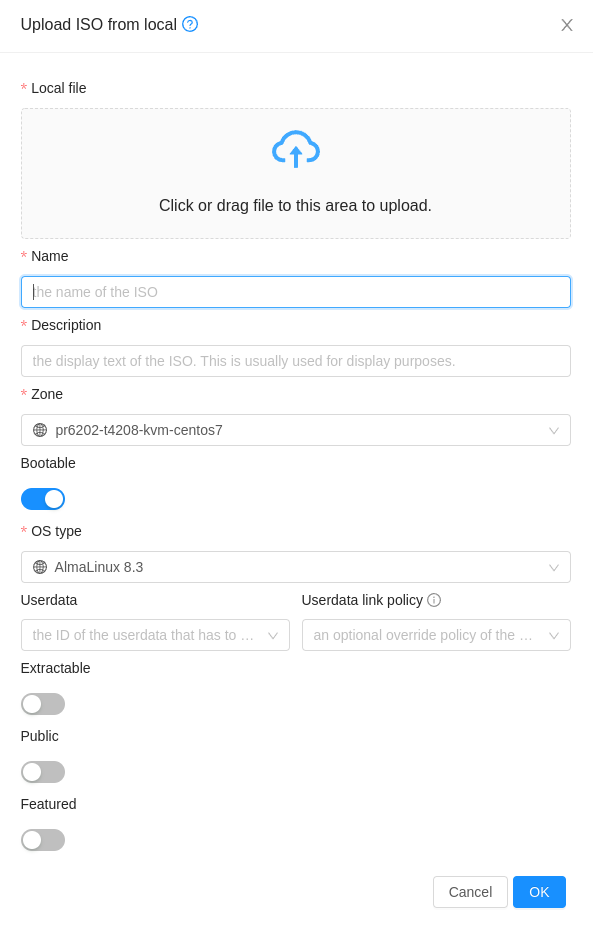
Note that uploading multi-disk Templates is also supported as well as selecting the template/ISO arch type.
Sharing Templates and ISOs with other Accounts/projects
When adding a Template/ISO, the owner can choose to make Template/ISO public or to keep it private. Once the Template/ISO is created, the owner can choose to share this Template/ISO so that other Accounts/Projects can also use the Template/ISO.
- Currently, the owners can share their Template/ISO with:
other Accounts inside their own domain (i.e. can’t share the Template/ISO with other Accounts in the subdomain of their domain or any other domains)
projects where they belongs to (i.e. projects where they are the owners/creators or other projects where they have been joined)
Template/ISO permissions can be changed via updateTemplatePermissions/updateIsoPermissions API call or via GUI. It is supported to add, remove or reset (remove all) Template/ISO permissions.
When adding or removing permissions to/from a Template/ISO, it is required to specify Account/Project name which is being added/removed from the Template/ISO permissions.
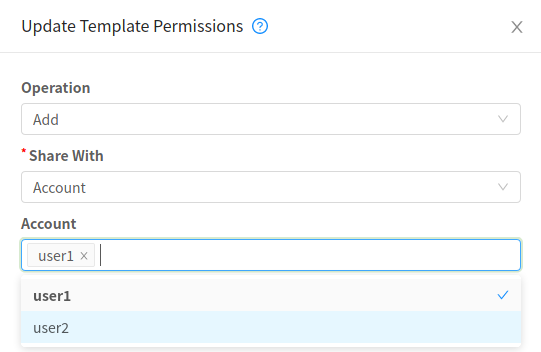
Global setting “allow.user.view.all.domain.accounts” has a default value of “false”. This makes sure that when the regular Users (of a “User” role) wants to share a Template/ISO via GUI, they will not be shown the list of all Accounts in their domain and they will need to know the name of the destination Account with which they are sharing the Template/ISO. This makes sense in public clouds where each Account of a single domain is a different tenant/customer and privacy is imperative. In this case, the User will be presented with an input field to enter the Account name, as on the images below:
Warning
The images displayed below refer to Template permissions, but the same applies for ISO permissions.

Sharing the Template with Account “user2”
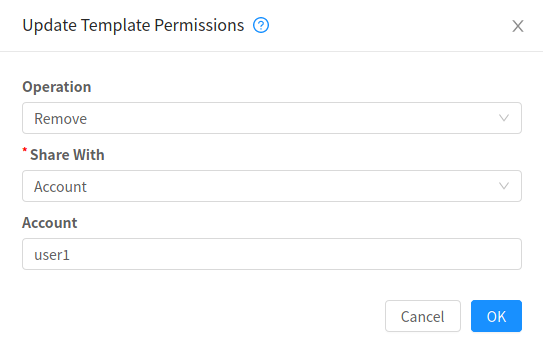
Revoking permissions from Account “user2”
But in environments where privacy within a domain is not an issue, setting “allow.user.view.all.domain.accounts” setting to “true” will make sure that the User, who is sharing the Template, will be presented a more User-friendly multi-select list, listing all the Accounts in their domain. This is shown in the images below;
Sharing the Template with just Account “user8”
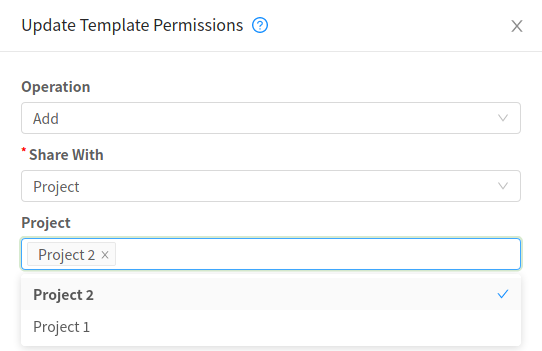
Sharing Template with 2 specific projects
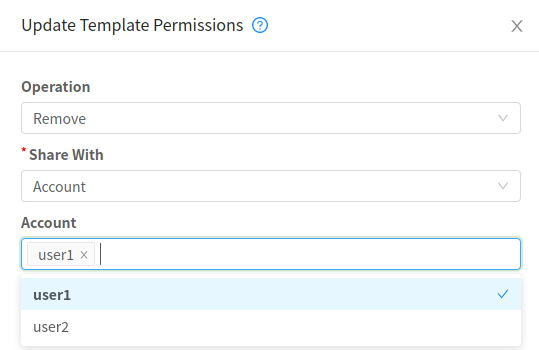
Revoking permissions from Account “user8”

Revoking permissions from both projects previously added
Finally, Template permissions can be reset:
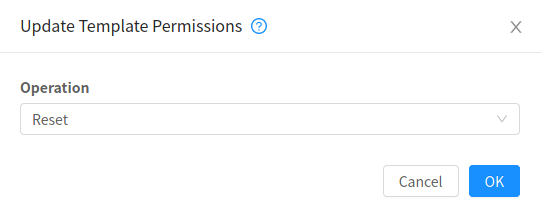
Resetting (removing all) permissions
Warning
Project-owned Templates are not supported to be shared outside of the Project, and if attempted to do so, a proper error message is shown.
Exporting Templates
End Users and Administrators may export Templates from the CloudStack. Navigate to the Template in the UI and choose the Download function from the Actions menu.
Creating a Linux Template
Linux Templates should be prepared using this documentation in order to prepare your linux Instances for Template deployment. For ease of documentation, the Instance which you are configuring the Template on will be referred to as “Main Template”. The final product, as created and usable for deployment in Cloudstack, will be referred as “Final Template”. This guide will cover cloud-init setup and scripted setups where available. It is assumed that openssh-server is installed during installation.
An overview of the procedure is as follow:
Upload your Linux ISO.
For more information, see Adding an ISO.
Create an Instance with this ISO.
For more information, see “Creating Instances”.
Prepare the Linux Instance
Create a Template from the Instance.
For more information, see “Creating a Template from an Existing Instance”.
System preparation for Linux
The following steps will provide basic Linux installation for templating of Centos and Ubuntu.
Update OS
The next step update the packages on the Main Template.
~ CentOS
yum update -y
reboot
~ Ubuntu
sudo -i
apt-get update
apt-get upgrade -y
apt-get install -y acpid ntp
reboot
Networking
Set Template Network interface configuration to DHCP so Cloudstack infrastructure can assign one on boot.
Warning
For CentOS, it is mandatory to take unique identification out of the interface configuration file /etc/sysconfig/network-scripts/ifcfg-eth0. Any entries starting with <VALUE> should be removed.
~ Centos
echo "DEVICE=eth0
TYPE=Ethernet
BOOTPROTO=dhcp
ONBOOT=yes" > /etc/sysconfig/network-scripts/ifcfg-eth0
Hostname Management
Set a generic name to the Template Instance during installation, this will ensure components such as LVM do not appear unique to a machine. It is recommended that the name of “localhost” is used for installation.
hostname localhost
echo "localhost" > /etc/hostname
Password management
Note
It is a good practice to remove any non root Users that come with the OS (such as ones created during the Ubuntu installation). First ensure the root user Account is enabled by giving it a password and then login as root to continue.
Once logged in as root, any custom User can be removed.
deluser myuser --remove-home
User password management and reset capabilities in GUI are available with:
Adding Password Management to Your Templates /Legacy for non systemd systems only/
SSH keys management
Cloudstack can create key pair and push certificates to Instances. This feature is available with:
Partition management
Volumes can autorextend after reboot when partition is extended in the GUI. This feature is possible with Cloud-init integration.
User Data
Cloudstack can push User Data during Instance creation. This feature is possible with Cloud-init integration.
Template cleanup
Warning
Cleanup steps should be run when all Main Template configuration is done and just before the shutdown step. After shut down Final Template should be created. If the Main Template is started or rebooted before Final Template creation all cleanup steps have to be rerun.
Remove the udev persistent device rules
This step removes information unique to the Main Template such as Network MAC addresses, lease files and CD block devices, the files are automatically generated on next boot.
~ CentOS
rm -f /etc/udev/rules.d/70*
rm -f /var/lib/dhclient/*
~ Ubuntu
rm -f /etc/udev/rules.d/70*
rm -f /var/lib/dhcp/dhclient.*
Remove SSH Keys
This step is to ensure all Templated Instances do not have the same SSH keys, which would decrease the security of the machines dramatically.
rm -f /etc/ssh/*key*
Cleaning log files
It is good practice to remove old logs from the Main Template.
cat /dev/null > /var/log/audit/audit.log 2>/dev/null
cat /dev/null > /var/log/wtmp 2>/dev/null
logrotate -f /etc/logrotate.conf 2>/dev/null
rm -f /var/log/*-* /var/log/*.gz 2>/dev/null
Set User password to expire
This step forces the User to change the password of the Instance after the Template has been deployed.
passwd --expire root
Clearing User History
The next step clears the bash commands you have just run.
history -c
unset HISTFILE
Shutdown the Instance
Shutdown the Main Template.
halt -pCreate the Template!
You are now ready to create the Final Template, for more information see Creating a Template from an Existing Instance.
Creating a Windows Template
Windows Templates must be prepared with Sysprep before they can be provisioned on multiple machines. Sysprep allows you to create a generic Windows Template and avoid any possible SID conflicts.
Note
(XenServer) Windows instances running on XenServer require PV drivers, which may be provided in the Template or added after the instance is created. The PV drivers are necessary for essential management functions such as mounting additional volumes and ISO images, live migration, and graceful shutdown.
An overview of the procedure is as follows:
Upload your Windows ISO.
For more information, see Adding an ISO.
Create an instance with this ISO.
For more information, see “Creating instances”.
Add Virtual TPM device to the instance.
For more information, see “Instance Settings for Virtual Trusted Platform Module (vTPM) ”.
Follow the steps in Sysprep for Windows Server 2008 R2 (below) or Sysprep for Windows Server 2003 R2, depending on your version of Windows Server
The preparation steps are complete. Now you can actually create the Template as described in Creating the Windows Template.
System Preparation for Windows Server 2008 R2
For Windows 2008 R2, you run Windows System Image Manager to create a custom sysprep response XML file. Windows System Image Manager is installed as part of the Windows Automated Installation Kit (AIK). Windows AIK can be downloaded from Microsoft Download Center.
Use the following steps to run sysprep for Windows 2008 R2:
Note
The steps outlined here are derived from the excellent guide by Charity Shelbourne, originally published at Windows Server 2008 Sysprep Mini-Setup.
Download and install the Windows AIK
Note
Windows AIK should not be installed on the Windows 2008 R2 instance you just created. Windows AIK should not be part of the Template you create. It is only used to create the sysprep answer file.
Copy the install.wim file in the \sources directory of the Windows 2008 R2 installation DVD to the hard disk. This is a very large file and may take a long time to copy. Windows AIK requires the WIM file to be writable.
Start the Windows System Image Manager, which is part of the Windows AIK.
In the Windows Image pane, right click the Select a Windows image or catalog file option to load the install.wim file you just copied.
Select the Windows 2008 R2 Edition.
You may be prompted with a warning that the catalog file cannot be opened. Click Yes to create a new catalog file.
In the Answer File pane, right click to create a new answer file.
Generate the answer file from the Windows System Image Manager using the following steps:
The first page you need to automate is the Language and Country or Region Selection page. To automate this, expand Components in your Windows Image pane, right-click and add the Microsoft-Windows-International-Core setting to Pass 7 oobeSystem. In your Answer File pane, configure the InputLocale, SystemLocale, UILanguage, and UserLocale with the appropriate settings for your language and country or region. Should you have a question about any of these settings, you can right-click on the specific setting and select Help. This will open the appropriate CHM help file with more information, including examples on the setting you are attempting to configure.

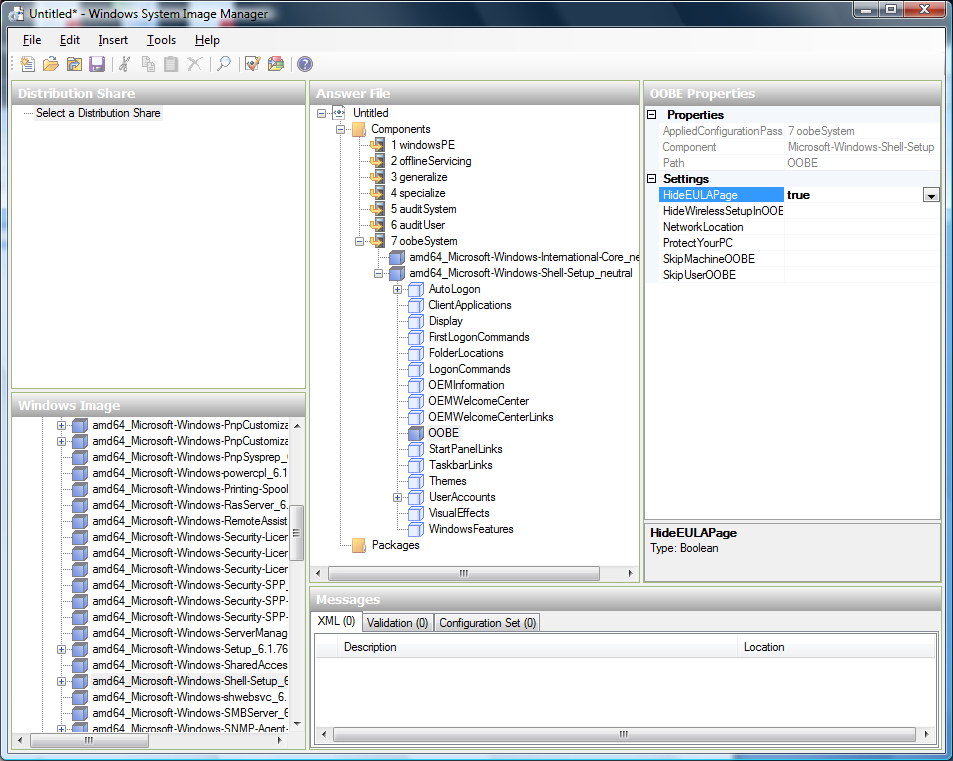
You need to automate the Software License Terms Selection page, otherwise known as the End-User License Agreement (EULA). To do this, expand the Microsoft-Windows-Shell-Setup component. High-light the OOBE setting, and add the setting to the Pass 7 oobeSystem. In Settings, set HideEULAPage true.
Make sure the license key is properly set. If you use MAK key, you can just enter the MAK key on the Windows 2008 R2 instance. You need not input the MAK into the Windows System Image Manager. If you use KMS host for activation you need not enter the Product Key. Details of Windows Volume Activation can be found at http://technet.microsoft.com/en-us/library/bb892849.aspx
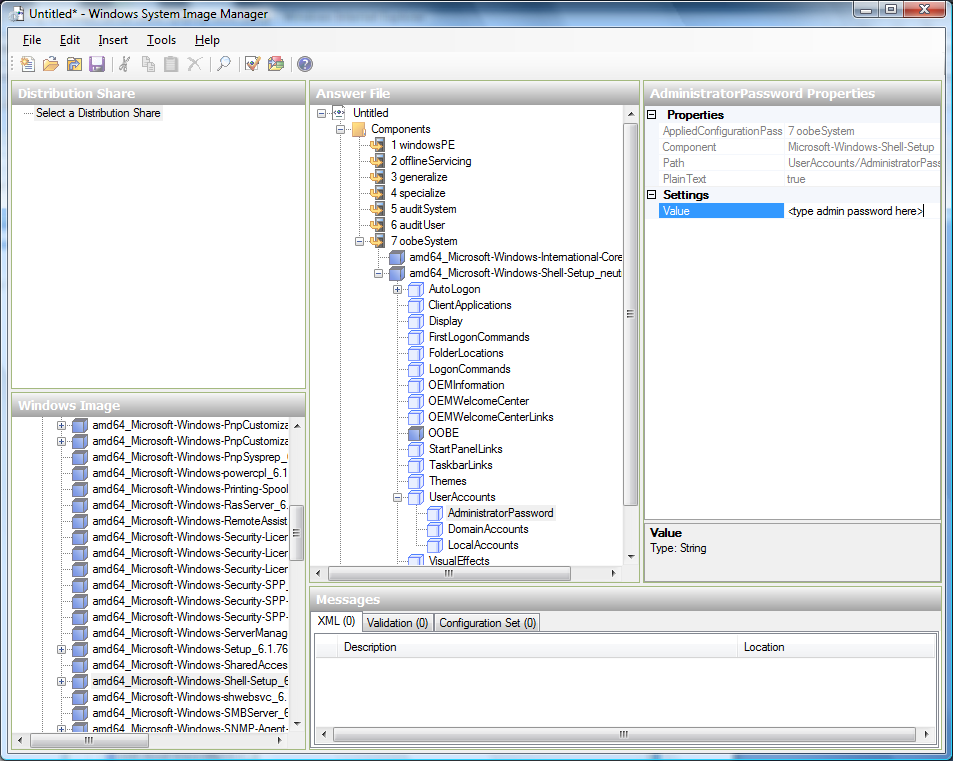
You need to automate is the Change Administrator Password page. Expand the Microsoft-Windows-Shell-Setup component (if it is not still expanded), expand UserAccounts, right-click on AdministratorPassword, and add the setting to the Pass 7 oobeSystem configuration pass of your answer file. Under Settings, specify a password next to Value.
You may read the AIK documentation and set many more options that suit your deployment. The steps above are the minimum needed to make Windows unattended setup work.
Save the answer file as unattend.xml. You can ignore the warning messages that appear in the validation window.
Copy the unattend.xml file into the c:\windows\system32\sysprep directory of the Windows 2008 R2 Instance
Once you place the unattend.xml file in c:\windows\system32\sysprep directory, you run the sysprep tool as follows:
cd c:\Windows\System32\sysprep
sysprep.exe /oobe /generalize /shutdown
The Windows 2008 R2 instance will automatically shut down after sysprep is complete.
System Preparation for Windows Server 2003 R2
Earlier versions of Windows have a different sysprep tool. Follow these steps for Windows Server 2003 R2.
Extract the content of \support\tools\deploy.cab on the Windows installation CD into a directory called c:\sysprep on the Windows 2003 R2 instance.
Run c:\sysprep\setupmgr.exe to create the sysprep.inf file.
Select Create New to create a new Answer File.
Enter “Sysprep setup” for the Type of Setup.
Select the appropriate OS version and edition.
On the License Agreement screen, select “Yes fully automate the installation”.
Provide your name and organization.
Leave display settings at default.
Set the appropriate time zone.
Provide your product key.
Select an appropriate license mode for your deployment
Select “Automatically generate computer name”.
Type a default administrator password. If you enable the password reset feature, the users will not actually use this password. This password will be reset by the instance manager after the guest boots up.
Leave Network Components at “Typical Settings”.
Select the “WORKGROUP” option.
Leave Telephony options at default.
Select appropriate Regional Settings.
Select appropriate language settings.
Do not install printers.
Do not specify “Run Once commands”.
You need not specify an identification string.
Save the Answer File as c:\sysprep\sysprep.inf.
Run the following command to sysprep the image:
c:\sysprep\sysprep.exe -reseal -mini -activated
After this step the machine will automatically shut down
Importing Amazon Machine Images
The following procedures describe how to import an Amazon Machine Image (AMI) into CloudStack when using the XenServer hypervisor.
Assume you have an AMI file and this file is called CentOS_6.2_x64. Assume further that you are working on a CentOS host. If the AMI is a Fedora image, you need to be working on a Fedora host initially.
You need to have a XenServer host with a file-based storage repository (either a local ext3 SR or an NFS SR) to convert to a VHD once the image file has been customized on the Centos/Fedora host.
Note
When copying and pasting a command, be sure the command has pasted as a single line before executing. Some document viewers may introduce unwanted line breaks in copied text.
To import an AMI:
Set up loopback on image file:
# mkdir -p /mnt/loop/centos62
# mount -o loop  CentOS_6.2_x64 /mnt/loop/centos54
Install the kernel-xen package into the image. This downloads the PV kernel and ramdisk to the image.
# yum -c /mnt/loop/centos54/etc/yum.conf --installroot=/mnt/loop/centos62/ -y install kernel-xenCreate a grub entry in /boot/grub/grub.conf.
# mkdir -p /mnt/loop/centos62/boot/grub
# touch /mnt/loop/centos62/boot/grub/grub.conf
# echo "" > /mnt/loop/centos62/boot/grub/grub.conf
Determine the name of the PV kernel that has been installed into the image.
# cd /mnt/loop/centos62
# ls lib/modules/
2.6.16.33-xenU  2.6.16-xenU  2.6.18-164.15.1.el5xen  2.6.18-164.6.1.el5.centos.plus  2.6.18-xenU-ec2-v1.0  2.6.21.7-2.fc8xen  2.6.31-302-ec2
# ls boot/initrd*
boot/initrd-2.6.18-164.6.1.el5.centos.plus.img boot/initrd-2.6.18-164.15.1.el5xen.img
# ls boot/vmlinuz*
boot/vmlinuz-2.6.18-164.15.1.el5xen  boot/vmlinuz-2.6.18-164.6.1.el5.centos.plus  boot/vmlinuz-2.6.18-xenU-ec2-v1.0  boot/vmlinuz-2.6.21-2952.fc8xen
Xen kernels/ramdisk always end with “xen”. For the kernel version you choose, there has to be an entry for that version under lib/modules, there has to be an initrd and vmlinuz corresponding to that. Above, the only kernel that satisfies this condition is 2.6.18-164.15.1.el5xen.
Based on your findings, create an entry in the grub.conf file. Below is an example entry.
default=0
timeout=5
hiddenmenu
title CentOS (2.6.18-164.15.1.el5xen)
   root (hd0,0)
   kernel /boot/vmlinuz-2.6.18-164.15.1.el5xen ro root=/dev/xvda
   initrd /boot/initrd-2.6.18-164.15.1.el5xen.img
Edit etc/fstab, changing “sda1” to “xvda” and changing “sdb” to “xvdb”.
# cat etc/fstab
/dev/xvda  /         ext3    defaults        1 1
/dev/xvdb  /mnt      ext3    defaults        0 0
none       /dev/pts  devpts  gid=5,mode=620  0 0
none       /proc     proc    defaults        0 0
none       /sys      sysfs   defaults        0 0
Enable login via the console. The default console device in a XenServer system is xvc0. Ensure that etc/inittab and etc/security have the following lines respectively:
# grep xvc0 etc/inittab
co:2345:respawn:/sbin/agetty xvc0 9600 vt100-nav
# grep xvc0 etc/security
xvc0
Ensure the ramdisk supports PV disk and PV network. Customize this for the kernel version you have determined above.
# chroot /mnt/loop/centos54
# cd /boot/
# mv initrd-2.6.18-164.15.1.el5xen.img initrd-2.6.18-164.15.1.el5xen.img.bak
# mkinitrd -f /boot/initrd-2.6.18-164.15.1.el5xen.img --with=xennet --preload=xenblk --omit-scsi-modules 2.6.18-164.15.1.el5xen
Change the password.
# passwd
Changing password for user root.
New UNIX password:
Retype new UNIX password:
passwd: all authentication tokens updated successfully.
Exit out of chroot.
# exitCheck etc/ssh/sshd_config for lines allowing ssh login using a password.
# egrep "PermitRootLogin|PasswordAuthentication" /mnt/loop/centos54/etc/ssh/sshd_config
PermitRootLogin yes
PasswordAuthentication yes
If you need the Template to be enabled to reset passwords from the CloudStack UI or API, install the password change script into the image at this point. See Adding Password Management to Your Templates.
Unmount and delete loopback mount.
# umount /mnt/loop/centos54
# losetup -d /dev/loop0
Copy the image file to your XenServer host’s file-based storage repository. In the example below, the Xenserver is “xenhost”. This XenServer has an NFS repository whose uuid is a9c5b8c8-536b-a193-a6dc-51af3e5ff799.
# scp CentOS_6.2_x64 xenhost:/var/run/sr-mount/a9c5b8c8-536b-a193-a6dc-51af3e5ff799/Log in to the Xenserver and create a VDI the same size as the image.
[root@xenhost ~]# cd /var/run/sr-mount/a9c5b8c8-536b-a193-a6dc-51af3e5ff799
[root@xenhost a9c5b8c8-536b-a193-a6dc-51af3e5ff799]#  ls -lh CentOS_6.2_x64
-rw-r--r-- 1 root root 10G Mar 16 16:49 CentOS_6.2_x64
[root@xenhost a9c5b8c8-536b-a193-a6dc-51af3e5ff799]# xe vdi-create virtual-size=10GiB sr-uuid=a9c5b8c8-536b-a193-a6dc-51af3e5ff799 type=user name-label="Centos 6.2 x86_64"
cad7317c-258b-4ef7-b207-cdf0283a7923
Import the image file into the VDI. This may take 10–20 minutes.
[root@xenhost a9c5b8c8-536b-a193-a6dc-51af3e5ff799]# xe vdi-import filename=CentOS_6.2_x64 uuid=cad7317c-258b-4ef7-b207-cdf0283a7923
Locate a the VHD file. This is the file with the VDI’s UUID as its name. Compress it and upload it to your web server.
[root@xenhost a9c5b8c8-536b-a193-a6dc-51af3e5ff799]# bzip2 -c cad7317c-258b-4ef7-b207-cdf0283a7923.vhd > CentOS_6.2_x64.vhd.bz2
[root@xenhost a9c5b8c8-536b-a193-a6dc-51af3e5ff799]# scp CentOS_6.2_x64.vhd.bz2 webserver:/var/www/html/templates/
Converting a Hyper-V Instance to a Template
To convert a Hyper-V Instance to a XenServer-compatible CloudStack Template, you will need a standalone XenServer host with an attached NFS VHD SR. Use whatever XenServer version you are using with CloudStack, but use XenCenter 5.6 FP1 or SP2 (it is backwards compatible to 5.6). Additionally, it may help to have an attached NFS ISO SR.
For Linux Instances, you may need to do some preparation in Hyper-V before trying to get the Instance to work in XenServer. Clone the Instance and work on the clone if you still want to use the Instance in Hyper-V. Uninstall Hyper-V Integration Components and check for any references to device names in /etc/fstab:
From the linux_ic/drivers/dist directory, run make uninstall (where “linux_ic” is the path to the copied Hyper-V Integration Components files).
Restore the original initrd from backup in /boot/ (the backup is named *.backup0).
Remove the “hdX=noprobe” entries from /boot/grub/menu.lst.
Check /etc/fstab for any partitions mounted by device name. Change those entries (if any) to mount by LABEL or UUID. You can get that information with the blkid command.
The next step is make sure the Instance is not running in Hyper-V, then get the VHD into XenServer. There are two options for doing this.
Option one:
Import the VHD using XenCenter. In XenCenter, go to Tools>Virtual Appliance Tools>Disk Image Import.
Choose the VHD, then click Next.
Name the Instance, choose the NFS VHD SR under Storage, enable “Run Operating System Fixups” and choose the NFS ISO SR.
Click Next, then Finish. An Instance should be created.
Option two:
Run XenConvert, under From choose VHD, under To choose XenServer. Click Next.
Choose the VHD, then click Next.
Input the XenServer host info, then click Next.
Name the Instance, then click Next, then Convert. An Instance should be created.
Once you have an Instance created from the Hyper-V VHD, prepare it using the following steps:
Boot the Instance, uninstall Hyper-V Integration Services, and reboot.
Install XenServer Tools, then reboot.
Prepare the Instance as desired. For example, run sysprep on Windows Instances. See “Creating a Windows Template”.
Either option above will create an Instance in HVM mode. This is fine for Windows Instances, but Linux Instances may not perform optimally. Converting a Linux instance to PV mode will require additional steps and will vary by distribution.
Shut down the instance and copy the VHD from the NFS storage to a web server; for example, mount the NFS share on the web server and copy it, or from the XenServer host use sftp or scp to upload it to the web server.
In CloudStack, create a new Template using the following values:
URL. Give the URL for the VHD
OS Type. Use the appropriate OS. For PV mode on CentOS, choose Other PV (32-bit) or Other PV (64-bit). This choice is available only for XenServer.
Hypervisor. XenServer
Format. VHD
The Template will be created, and you can create instances from it.
Adding Password Management to Your Templates
CloudStack provides an optional password reset feature that allows users to set a temporary admin or root password as well as reset the existing admin or root password from the CloudStack UI.
To enable the Reset Password feature, you will need to download an additional script to patch your Template. When you later upload the Template into CloudStack, you can specify whether reset admin/root password feature should be enabled for this Template.
The password management feature works always resets the account password on Instance boot. The script does an HTTP call to the virtual router to retrieve the account password that should be set. As long as the virtual router is accessible the guest will have access to the account password that should be used. When the user requests a password reset the management server generates and sends a new password to the virtual router for the account. Thus an Instance reboot is necessary to effect any password changes.
If the script is unable to contact the virtual router during Instance boot it will not set the password but boot will continue normally.
Linux OS Installation
Use the following steps to begin the Linux OS installation:
Download the latest version of the cloud-set-guest-password script from the repository:
Rename the file:
mv cloud-set-guest-password.in cloud-set-guest-password
Copy this file to /etc/init.d.
On some Linux distributions, copy the file to
/etc/rc.d/init.d.Run the following command to make the script executable:
chmod +x /etc/init.d/cloud-set-guest-password
Depending on the Linux distribution, continue with the appropriate step.
On Fedora, CentOS/RHEL, and Debian, run:
chkconfig --add cloud-set-guest-password
Windows OS Installation
Download the installer, CloudInstanceManager.msi, from the Download page and run the installer in the newly created Windows Instance.
Deleting Templates
Templates may be deleted. However when the Templates are used the default behaviour is to refuse deletion. In general, when a Template spans multiple Zones, only the copy that is selected for deletion will be deleted; the same Template in other Zones will not be deleted. The provided CentOS Template is an exception to this. If the provided CentOS Template is deleted, it will be deleted from all Zones.
When Templates are deleted, the Instances instantiated from them will continue to run. However, new Instances cannot be created based on the deleted Template.
As said, Cloudstack refuses to delete a template when VMs based on the template exist. If this is the case, the parameter “forced” can be set to “true” to delete the template anyways. These VMs can no longer be reinstalled from that template, but will be unaffected otherwise.
Working with ISOs
CloudStack supports ISOs and their attachment to Guest Instances. An ISO is a read-only file that has an ISO/CD-ROM style file system. Users can upload their own ISOs and mount them on their Guest Instances.
ISOs are uploaded based on a URL. HTTP is the supported protocol. Once the ISO is available via HTTP specify an upload URL such as http://my.web.server/filename.iso.
ISOs may be public or private, like Templates.ISOs are not hypervisor-specific. That is, a guest on vSphere can mount the exact same image that a guest on KVM can mount.
ISO images may be stored in the system and made available with a privacy level similar to Templates. ISO images are classified as either bootable or not bootable. A bootable ISO image is one that contains an OS image. CloudStack allows a User to boot a Guest Instance off of an ISO image. Users can also attach ISO images to Guest Instances. For example, this enables installing PV drivers into Windows. ISO images are not hypervisor-specific.
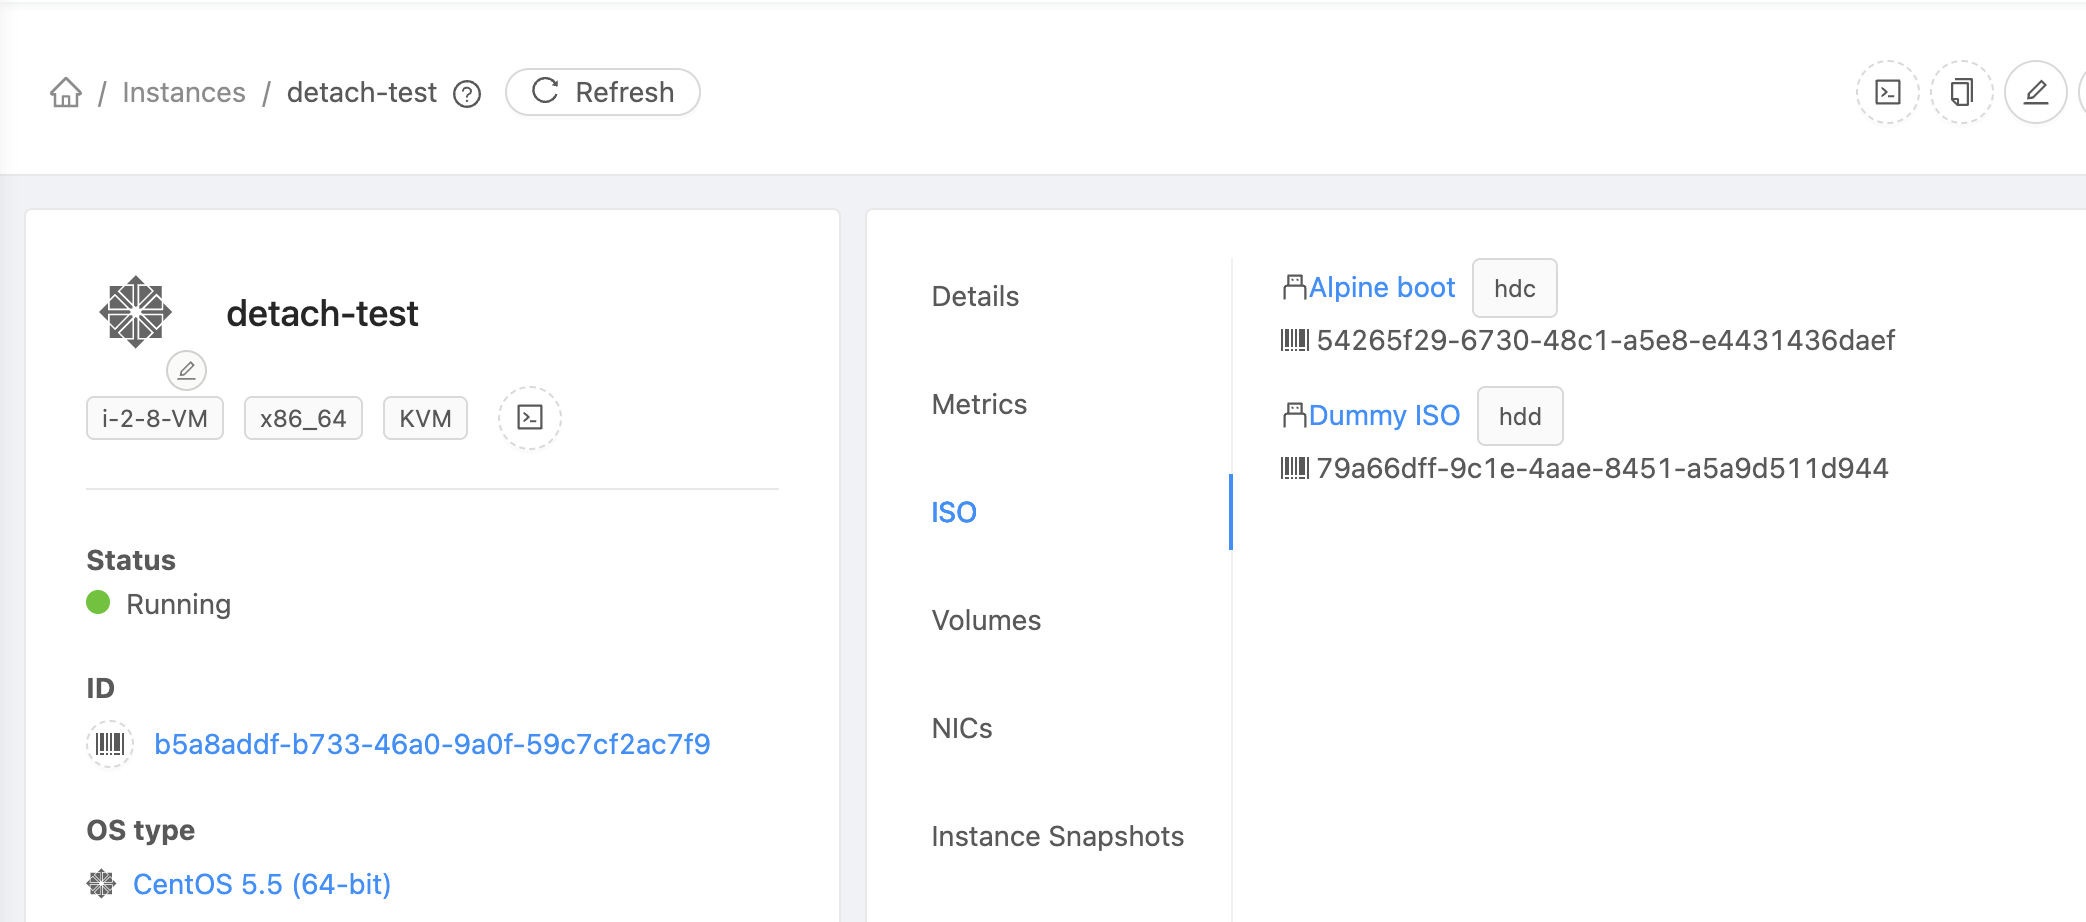
A single Instance can hold more than one attached ISO simultaneously, with each ISO appearing as its own CD-ROM drive inside the guest. This is useful, for example, when installing Windows on a KVM Instance that uses VirtIO disks - the Windows installer ISO and the VirtIO drivers ISO can both be attached at the same time so the installer can load the drivers without an ISO swap.
Adding an ISO
To make additional operating system or other software available for use with Guest Instances, you can add an ISO. The ISO is typically thought of as an operating system image, but you can also add ISOs for other types of software, such as desktop applications that you want to be installed as part of a Template.
Log in to the CloudStack UI as an administrator or end User.
In the left navigation bar, click Templates.
In Select View, choose ISOs.
Click Add ISO.
In the Add ISO screen, provide the following:
Name: Short name for the ISO image. For example, CentOS 6.2 64-bit.
Description: Display test for the ISO image. For example, CentOS 6.2 64-bit.
URL: The URL that hosts the ISO image. The Management Server must be able to access this location via HTTP. If needed you can place the ISO image directly on the Management Server
Zone: Choose the zone where you want the ISO to be available, or All Zones to make it available throughout CloudStack.
Bootable: Whether or not a guest could boot off this ISO image. For example, a CentOS ISO is bootable, a Microsoft Office ISO is not bootable.
OS Type: This helps CloudStack and the hypervisor perform certain operations and make assumptions that improve the performance of the guest. Select one of the following.
If the operating system of your desired ISO image is listed, choose it.
If the OS Type of the ISO is not listed or if the ISO is not bootable, choose Other.
(XenServer only) If you want to boot from this ISO in PV mode, choose Other PV (32-bit) or Other PV (64-bit)
(KVM only) If you choose an OS that is PV-enabled, the Instances created from this ISO will have a SCSI (virtio) root disk. If the OS is not PV-enabled, the Instances will have an IDE root disk. The PV-enabled types are:
Fedora 13
Fedora 12
Fedora 11
Fedora 10
Fedora 9
Other PV
Debian GNU/Linux
CentOS 5.3
CentOS 5.4
CentOS 5.5
Red Hat Enterprise Linux 5.3
Red Hat Enterprise Linux 5.4
Red Hat Enterprise Linux 5.5
Red Hat Enterprise Linux 6
Note
It is not recommended to choose an older version of the OS than the version in the image. For example, choosing CentOS 5.4 to support a CentOS 6.2 image will usually not work. In these cases, choose Other.
Extractable: Choose Yes if the ISO should be available for extraction.
Public: Choose Yes if this ISO should be available to other Users.
Featured: Choose Yes if you would like this ISO to be more prominent for Users to select. The ISO will appear in the Featured ISOs list. Only an administrator can make an ISO Featured.
Arch: The supported arch types are listed. Select the desired one.
Click OK.
The Management Server will download the ISO. Depending on the size of the ISO, this may take a long time. The ISO status column will display Ready once it has been successfully downloaded into secondary storage. Clicking Refresh updates the download percentage.
Important: Wait for the ISO to finish downloading. If you move on to the next task and try to use the ISO right away, it will appear to fail. The entire ISO must be available before CloudStack can work with it.
Attaching an ISO to a Instance
In the left navigation, click Instances.
Choose the Instance you want to work with.
Click the Attach ISO button.

In the Attach ISO dialog box, select one or more ISOs.
Click OK.
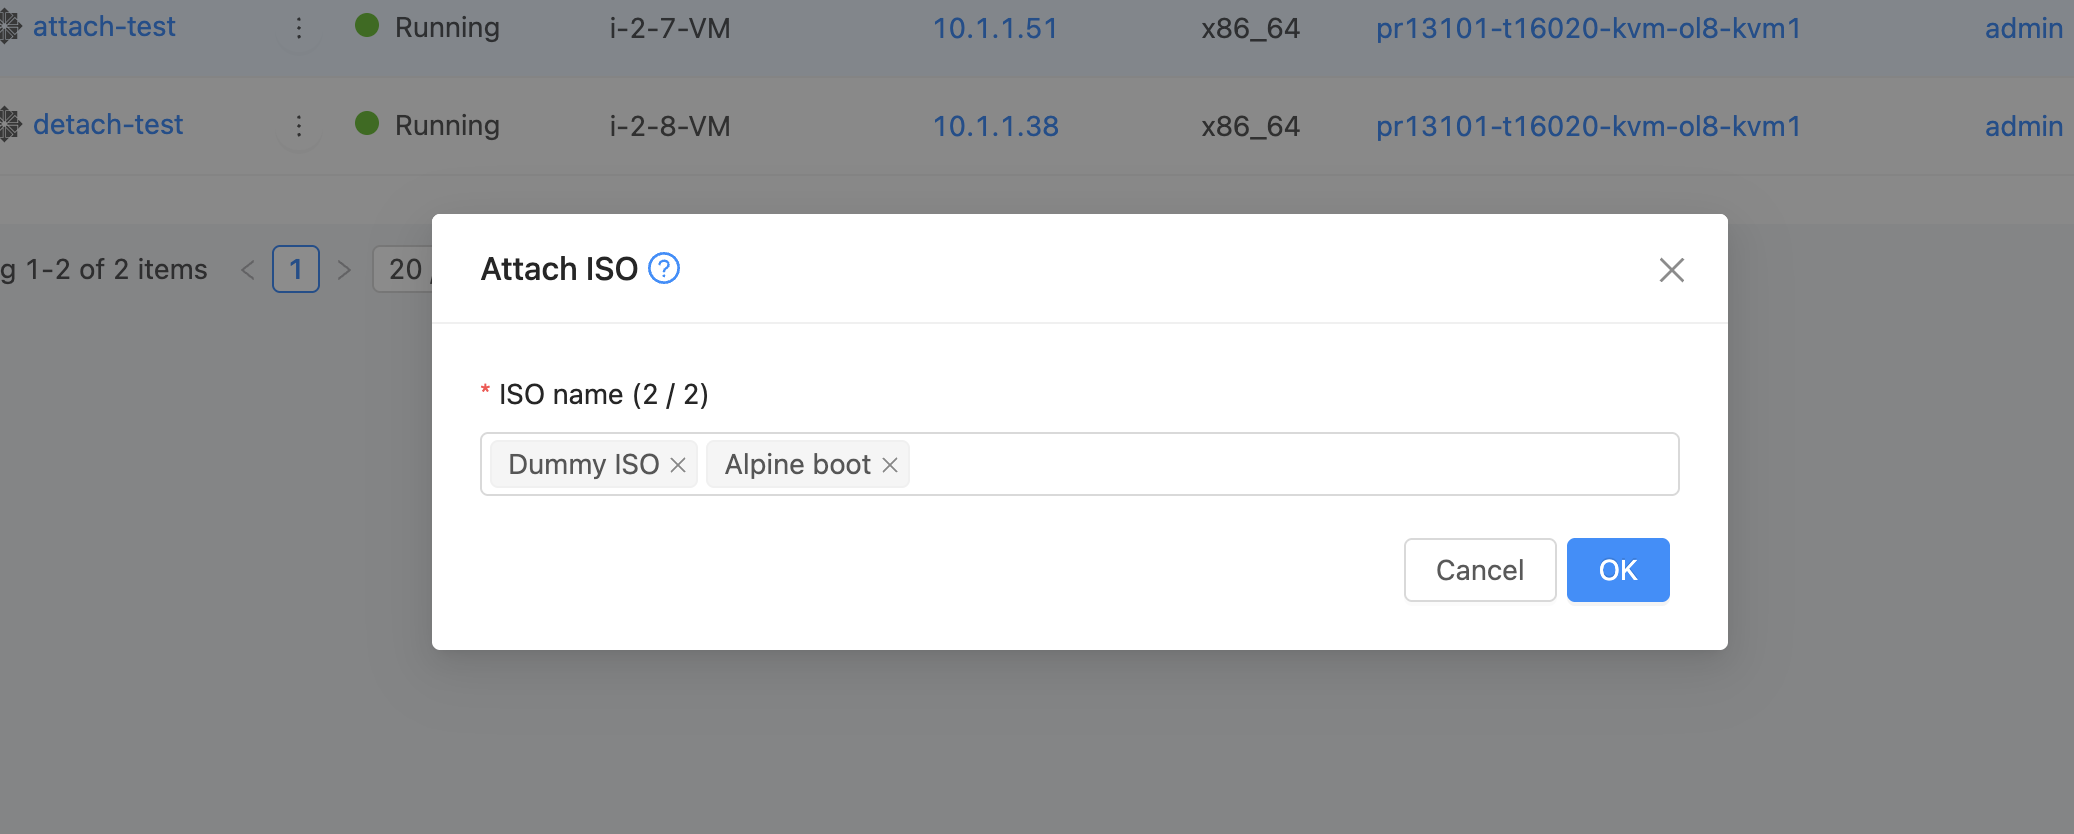
The maximum number of ISOs that may be attached to an Instance is controlled
by the configuration setting vm.iso.max.count (default 1); on KVM,
the hypervisor caps it at 2. The first ISO attached is the bootable one;
the Attach ISO action is hidden once the Instance reaches its limit.
Detaching an ISO
In the left navigation, click Instances.
Choose the Instance you want to work with.
Click the Detach ISO button.
In the Detach ISO dialog box, select one or more ISOs to detach.
Click OK.
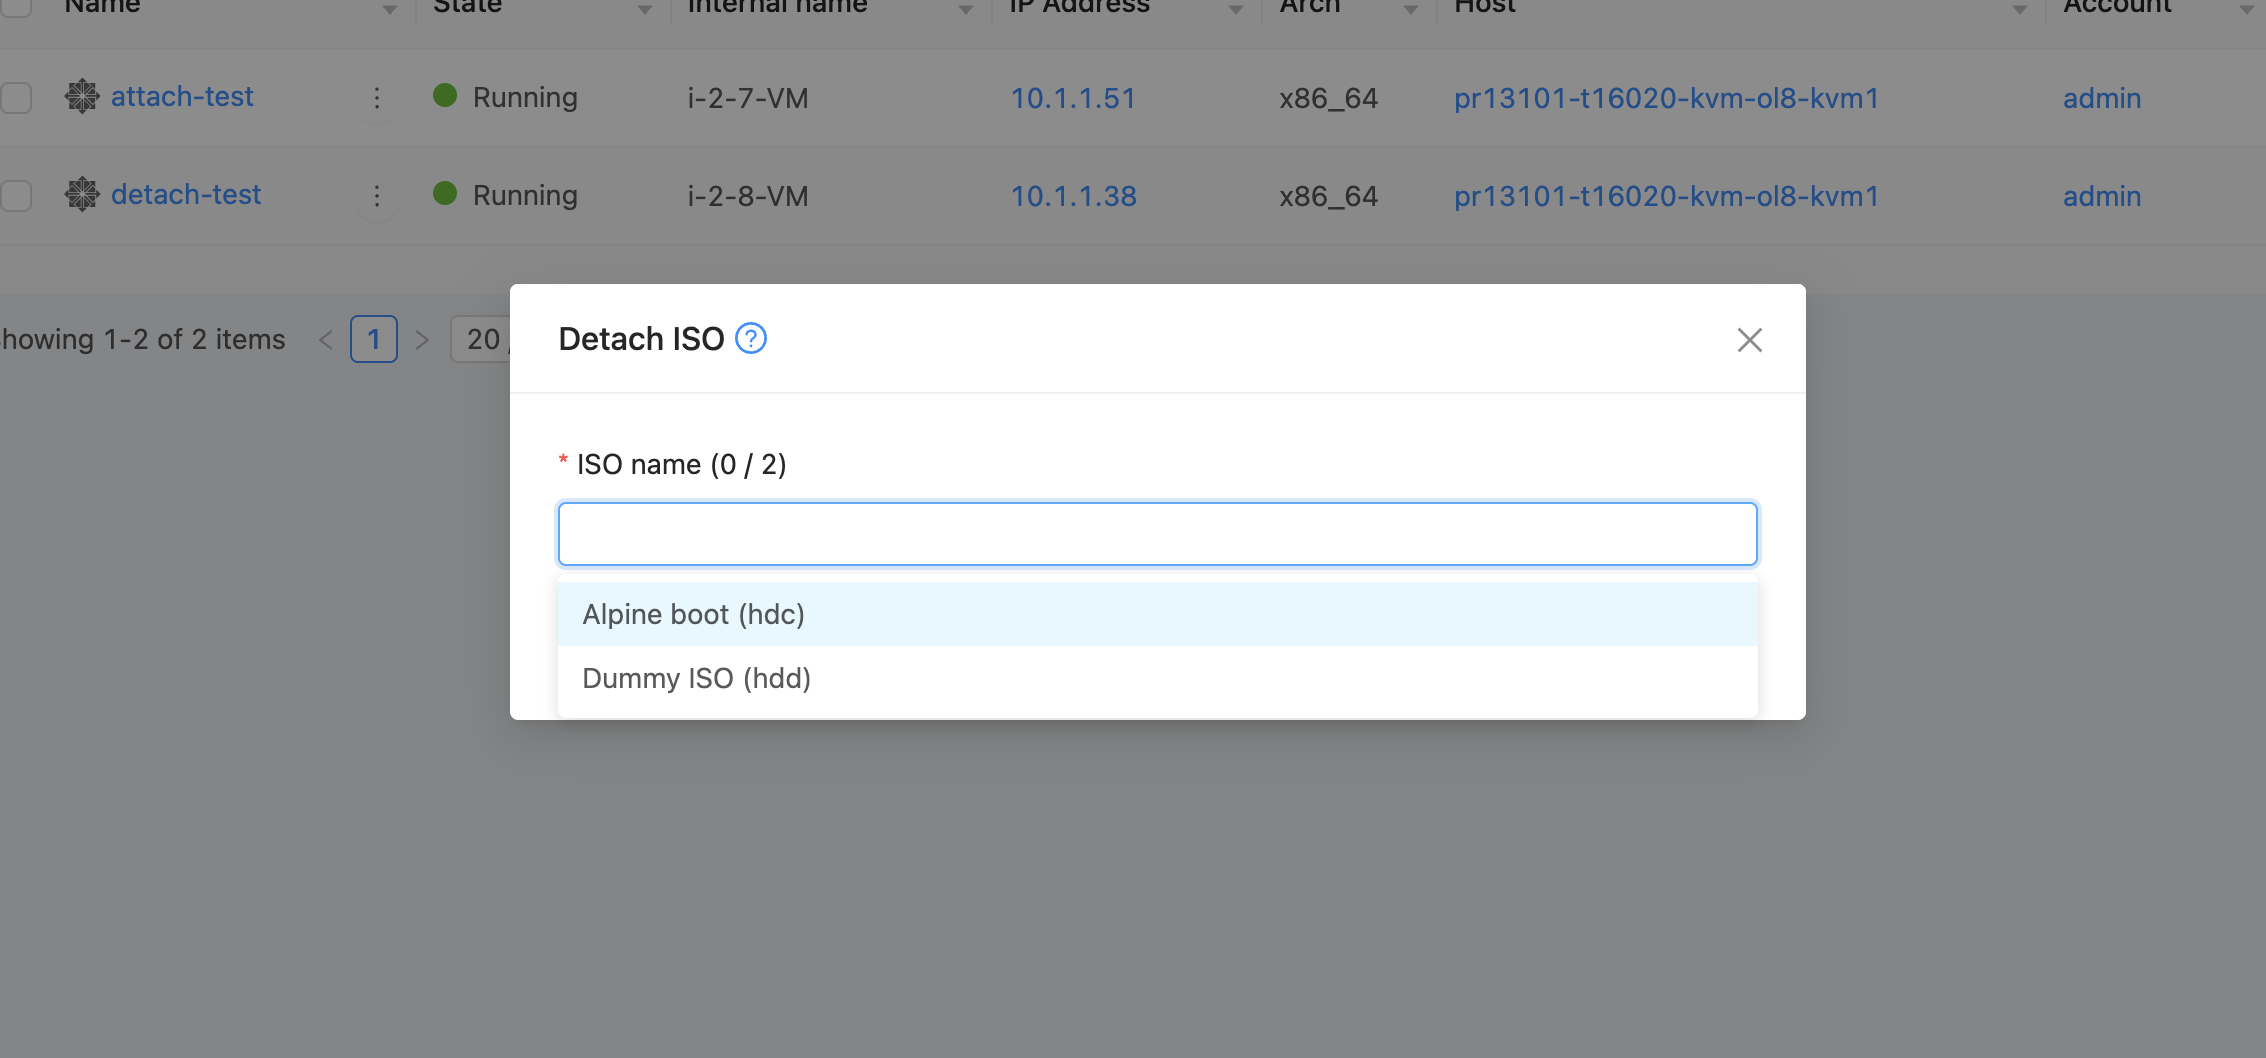
When more than one ISO is attached, each entry in the dialog shows its CD-ROM slot label so the right one can be picked.