About Working with Instances
CloudStack provides administrators with complete control over the lifecycle of all guest Instances executing in the cloud. CloudStack provides several guest management operations for end Users and administrators. Instances may be stopped, started, rebooted, and destroyed.
Guest Instances have a name and group. Instance names and groups are opaque to CloudStack and are available for end Users to organize their Instances. Each Instance can have three names for use in different contexts. Only two of these names can be controlled by the User:
Instance name – a unique, immutable ID that is generated by CloudStack and can not be modified by the User. This name conforms to the requirements in IETF RFC 1123.
Display name – the name displayed in the CloudStack web UI. Can be set by the User. Defaults to Instance name.
Name – host name that the DHCP server assigns to the Instance. Can be set by the User. Defaults to Instance name
Note
You can append the display name of a guest Instance to its internal name. For more information, see “Appending a Name to the Guest Instance’s Internal Name”.
Guest Instances can be configured to be Highly Available (HA). An HA-enabled Instance is monitored by the system. If the system detects that the Instance is down, it will attempt to restart the Instance, possibly on a different host. For more information, see HA-Enabled Instances on
Each new Instance is allocated one public IP address. When the Instance is started, CloudStack automatically creates a static NAT between this public IP address and the private IP address of the Instance.
If elastic IP is in use (with the NetScaler load balancer), the IP address initially allocated to the new Instance is not marked as elastic. The User must replace the automatically configured IP with a specifically acquired elastic IP, and set up the static NAT mapping between this new IP and the guest Instance’s private IP. The Instance’s original IP address is then released and returned to the pool of available public IPs. Optionally, you can also decide not to allocate a public IP to an Instance in an EIP-enabled Basic zone. For more information on Elastic IP, see “About Elastic IP”.
CloudStack cannot distinguish a guest Instance that was shut down by the User (such as with the “shutdown” command in Linux) from an Instance that shut down unexpectedly. If an HA-enabled Instance is shut down from inside the Instance, CloudStack will restart it. To shut down an HA-enabled Instance, you must go through the CloudStack UI or API.
Note
Monitor Instances for Max Capacity
The CloudStack administrator should monitor the total number of Instances in each cluster, and disable allocation to the cluster if the total is approaching the maximum that the hypervisor can handle. Be sure to leave a safety margin to allow for the possibility of one or more hosts failing, which would increase the Instance load on the other hosts as the Instances are automatically redeployed. Consult the documentation for your chosen hypervisor to find the maximum permitted number of Instances per host, then use CloudStack global configuration settings to set this as the default limit. Monitor the Instance activity in each cluster at all times. Keep the total number of Instances below a safe level that allows for the occasional host failure. For example, if there are N hosts in the cluster, and you want to allow for one host in the cluster to be down at any given time, the total number of Instances you can permit in the cluster is at most (N-1) * (per-host-limit). Once a cluster reaches this number of Instances, use the CloudStack UI to disable allocation of more Instances to the cluster.
Instance Lifecycle
Instances can be in the following states:
Created
Running
Stopped
Destroyed
Expunged
With the intermediate states of
Creating
Starting
Stopping
Expunging
Creating Instances
Instance are usually created from a Template. Users can also create blank Instances. A blank Instance is a virtual machine without an OS Template. Users can attach an ISO file and install the OS from the CD/DVD-ROM.
Note
You can create an Instance without starting it. You can determine whether the Instance needs to be started as part of the Instance deployment. A request parameter, startVM, in the deployVm API provides this feature. For more information, see the Developer’s Guide.
To create an Instance from a Template:
Log in to the CloudStack UI as an administrator or User.
In the left navigation bar, click Compute -> Instances.
Click the Add Instance button.
Select a zone. Admin Users will have the option to select a pod, cluster or host.
Select a Template or ISO. For more information about how the Templates came to be in this list, see *Working with Templates*.
Select a service offering. Be sure that the hardware you have allows starting the selected service offering. If the selected template has a tag associated with it then only supported service offerings will be available for the selection.
Select a disk offering.
Select/Add a Network.
Note
VMware only: If the selected Template contains OVF properties, different deployment options or configurations, multiple NICs or end-user license agreements, then the wizard will display these properties.
Click Launch Instance and your Instance will be created and started.
Note
For security reason, the internal name of the Instance is visible only to the root admin.
Note
XenServer
Windows Instances running on XenServer require PV drivers, which may be provided in the Template or added after the Instance is created. The PV drivers are necessary for essential management functions such as mounting additional volumes and ISO images, live migration, and graceful shutdown.
VMware
If the rootDiskController and dataDiskController are not specified for an Instance using Instance details and these are set to use osdefault in the Template or the global configuration, then CloudStack tries to find the recommended disk controllers for it using guest OS from the hypervisor. In some specific cases, it may create issues with the Instance deployment or start operation. To overcome this, a specific disk controller can be specified at the Instance or Template level. For an existing Instance its settings can be updated while it is in stopped state by admin.
Install Required Tools and Drivers
Be sure the following are installed on each Instance:
For XenServer, install PV drivers and Xen tools on each Instance. This will enable live migration and clean guest shutdown. Xen tools are required in order for dynamic CPU and RAM scaling to work.
For vSphere, install VMware Tools on each Instance. This will enable console view to work properly. VMware Tools are required in order for dynamic CPU and RAM scaling to work.
To be sure that Xen tools or VMware Tools is installed, use one of the following techniques:
Create each Instance from a Template that already has the tools installed; or,
When registering a new Template, the Administrator or User can indicate whether tools are installed on the Template. This can be done through the UI or using the updateTemplate API; or,
If a User deploys an Instance with a Template that does not have Xen tools or VMware Tools, and later installs the tools on the Instance, then the User can inform CloudStack using the updateVirtualMachine API. After installing the tools and updating the Instance, stop and start the Instance.
Accessing Instances
Any User can access their own Instances. The administrator can access all Instances running in the cloud.
To access an Instance through the CloudStack UI:
Log in to the CloudStack UI as a User or admin.
Click Compute -> Instances, then click the name of a running Instance.
Click the View Console button
 .
.
To access an Instance directly over the Network:
The Instance must have some port open to incoming traffic. For example, in a basic zone, a new Instance might be assigned to a security group which allows incoming traffic. This depends on what security group you picked when creating the Instance. In other cases, you can open a port by setting up a port forwarding policy. See “IP Forwarding and Firewalling”.
If a port is open but you can not access the Instance using ssh, it’s possible that ssh is not already enabled on the Instance. This will depend on whether ssh is enabled in the Template you picked when creating the Instance. Access the Instance through the CloudStack UI and enable ssh on the machine using the commands for the Instance’s operating system.
If the Network has an external firewall device, you will need to create a firewall rule to allow access. See “IP Forwarding and Firewalling”.
Securing Instance Console Access (KVM only)
CloudStack provides a way to secure VNC console access on KVM using the CA Framework certificates to enable TLS on VNC on each KVM host.
To enable TLS on a KVM host, navigate to the host and click on: Provision Host Security Keys (or invoke the provisionCertificate API for the host):
When a new host is added and it is provisioned with a certificate, TLS will also be enabled for VNC
The running Instances on a secured host will continue to be VNC unencrypted unless they are stopped and started.
New Instances created on a secured host will be VNC encrypted.
Once the administrator concludes the certificates provisioning on Cloudstack, the console access for new Instances on the hosts will be encrypted. CloudStack displays the console of the Instances through the noVNC viewer embedded in the console proxy System VMs. The CloudStack Users will notice the encrypted VNC sessions display a green bar stating the session is encrypted as in the image below. Also, the tab title includes ‘(TLS backend)’ when the session is encrypted.
Note
CloudStack will give access to the certificates to the group defined on the /etc/libvirt/qemu.conf file (or the last one defined on the file in case of multiple lines setting a group).
Stopping and Starting Instance
Once an Instance is created, you can stop, restart, or delete it as needed. In the CloudStack UI, click Instances, select the Instance, and use the Stop, Start, Reboot, and Destroy buttons.
A stop will attempt to gracefully shut down the operating system, via an ACPI ‘stop’ command which is similar to pressing the soft power switch on a physical server. If the operating system cannot be stopped, it will be forcefully terminated. This has the same effect as pulling out the power cord from a physical machine.
A reboot should not be considered as a stop followed by a start. In CloudStack, a start command reconfigures the Instance to the stored parameters in CloudStack’s database. The reboot process does not do this.
When starting an Instance, admin Users have the option to specify a pod, cluster, or host.
Deleting Instance
Users can delete their own Instance. A running Instance will be abruptly stopped before it is deleted. Administrators can delete any Instance.
To delete an Instance:
Log in to the CloudStack UI as a User or admin.
In the left navigation, click Compute -> Instances.
Choose the Instance that you want to delete.
Click the Destroy Instance button.

Optionally both expunging and the deletion of any attached volumes can be enabled.
When an Instance is destroyed, it can no longer be seen by the end User, however, it can be seen (and recovered) by a root admin. In this state it still consumes logical resources. Global settings control the maximum time from an Instance being destroyed, to the physical disks being removed. When the Instance and its rooot disk have been deleted, the Instance is said to have been expunged.
Once an Instance is expunged, it cannot be recovered. All the resources used by the Instance will be reclaimed by the system, This includes the Instance’s IP address.
Managing Instances
Scheduling operations on an Instance
After an Instance is created, you can schedule Instance lifecycle operations using cron expressions. The operations that can be scheduled are:
Start
Stop
Reboot
Force Stop
Force Reboot
To schedule an operation on an Instance through the UI:
Log in to the CloudStack UI as a User or admin.
In the left navigation, click Instances.
Click the Instance that you want to schedule the operation on.
On the Instance details page, click the Schedule button.
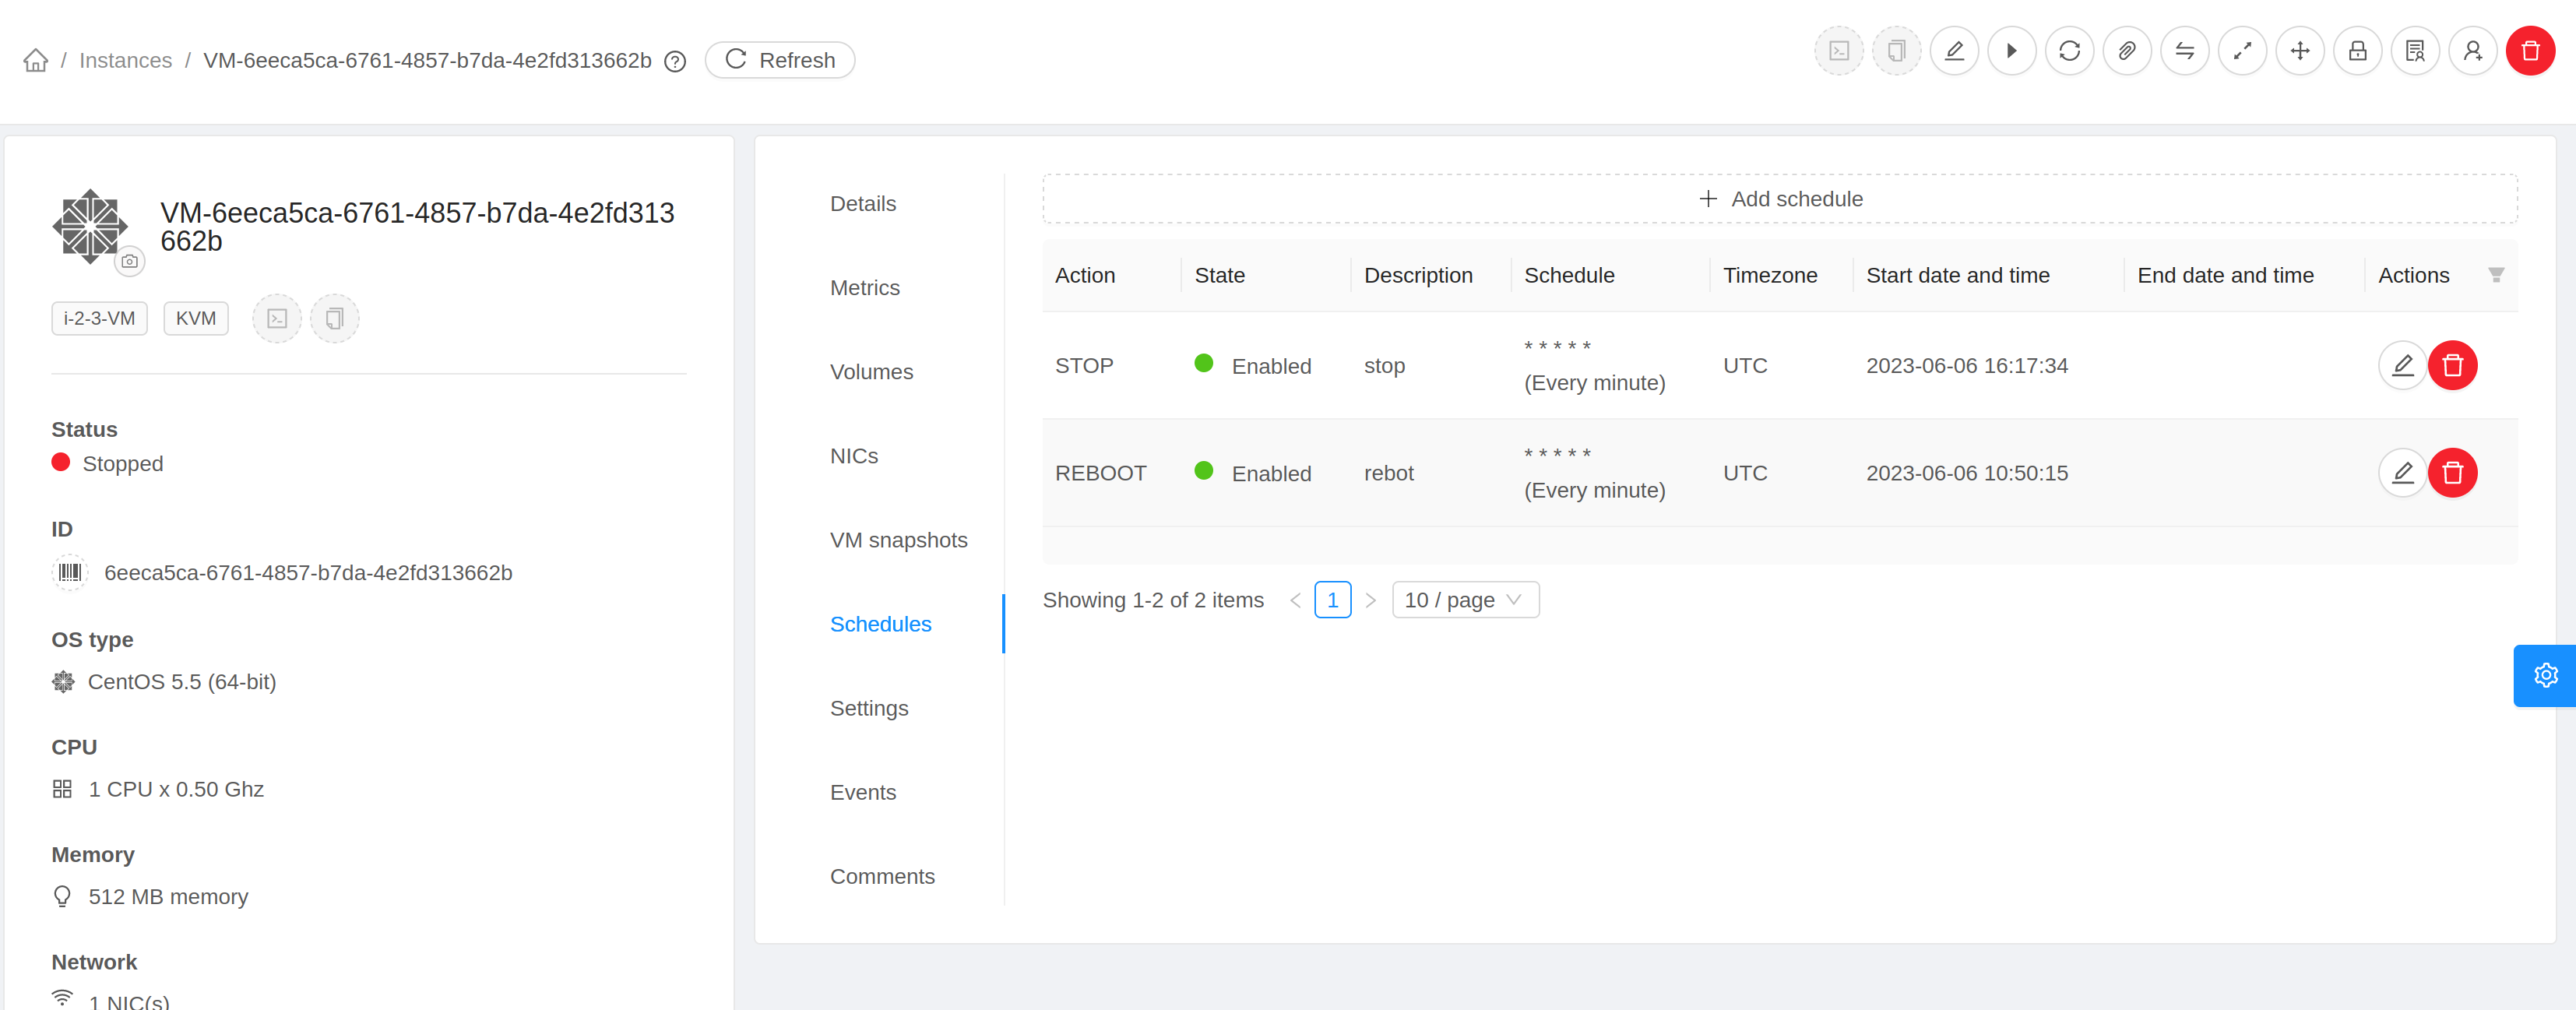
Click on Add schedule button to add a new schedule or click on Edit button
 to edit
an existing schedule.
to edit
an existing schedule. 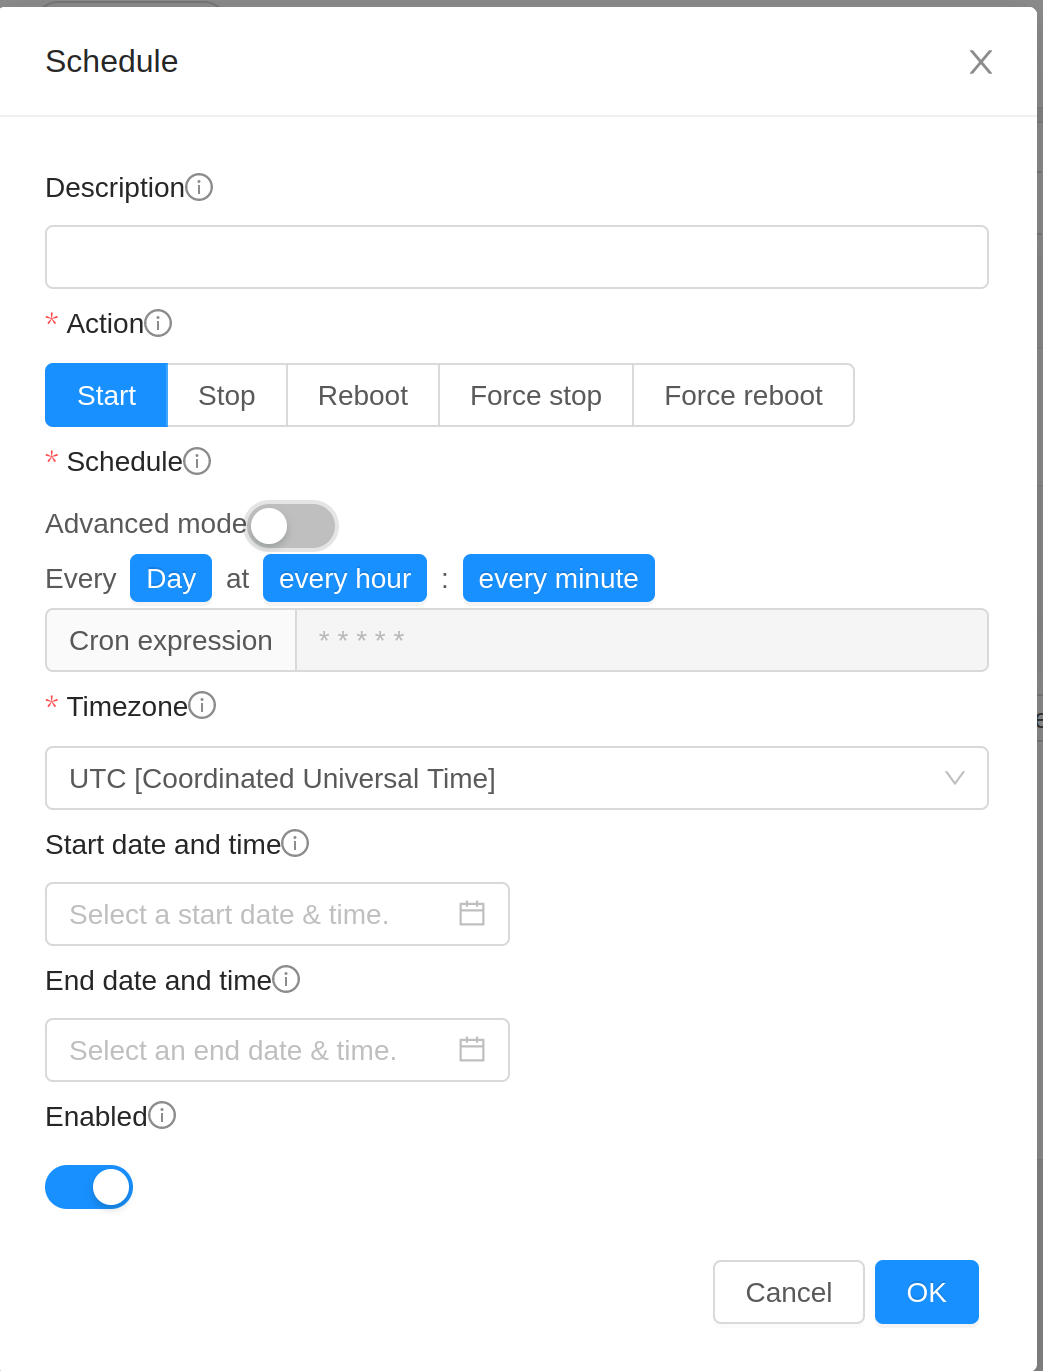
Configure the schedule as per requirements:
Description: Enter a description for the schedule. If left empty, it’s generated on the basis of action and the schedule.
Action: Select the action to be triggered by the schedule. Can’t be changed once the schedule has been created.
Schedule: Select the frequency using cron format at which the action should be triggered. For example, * * * * * will trigger the job every minute.
Timezone: Select the timezone in which the schedule should be triggered.
Start Date: Date at the specified time zone after which the schedule becomes active. Defaults to current timestamp plus 1 minute.
End Date: Date at the specified time zone before which the schedule is active. If not set, schedule won’t become inactive.
Note
It’s not possible to remove the end date once it’s configured.
Click OK to save the schedule.
Note
If multiple schedules are configured for an Instance and the scheduled time coincides, then only the schedule which was created first will be executed and the rest will be skipped.
Changing the Instance Name, OS, or Group
After an Instance is created, you can modify the display name, operating system, and the group it belongs to.
To access an Instance through the CloudStack UI:
Log in to the CloudStack UI as a User or admin.
In the left navigation, click Instances.
Select the Instance that you want to modify.
Click the Stop button to stop the Instance.

Click Edit.
Make the desired changes to the following:
Display name: Enter a new display name if you want to change the name of the Instance.
OS Type: Select the desired operating system.
Group: Enter the group name for the Instance.
Click Apply.
Appending a Name to the Guest Instance’s Internal Name
Every guest Instance has an internal name. The host uses the internal name to identify the guest Instances. CloudStack gives you an option to provide a guest Instance with a name. You can set this name as the internal name so that the vCenter can use it to identify the guest Instance. A new global parameter, vm.instancename.flag, has now been added to achieve this functionality.
The default format of the internal name is i-<account_id>-<vm_id>-<i.n>, where i.n is the value of the global configuration - instance.name. However, If vm.instancename.flag is set to true, and if a name is provided during the creation of a guest Instance, the name is appended to the internal name of the guest Instance on the host. This makes the internal name format as i-<account_id>-<vm_id>-<name>. The default value of vm.instancename.flag is set to false. This feature is intended to make the correlation between Instance names and internal names easier in large data center deployments.
The following table explains how an Instance name is displayed in different scenarios.
User-Provided Name |
Yes |
No |
Yes |
No |
vm.instancename.flag |
True |
True |
False |
False |
Name |
<Name> |
<i.n>-<UUID> |
<Name> |
<i.n>-<UUID> |
Display Name |
<Display name> |
<i.n>-<UUID> |
<Display name> |
<i.n>-<UUID> |
Hostname on the VM |
<Name> |
<i.n>-<UUID> |
<Name> |
<i.n>-<UUID> |
Name on vCenter |
i-<account_id>-<vm_id>-<Name> |
<i.n>-<UUID> |
i-<account_id>-<vm_id>-<i.n> |
i-<account_id>-<vm_id>-<i.n> |
Internal Name |
i-<account_id>-<vm_id>-<Name> |
i-<account_id>-<vm_id>-<i.n> |
i-<account_id>-<vm_id>-<i.n> |
i-<account_id>-<vm_id>-<i.n> |
Note
<i.n> represents the value of the global configuration - instance.name
Changing the Service Offering for an Instance
To upgrade or downgrade the level of compute resources available to an Instance, you can change the Instance’s compute offering.
Log in to the CloudStack UI as a User or admin.
In the left navigation, click Instances.
Choose the Instance that you want to work with.
(Skip this step if you have enabled dynamic Instance scaling; see CPU and Memory Scaling for Running Instances.)
Click the Stop button to stop the Instance.
Click the Change Service button.

The Change service dialog box is displayed.
Select the offering you want to apply to the selected Instance.
Click OK.
CPU and Memory Scaling for Running Instances
(Supported on VMware and XenServer)
It is not always possible to accurately predict the CPU and RAM requirements when you first deploy an Instance. You might need to increase these resources at any time during the life of an Instance. You can dynamically modify CPU and RAM levels to scale up these resources for a running Instance without incurring any downtime.
Dynamic CPU and RAM scaling can be used in the following cases:
User Instances on hosts running VMware and XenServer.
System VMs on VMware.
VMware Tools or XenServer Tools must be installed on the virtual machine.
The new requested CPU and RAM values must be within the constraints allowed by the hypervisor and the Instance operating system.
New Instances that are created after the installation of CloudStack 4.2 can use the dynamic scaling feature. If you are upgrading from a previous version of CloudStack, your existing Instances created with previous versions will not have the dynamic scaling capability unless you update them using the following procedure.
Updating Existing Instances
If you are upgrading from a previous version of CloudStack, and you want your existing Instances created with previous versions to have the dynamic scaling capability, update the Instances using the following steps:
Make sure the zone-level setting enable.dynamic.scale.vm is set to true. In the left navigation bar of the CloudStack UI, click Infrastructure, then click Zones, click the zone you want, and click the Settings tab.
Install Xen tools (for XenServer hosts) or VMware Tools (for VMware hosts) on each Instance if they are not already installed.
Stop the Instance.
Click the Edit button.
Click the Dynamically Scalable checkbox.
Click Apply.
Restart the Instance.
Configuring Dynamic CPU and RAM Scaling
To configure this feature, use the following new global configuration variables:
enable.dynamic.scale.vm: Set to True to enable the feature. By default, the feature is turned off.
scale.retry: How many times to attempt the scaling operation. Default = 2.
Along with these global configurations, the following options need to be enabled to make an Instance dynamically scalable
Template from which Instance is created needs to have Xen tools (for XenServer hosts) or VMware Tools (for VMware hosts) and it should have ‘Dynamically Scalable’ flag set to true.
Service Offering of the Instance should have ‘Dynamic Scaling Enabled’ flag set to true. By default, this flag is true when a Service Offering is created.
While deploying an Instance, User or Admin needs to mark ‘Dynamic Scaling Enabled’ to true. By default this flag is set to true.
If any of the above settings are false then the Instance cannot be configured as dynamically scalable.
How to Dynamically Scale CPU and RAM
To modify the CPU and/or RAM capacity of an Instance, you need to change the compute offering of the Instance to a new compute offering that has the desired CPU value and RAM value and ‘Dynamic Scaling Enabled’ flag as true. You can use the same steps described above in “Changing the Service Offering for an Instance”, but skip the step where you stop the Instance. Of course, you might have to create a new compute offering first.
When you submit a dynamic scaling request, the resources will be scaled up on the current host if possible. If the host does not have enough resources, the Instance will be live migrated to another host in the same cluster. If there is no host in the cluster that can fulfill the requested level of CPU and RAM, the scaling operation will fail. The Instance will continue to run as it was before.
Limitations
You can not do dynamic scaling for system Instances on XenServer.
CloudStack will not check to be sure that the new CPU and RAM levels are compatible with the OS running on the Instance.
When scaling memory or CPU for a Linux Instance on VMware, you might need to run scripts in addition to the other steps mentioned above. For more information, see Hot adding memory in Linux (1012764) in the VMware Knowledge Base.
(VMware) If resources are not available on the current host, scaling up will fail on VMware because of a known issue where CloudStack and vCenter calculate the available capacity differently. For more information, see https://issues.apache.org/jira/browse/CLOUDSTACK-1809.
On Instances running Linux 64-bit and Windows 7 32-bit operating systems, if the Instance is initially assigned a RAM of less than 3 GB, it can be dynamically scaled up to 3 GB, but not more. This is due to a known issue with these operating systems, which will freeze if an attempt is made to dynamically scale from less than 3 GB to more than 3 GB.
On KVM, not all versions of Qemu/KVM may support dynamic scaling. Some combinations may result CPU or memory related failures during Instance deployment.
Resetting the Instance Root Volume on Reboot
For secure environments, and to ensure that Instance state is not persisted across reboots, you can reset the root disk. For more information, see “Reset Instance to New Root Disk on Reboot”.
Moving Instances Between Hosts (Manual Live Migration)
The CloudStack administrator can move a running Instance from one host to another without interrupting service to Users or going into maintenance mode. This is called manual live migration, and can be done under the following conditions:
The root administrator is logged in. Domain admins and Users can not perform manual live migration of Instances.
The Instance is running. Stopped Instances can not be live migrated.
The destination host must have enough available capacity. If not, the Instance will remain in the “migrating” state until memory becomes available.
(KVM) The Instance must not be using local disk storage. (On XenServer and VMware, Instance live migration with local disk is enabled by CloudStack support for XenMotion and vMotion.)
(KVM) The destination host must be in the same cluster as the original host. (On XenServer and VMware, Instance live migration from one cluster to another is enabled by CloudStack support for XenMotion and vMotion.)
To manually live migrate an Instance
Log in to the CloudStack UI as root administrator.
In the left navigation, click Instances.
Choose the Instance that you want to migrate.
Click the Migrate Instance button.

From the list of suitable hosts, choose the one to which you want to move the Instance.
Note
If the Instance’s storage has to be migrated along with the Instance, this will be noted in the host list. CloudStack will take care of the storage migration for you.
Click OK.
Note
(KVM) If the Instance’s storage has to be migrated along with the Instance, from a mounted NFS storage pool to a cluster-wide mounted NFS storage pool, then the ‘migrateVirtualMachineWithVolume’ API has to be used. There is no UI integration for this feature.
(CloudMonkey) > migrate virtualmachinewithvolume virtualmachineid=<virtual machine uuid> hostid=<destination host uuid> migrateto[i].volume=<virtual machine volume number i uuid> migrateto[i].pool=<destination storage pool uuid for volume number i>
where i in [0,..,N] and N = number of volumes of the Instance
Moving Instance’s Volumes Between Storage Pools (offline volume Migration)
The CloudStack administrator can move a stopped Instance’s volumes from one storage pool to another within the cluster. This is called offline volume migration, and can be done under the following conditions:
The root administrator is logged in. Domain admins and Users can not perform offline volume migration of Instances.
The Instance is stopped.
The destination storage pool must have enough available capacity.
UI operation allows only migrating the root volume upon selecting the storage pool. To migrate all volumes to the desired storage pools the ‘migrateVirtualMachineWithVolume’ API has to be used by providing ‘migrateto’ map parameter.
To perform stopped Instance’s volumes migration
Log in to the CloudStack UI as root administrator.
In the left navigation, click Instances.
Choose the Instance that you want to migrate.
Click the Migrate Instance button.
From the list of suitable storage pools, choose the one to which you want to move the Instance root volume.
Click OK.
Assigning Instances to Hosts
At any point in time, each Instance is running on a single host. How does CloudStack determine which host to place an Instance on? There are several ways:
Automatic default host allocation. CloudStack can automatically pick the most appropriate host to run each Instance.
Instance type preferences. CloudStack administrators can specify that certain hosts should have a preference for particular types of guest Instances. For example, an administrator could state that a host should have a preference to run Windows guests. The default host allocator will attempt to place guests of that OS type on such hosts first. If no such host is available, the allocator will place the Instance wherever there is sufficient physical capacity.
Vertical and horizontal allocation. Vertical allocation consumes all the resources of a given host before allocating any guests on a second host. This reduces power consumption in the cloud. Horizontal allocation places a guest on each host in a round-robin fashion. This may yield better performance to the guests in some cases.
Admin Users preferences. Administrators have the option to specify a pod, cluster, or host to run the Instance in. CloudStack will then select a host within the given infrastructure.
End User preferences. Users can not control exactly which host will run a given Instance, but they can specify a zone for the Instance. CloudStack is then restricted to allocating the Instance only to one of the hosts in that zone.
Host tags. The administrator can assign tags to hosts. These tags can be used to specify which host an Instance should use. The CloudStack administrator decides whether to define host tags, then create a service offering using those tags and offer it to the User.
Affinity groups. By defining affinity groups and assigning Instances to them, the User or administrator can influence (but not dictate) whether Instances should run on separate hosts or on the same host. This feature is to let Users specify whether certain Instances will or will not be on the same host.
CloudStack also provides a pluggable interface for adding new allocators. These custom allocators can provide any policy the administrator desires.
Affinity Groups
By defining affinity groups and assigning Instances to them, the User or administrator can influence (but not dictate) which Instances should run on either the same or separate hosts. This feature allows Users to specify the affinity groups to which an Instance can belong. Instances with the same “host anti-affinity” type won’t be on the same host, which serves to increase fault tolerance. If a host fails, another Instance offering the same service (for example, hosting the User’s website) is still up and running on another host. It also allows Users to specify that Instances with the same “host affinity” type must run on the same host, which can be useful in ensuring connectivity and low latency between guest Instances. “non-strict host anti-affinity” is similar to, but more flexible than, “host anti-affinity”. In that case Instances are deployed to different hosts as long as there are enough hosts to satisfy the requirement, otherwise they might be deployed to the same host. “non-strict host affinity” is similar to, but more flexible than, “host affinity”, Instances are ideally placed together in the same host, but only if possible.
The scope of an affinity group is on an Account level.
Creating a New Affinity Group
To add an affinity group:
Log in to the CloudStack UI as an administrator or User.
In the left navigation bar, click Affinity Groups.
Click Add affinity group. In the dialog box, fill in the following fields:
Name. Give the group a name.
Description. Any desired text to tell more about the purpose of the group.
Type. CloudStack supports four types of affinity groups. “host anti-affinity”, “host affinity”, “non-strict host affinity” and “non-strict host anti-affinity”. “host anti-affinity” indicates that the Instances in this group must not be placed on the same host with each other. “host affinity” on the other hand indicates that Instances in this group must be placed on the same host. “non-strict host anti-affinity” indicates that Instances in this group should be deployed to different hosts. “non-strict host affinity” indicates that Instances in this group should not be deployed to same hosts.
Assign a New Instance to an Affinity Group
To assign a new Instance to an affinity group:
Create the Instance as usual, as described in “Creating Instances”. In the Add Instance wizard, there is a new Affinity tab where you can select the affinity group.
Change Affinity Group for an Existing Instance
To assign an existing Instance to an affinity group:
Log in to the CloudStack UI as an administrator or User.
In the left navigation bar, click Instances.
Click the name of the Instance you want to work with.
Stop the Instance by clicking the Stop button.
Click the Change Affinity button.

View Members of an Affinity Group
To see which Instances are currently assigned to a particular affinity group:
In the left navigation bar, click Affinity Groups.
Click the name of the group you are interested in.
Click View Instances. The members of the group are listed.
From here, you can click the name of any Instance in the list to access all its details and controls.
Delete an Affinity Group
To delete an affinity group:
In the left navigation bar, click Affinity Groups.
Click the name of the group you are interested in.
Click Delete.
Any Instance that is a member of the affinity group will be disassociated from the group. The former group members will continue to run normally on the current hosts, but if the Instance is restarted, it will no longer follow the host allocation rules from its former affinity group.
Determine Destination Host of Instances with Non-Strict Affinity Groups
(Non-Strict Host Anti-Affinity and Non-Strict Host Affinity only)
The destination host of Instances with Non-Strict Affinity Groups are determined by the host priorities. The hosts have default priority as 0. If there is a Instance in the same Non-Strict Host Anti-Affinity group on the host, the host priority will be decreased by 1. If there is an Instance in the same Non-Strict Host Affinity group on the host, the host priority will be increased by 1. All available hosts are reordered by host priorities when deploy or start an Instance.
Here are some examples how host priorities are calculated.
Example 1: Instance has a non-strict host anti-affinity group.
If Host-1 has 2 Instances in the group, Host-2 has 3 Instances in the group. Host-1 priority is -2, Host-2 priority is -3. If there are only 2 hosts, Instance will be deployed to Host-1 as it has higher priority (-2 > -3).
Example 2: Instance has a non-strict host affinity group.
If Host-1 has 2 Instances in the group, Host-2 has 3 Instances in the group. Host-1 priority is 2, Host-2 priority is 3. If there are only 2 hosts, Instance will be deployed to Host-2 (3 >2).
Example 3: Instance has a non-strict host affinity group and also a non-strict host anti-affinity group.
If Host-1 has 2 Instances in the non-strict host affinity group, and 3 Instances in the non-strict host anti-affinity group. Host-1 priority is calculated by:
0 (default) + 2 (Instances in non-strict host affinity group) - 3 (Instances in the non-strict host anti-affinity group) = -1
Changing an Instance’s Base Image
Every Instance is created from a base image, which is a Template or ISO which has been created and stored in CloudStack. Both cloud administrators and end Users can create and modify Templates, ISOs, and Instances.
In CloudStack, you can change an existing Instance’s base image from one Template to another, or from one ISO to another. (You can not change from an ISO to a Template, or from a Template to an ISO).
For example, suppose there is a Template based on a particular operating system, and the OS vendor releases a software patch. The administrator or User naturally wants to apply the patch and then make sure existing Instances start using it. Whether a software update is involved or not, it’s also possible to simply switch an Instance from its current Template to any other desired Template.
To change an Instance’s base image, call the restoreVirtualMachine API command and pass in the Instance ID and a new Template ID. The Template ID parameter may refer to either a Template or an ISO, depending on which type of base image the Instance was already using (it must match the previous type of image). When this call occurs, the Instance’s root disk is first destroyed, then a new root disk is created from the source designated in the Template ID parameter. The new root disk is attached to the Instance, and now the Instance is based on the new Template.
You can also omit the Template ID parameter from the restoreVirtualMachine call. In this case, the Instance’s root disk is destroyed and recreated, but from the same Template or ISO that was already in use by the Instance.
Advanced Instance Settings
Each User Instance has a set of “details” associated with it (as visible via listVirtualMachine API call) - those “details” are shown on the “Settings” tab of the Instance in the GUI (words “setting(s)” and “detail(s)” are here used interchangeably).
The Settings tab is always present/visible, but settings can be changed only when the Instance is in a Stopped state. Some Instance details/settings can be hidden for users via “user.vm.denied.details” global setting. Instance details/settings can also be made read-only for users using “user.vm.readonly.details” global setting. List of default hidden and read-only details/settings is given below.
Note
Since version 4.15, VMware Instance settings for the ROOT disk controller, NIC adapter type and data disk controller are populated automatically with the values inherited from the Template.
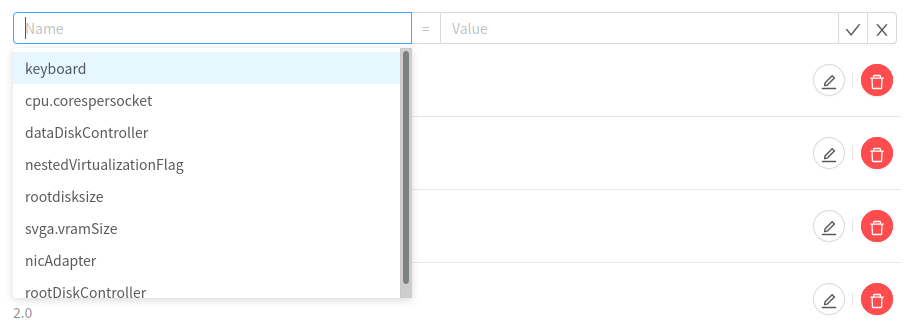
When adding a new setting or modifying the existing ones, setting names are shown/offered in a drop-down list, as well as their possible values (with the exception of boolean or numerical values).
Details/settings that are hidden for users by default:
rootdisksize
cpuOvercommitRatio
memoryOvercommitRatio
Message.ReservedCapacityFreed.Flag
Details/settings that are read-only for users by default:
dataDiskController
rootDiskController
An example list of settings as well as their possible values are shown on the images below:
 (VMware hypervisor)
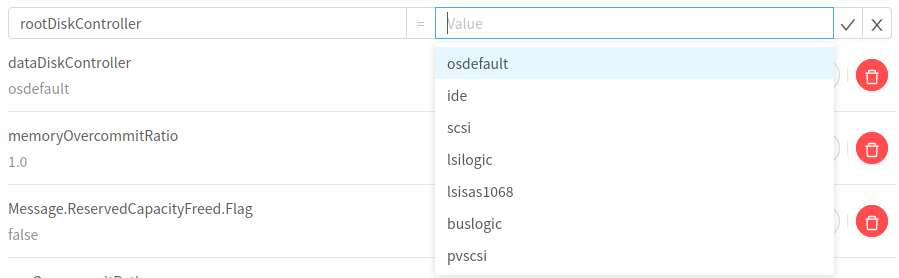 (VMware disk controllers)
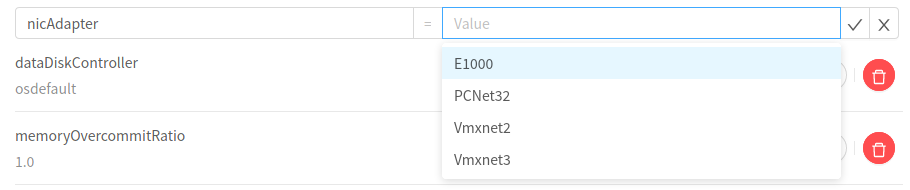 (VMware NIC models)
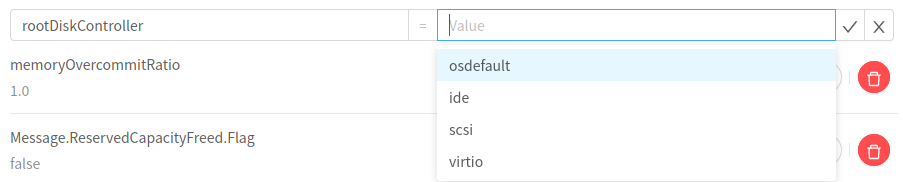 (KVM disk controllers)
Instance Snapshots
(Supported on VMware, XenServer and KVM (NFS only))
In addition to the existing CloudStack ability to snapshot individual Instance volumes, you can take an Instance Snapshot to preserve all the Instance’s data volumes as well as (optionally) its CPU/memory state. This is useful for quick restore of an Instance. For example, you can snapshot an Instance, then make changes such as software upgrades. If anything goes wrong, simply restore the Instance to its previous state using the previously saved Instance Snapshot.
The Snapshot is created using the hypervisor’s native Snapshot facility. The Instance Snapshot includes not only the data volumes, but optionally also whether the Instance is running or turned off (CPU state) and the memory contents. The Snapshot is stored in CloudStack’s primary storage.
Instance Snapshots can have a parent/child relationship. Each successive Snapshot of the same Instance is the child of the Snapshot that came before it. Each time you take an additional Snapshot of the same Instance, it saves only the differences between the current state of the Instance and the state stored in the most recent previous Snapshot. The previous Snapshot becomes a parent, and the new Snapshot is its child. It is possible to create a long chain of these parent/child Snapshots, which amount to a “redo” record leading from the current state of the Instance back to the original.
After Instance Snapshots are created, they can be tagged with a key/value pair, like many other resources in CloudStack.
KVM supports Instance Snapshots when using NFS shared storage. If raw block storage is used (i.e. Ceph), then Instance Snapshots are not possible, since there is no possibility to write RAM memory content anywhere. In such cases you can use as an alternative `Storage-based VM Snapshots on KVM`_
If you need more information about Instance Snapshots on VMware, check out the VMware documentation and the VMware Knowledge Base, especially Understanding Instance Snapshots.
Storage-based Instance Snapshots on KVM
Note
For now this functionality is limited for NFS and Local storage.
CloudStack introduces a new Storage-based Instance Snapshots on KVM feature that provides crash-consistent Snapshots of all disks attached to the Instance. It employs the underlying storage providers’ capability to create/revert/delete disk Snapshots. Consistency is obtained by freezing the Instance before the snapshotting. Memory Snapshots are not supported.
Note
freeze and thaw of Instance is maintained by the guest agent.
qemu-guest-agent has to be installed in the Instance.
When the snapshotting is complete, the Instance is thawed.
You can use this functionality on Instances with raw block storages (E.g. Ceph/SolidFire/Linstor).
Limitations on Instance Snapshots
If an Instance has some stored Snapshots, you can’t attach new volume to the Instance or delete any existing volumes. If you change the volumes on the Instance, it would become impossible to restore the Instance Snapshot which was created with the previous volume structure. If you want to attach a volume to such an Instance, first delete its Snapshots.
Instance Snapshots which include both data volumes and memory can’t be kept if you change the Instance’s service offering. Any existing Instance Snapshots of this type will be discarded.
You can’t make an Instance Snapshot at the same time as you are taking a Volume Snapshot.
You should use only CloudStack to create Instance Snapshots on hosts managed by CloudStack. Any Snapshots that you make directly on the hypervisor will not be tracked in CloudStack.
Configuring Instance Snapshots
The cloud administrator can use global configuration variables to control the behavior of Instance Snapshots. To set these variables, go through the Global Settings area of the CloudStack UI.
Configuration |
Description |
|---|---|
vmsnapshots.max |
The maximum number of Instance Snapshots that can be saved for any given Instance in the cloud. The total possible number of Instance Snapshots in the cloud is (number of Instances) * vmsnapshots.max. If the number of Snapshots for any Instance ever hits the maximum, the older ones are removed by the Snapshot expunge job. |
vmsnapshot.create.wait |
Number of seconds to wait for a Snapshot job to succeed before declaring failure and issuing an error. |
kvm.vmstoragesnapshot.enabled |
For live Snapshot of an Instance on KVM hypervisor without memory. Requires qemu version 1.6+ (on NFS or Local file system) and qemu-guest-agent installed on guest Instance |
Using Instance Snapshots
To create an Instance Snapshot using the CloudStack UI:
Log in to the CloudStack UI as a user or administrator.
Click Instances.
Click the name of the Instance you want to Snapshot.
Click the Take Instance Snapshot button.

Note
If a Snapshot is already in progress, then clicking this button will have no effect.
Provide a name and description. These will be displayed in the Instance Snapshots list.
(For running Instances only) If you want to include the Instance’s memory in the Snapshot, click the Memory checkbox. This saves the CPU and memory state of the Instance. If you don’t check this box, then only the current state of the Instance disk is saved. Checking this box makes the Snapshot take longer.
Quiesce Instance: check this box if you want to quiesce the file system on the Instance before taking the Snapshot. Not supported on XenServer when used with CloudStack-provided primary storage.
When this option is used with CloudStack-provided primary storage, the quiesce operation is performed by the underlying hypervisor (VMware is supported). When used with another primary storage vendor’s plugin, the quiesce operation is provided according to the vendor’s implementation.
Click OK.
To delete a Snapshot or restore an Instance to the state saved in a particular Snapshot:
Navigate to the Instance as described in the earlier steps.
Click View Instance Snapshots.
In the list of Snapshots, click the name of the Snapshot you want to work with.
Depending on what you want to do:
To delete the Snapshot, click the Delete button.

To revert to the Snapshot, click the Revert button.

Note
Instance Snapshots are deleted automatically when an Instance is destroyed. You don’t have to manually delete the Snapshots in this case.
Support for Virtual Appliances
About Virtual Appliances
CloudStack allows users to deploy virtual appliances on VMware such as its been made directly though vCenter. Vendors of virtual appliances for VMware often produce ‘Templates’ of their appliances in an OVA format. An OVA file contain disc images, as well as the configuration data of the virtual appliance and also at times a EULA which must be acknowledged.
Virtual Appliances are supported only on VMware.
Note
Since version 4.15.1, administrators and users can register virtual appliance Templates by selecting the option ‘Read instance Settings from OVA’ on the Template registration.
Deployment options (configurations)
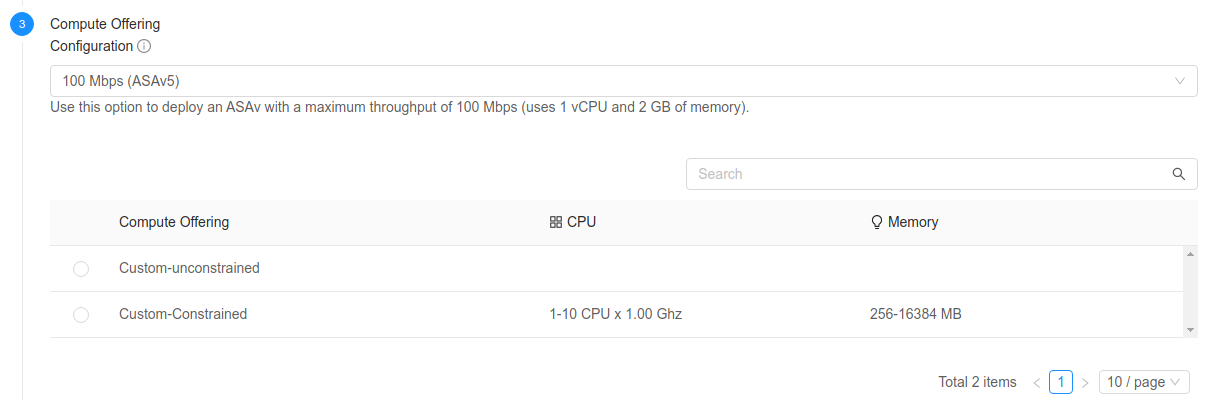
VMware Templates can provide different deployment options in their OVF descriptor file. CloudStack obtains the different deployment options when the Template is registered and it displays them to the users in the Instance deployment wizard, under the ‘Compute Offering’ section.
After the user selects a deployment option, CloudStack lists the compute offerings which match or exceed the deployment options hardware requirements for CPU and memory.
Note
All the custom unconstrained compute offerings are displayed, but only those constrained custom offerings in which the maximum or minimum requirements for CPU and memory are supported by the selected deployment option.
- The ‘Compute Offering’ section will be similar to this:
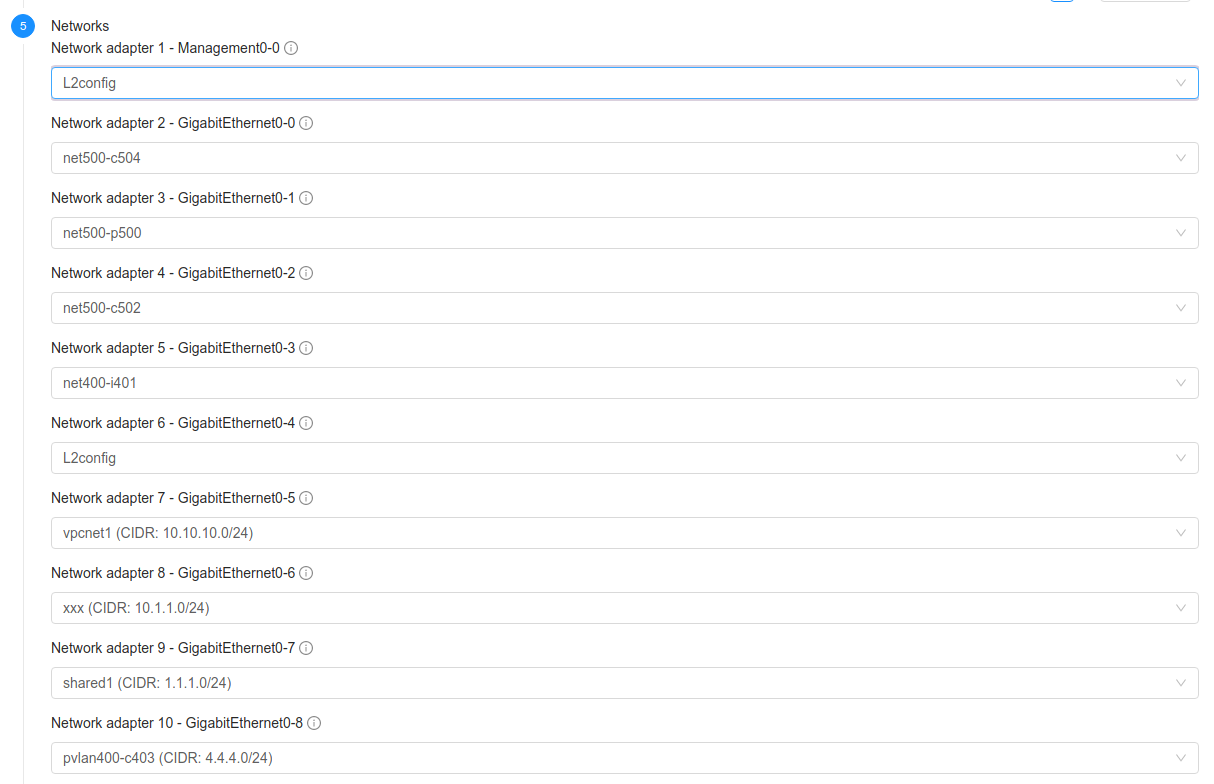
Network interfaces
In case the Template requires the virtual appliance to connect different network interfaces, these are displayed in the ‘Networks’ section, similar to this:
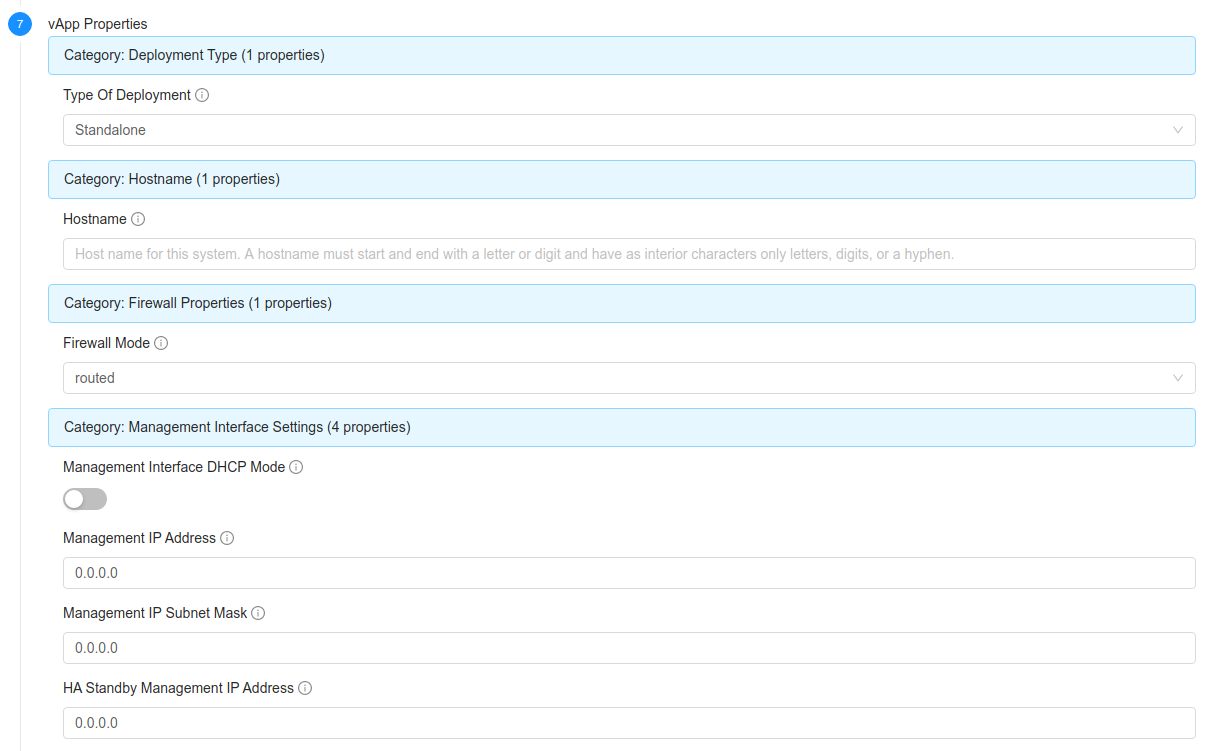
Properties
If the Template contains properties that require the user input, those are being displayed on the ‘Properties’ section, similar to this:
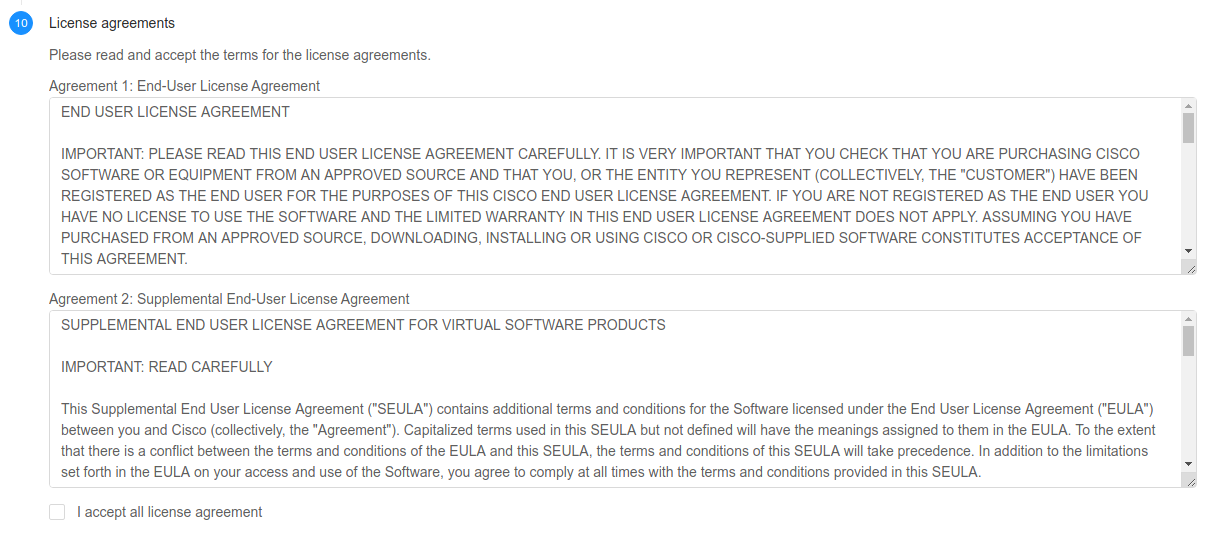
End-user license agreements
If the Template contains one or more end-user license agreements, the user must accept them prior to deploy their virtual appliance. If the license agreements are not accepted, then it is not possible to deploy a virtual appliance.
Advanced deployment settings
It is not possible to choose the boot type (BIOS, UEFI) and boot mode for virtual appliances. The boot mode and type used by the virtual appliances is defined in the Template.
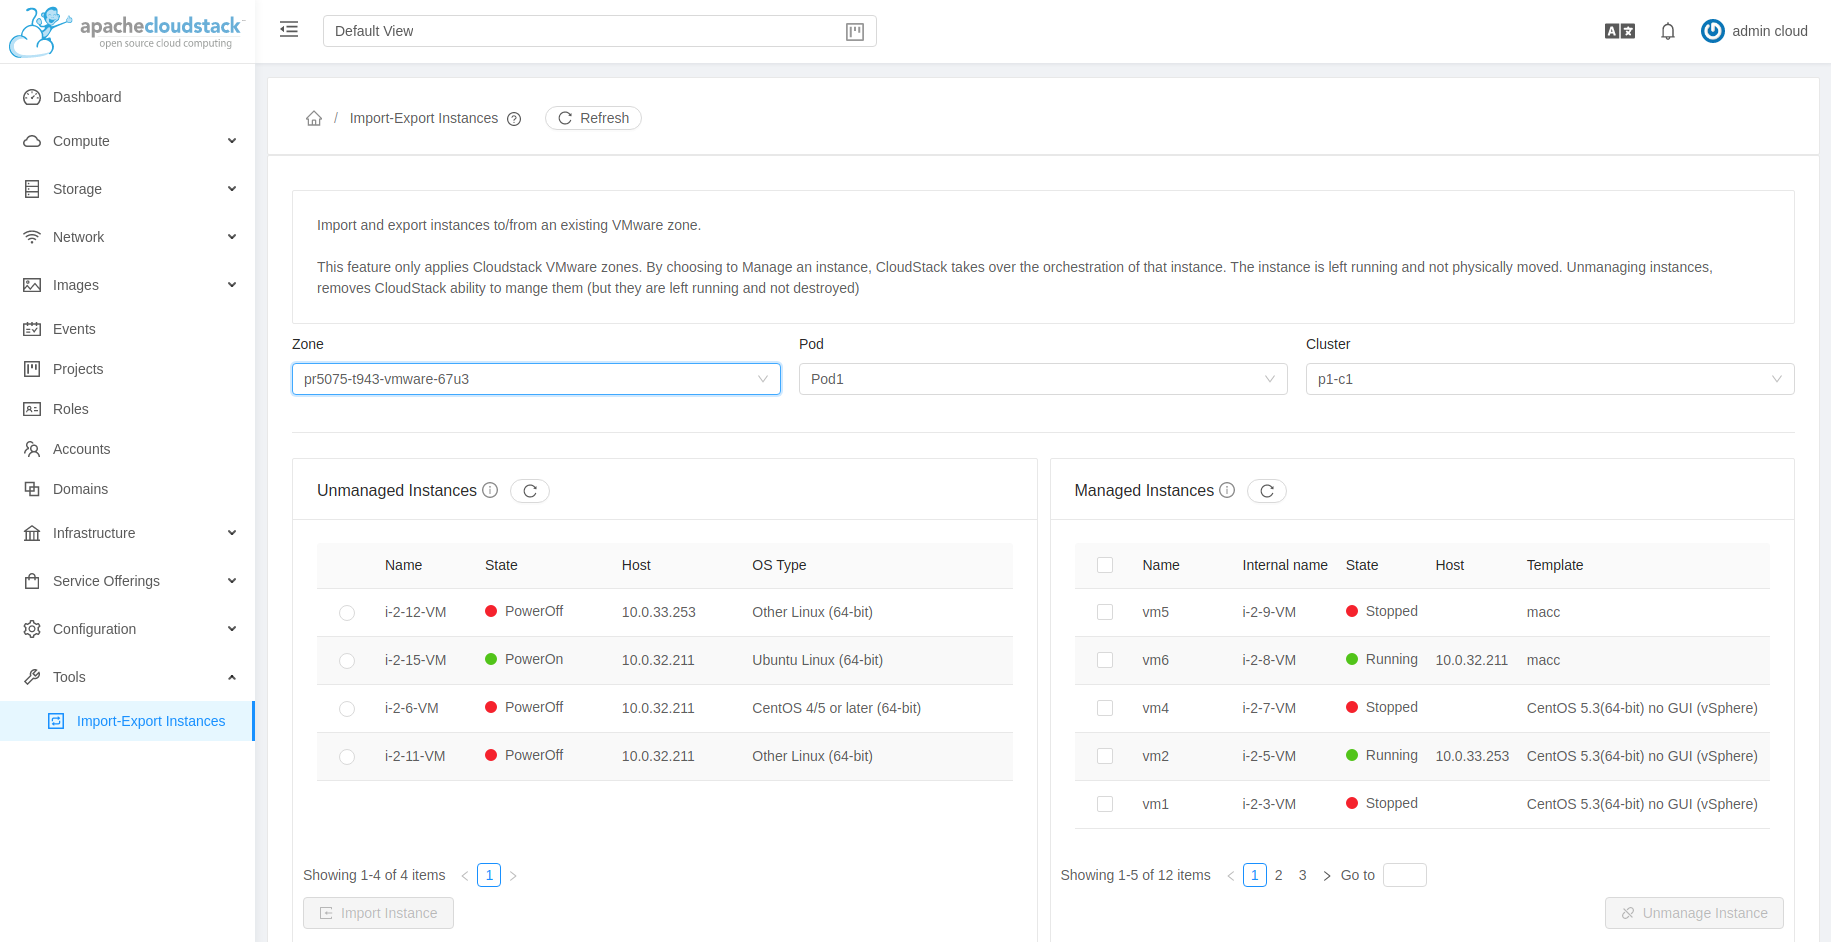
Importing and Unmanaging Instances
In the UI, both unmanaged and managed virtual machines or instances are listed in Tools > Import-Export Instances section, selecting:
Source
Destination Hypervisor
Unmanaged Instance
VMware
About Import Export Instances
For certain hypervisors, CloudStack supports importing of Instances from Managed Hosts, External Hosts, Local Storage and Shared Storage, into CloudStack.
Manage or Unmanage Instances on Managed Hosts
Note
This is currently only available for vSphere and KVM clusters.
As of ACS 4.14, CloudStack has the concept of unmanaged Instances. These are Instances that exist on CloudStack managed hosts, but are not in CloudStack’s database and therefore CloudStack cannot control (manage) them in any way. Previously, such Instances could exist, but CloudStack did not ‘see’ them (their existence would be reported in logs as unrecognised Instances).
From ACS 4.14 onwards, CloudStack is able to list VMware-based unmanaged instances via the listUnmanagedInstances API command and then import (also known as ingest) those unmanaged Instances via the importUnmanagedInstance API so that they become CloudStack-managed Guest Instances.
From ACS 4.15 onwards, administrators are able to unmanage VMware-based guest Instances.
From ACS 4.16 onwards, importing unmanaged Instances can also be done in the UI.
From ACS 4.19, CloudStack also supports importing KVM-based guest instances. However, this feature is experimental, and only KVM instances which were previously unmanaged, can be imported/become managed again.
Importing Unmanaged Instances
Use Cases and General Usage
The ability to import Instances allows Cloud operators to onboard new tenants simply and quickly, with the minimum amount of disk IO. It can also be used in disaster recovery scenarios at remote sites (if storage is replicated).
The most complex part of importing Instances is the mapping of an unmanaged Instance’s Networks (on the hypervisor level) to CloudStack Networks, as an operator could be importing tens or even hundreds of Instances.
If the ‘destination’ Network’s VLAN(s) and the requested service offerings match the existing VLAN and the CPU/RAM profile of the Instance on the hypervisor level, then the Instance can be imported while it is running. If the VLANs or service offerings do not match, then the Instance to be imported must be stopped. Once the Instance has been added to CloudStack, starting it through CloudStack will alter the Instance’s settings on the hypervisor in line with those set in the CloudStack DB (e.g. the Instance might be moved to a different Port Group on vSwitch/dvSwitch, with the corresponding VLAN)
To import Instances, it is imagined that a Cloud Provider will:
List/get familiar with all of the existing Networks on which the Instances to be imported are on.
Create corresponding Networks in CloudStack (with the same VLANs, as needed)
Use the listUnmanagedInstances API to create a CSV of Instances to be imported.
Where required, add metadata to the CSV such as the Account to which the imported Instance should belong, the Network to which each Instance should be attached to, the Compute Offering required for each Instance, and the Disk Offering for each disk.
Create a script that will loop through the CSV, sending the importUnmanagedInstance API command with the corresponding parameters for each Instance being read from the CSV
Using CSV is just an example that would help in the automation of bulk-importing multiple VMs, but it is not mandatory and operators might decide to do it differently.
Listing unmanaged Instances
Prerequisites to list unmanaged Instances (vSphere or KVM)
In order for CloudStack to list the Instances that are not managed by CloudStack on a host/cluster, the instances must exist on the hosts that are already part to the CloudStack.
listUnmanagedInstances API
This API will list all unmanaged Instances for a given cluster. Optionally, the vSphere name for an existing unmanaged Instance can be given to retrieve Instance details. The API will filter all CloudStack managed Instances, and will also filter Templates that show up as Instances on vCenter.
Request parameters:
- clusterid (CloudStack UUID of cluster)
- name (vSphere Instance name)
Response:
- clusterid
- hostid
- name
- osdisplayname
- memory
- powerstate
- cpuCoresPerSocket
- cpunumber
- cpuspeed
- disk
   - id
   - capacity (in bytes)
   - controller
   - controllerunit
   - imagepath
   - position
- nic
   - id
   - macaddress
   - networkname
   - vlanid
   - pcislot
   - adaptertype (when available)
   - ipaddress (Only returned when VMware tools are running on Instance)
Importing Unmanaged Instances
Administrators can import unmanaged Instances either using UI or with the importUnmanagedInstance API.
UI provides the following form for importing the Instance when Import Instance action is used in Import-Export Instances view:
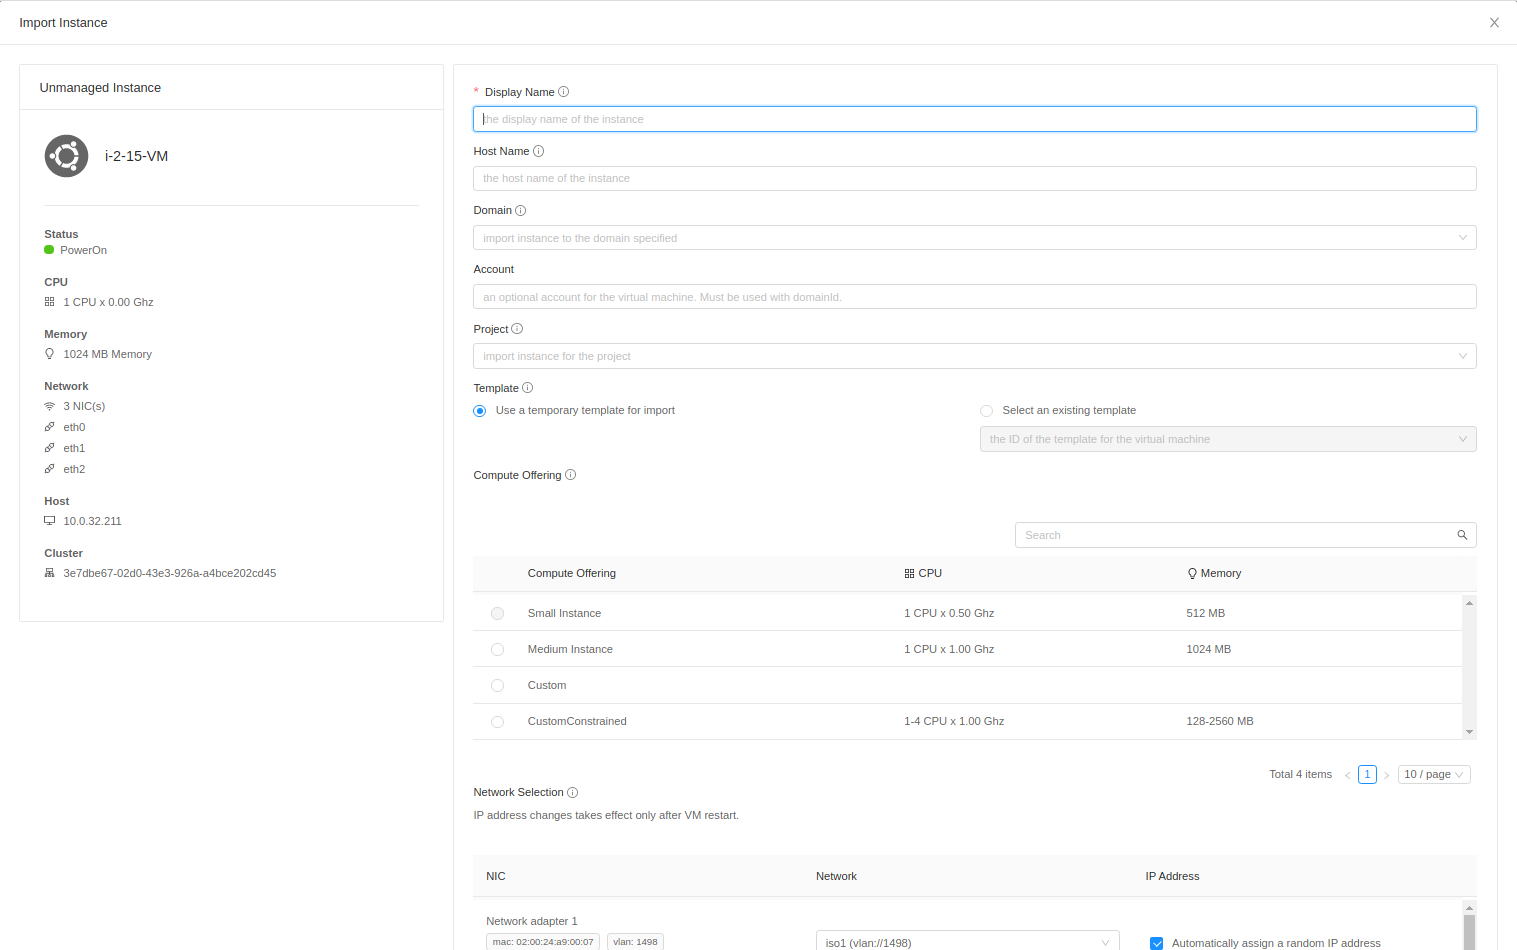
importUnmanagedInstance API
Request parameters:
- clusterid (CloudStack UUID of cluster)
- name (vSphere Instance name)
- displayname
- hostname
- account (An optional account name for the Instance. Must be used with domainid parameter)
- domainid (An optional domain ID for the Instance. Must be used with account parameter)
- projectid
- templateid
- serviceofferingid
- nicnetworklist (Map for NIC ID and corresponding Network UUID)
- nicipaddresslist (Map for NIC ID and corresponding IP address)
- datadiskofferinglist (Map for data disk ID and corresponding disk offering UUID)
- details (Map for Instance details)
- migrateallowed (Instance and its volumes are allowed to migrate to different host/storage pool when offering tags conflict with host/storage pool)
- forced (If true, an Instance is imported despite some of its NIC's MAC addresses being already present)
Note
The forced parameter is false by default and thus prevents importing an Instance which has a NIC containing a MAC address that has been previously assigned by CloudStack to another existing VM. If it is set to true, importing a VM with such already-used MAC addresses of the NICS will be allowed. This should be done with a full understanding of possible consequences due to duplicate MAC addresses.
Response:
Same response as that of deployVirtualMachine API.
Prerequisites to Importing Unmanaged Instances (vSphere)
There are a few prerequisites to importing unmanaged Instances into CloudStack. Largely, these are simply that the network which you are going to attach the Instance to in CloudStack need to already exist in CloudStack and also that the storage which an unmanaged Instance is located on (before importing) and also the storage which you wish the Instance to be on after importing (if different from the original storage) must already have been added to CloudStack as Primary Storage pools.
Instances can be imported to isolated, shared or L2 networks. Instances can also be imported and then automatically migrated to storage in accordance with service offerings using the migrateallowed API parameter.
The assumption that all Guest Instances in CloudStack are created from a Template or ISO is hardcoded into CloudStack. This source Template will not exist for Instances which have been imported into CloudStack, there for a dummy Template has been created in the CloudStack database. When a Template ID is not supplied when importing the Instance, the built-in dummy Template ID will be used. As this Template is only a dummy one, it will not be possible to ‘revert’ to the original Template unless you specify a real Template ID.
Offerings and Automatic Mapping
Custom vs Fixed Offerings
All Guest Instances in CloudStack must have an associated compute offering. The import API supports using ‘fixed’ (ie 2 vCPUs with 2GB RAM hardcoded into the offering) and ‘custom’ (user can choose the number of vCPUs and memory) offerings. When a custom offering is chosen, then the CloudStack will automatically set the number vCPUs, CPU speed and amount of RAM, to be the same as the Instance before importing it. When using custom offerings, the Instance to be imported can remain running. If the compute offering is ‘fixed’ and it matches the vCPU and RAM of the existing Instance, the Instance can remain running while being imported, otherwise the Instance must be stopped first and it will be reconfigured with the new values when it is started.
For maximum compatibility when importing an Instance, the Custom Constrained type of compute offerings in CloudStack are the recommended type of offerings. The amount of memory and number of CPUs assigned to the imported Instance will automatically be matched to the existing Instance, while the CPU speed will have been set to a sensible value by the admin when creating the offering.
Note
To use the Custom Unconstrained type of compute offering, CPU speed will need to be passed using details parameter when the CPU reservation is not set for the unmanaged Instance in vSphere. CPU speed in the latter case can be passed as, details[0].cpuSpeed=SOME_VALUE.
Disk Offerings
To import an Instance which has data disks attached, a map of the disk ID and corresponding disk offering ID must be passed via the datadiskofferinglist parameter.
For example:
datadiskofferinglist[0].disk=<DISK_ID> datadiskofferinglist[0].diskOffering=<DISK_OFFERING_ID>
Note
If the selected disk offering is greater in size than the actual disk size, CloudStack will not perform resize of the disk when importing. The disk will remain with its original size, but CloudStack will have a record as per the offering.
Networks
When importing an Instance, CloudStack needs to attach the virtual network interfaces (vNICs) to CloudStack networks. vNICs are associated with a network in one of two ways.
Automatically (available for L2 and shared networks)
Manual assignment of vNIC to network (ID) as a map if an Instance has more that one NIC
In an enterprise, the vast majority of networks will operate as Layer 2 networks with IP addressing handled by an IPAM system such as Active Directory or InfoBlox. This makes CloudStack’s L2 networks the natural choice for a like-for-like migration/on-boarding of Instances.
When importing an Instance to a shared or L2 network, CloudStack will automatically look for a CloudStack network that has the same VLAN(s) as the Instance’s NIC(s) is already on. This can be overridden by providing a network_id for the ‘nicnetworklist’ parameter
Note
this includes PVLANs on L2 networks.
IP Addresses
To assigning a specific IP address to a NIC, the ‘nicipaddresslist’ parameter is used. This parameter should not be used for L2 networks, and is optional for shared networks. To ask CloudStack to assign an Instance’s existing IP when importing, a value of auto can be used.
nicipaddresslist[0].nic=NIC_ID nicipaddresslist[0].ip4Address=auto
Auto-assigning IP addresses requires VMware tools to be on the Guest Instance (for the IP to be reported to vCenter) and is not supported if an unmanaged Instance reports more than one IP address associated with its NIC (CloudStack cannot tell which is the primary address). For Instances with more than 1 IP addresses per NIC, pass the first IP address via the import API and then add secondary addresses via the ‘addIpToNic’ API
Registered Operating System
Import API will try to recognize and map the operating system type for the unmanaged Instance to the one from the list of the guest operating systems available in CloudStack. If the operating system type can not be mapped, the API will return an error, and the templateid parameter (value = ID of a Template with the appropriate operating system) will be needed for a successful import. When templateid is defined in the import API call, the guest operating system details of the imported Instance will be set to the operating system details of the specified Template after Instance restart.
Other notes for the importUnmanagedInstance API
The API will use name for the hostname of the Instance when hostname parameter is not explicitly passed. The hostname cannot be longer than 63 characters. Only ASCII letters a-z, A-Z, digits 0-9, hyphen are allowed. Must start with a letter and end with a letter or a digit.
NIC adapters and disk controllers of the Instance will remain same as they were before the import, irrespective of the Template configurations.
When the Instance operating system is automatically recognized during the import (i.e. templateid parameter is not specified), and the operating system of the Instance (as reported by the hypervisor) can be matched to multiple operating systems in the CloudStack, the first match will be used as the operating system for the imported Instance in CloudStack. An example of this is i.e. “CentOS 7 (64-bit)” operating system type, as visible in vSphere, since this one can be matched against “CentOS 7” or “CentOS 7.1” or “CentOS 7.2” in CloudStack (based on the existing guest OS mappings), and here the first one (“CentOS 7”) will be used as the operating system for the imported Instance.
Importing Instances with different types of disk controllers for data disks and multiple NICs of different types is not supported and will result in an error response. Root disk and other (data disks) disks can have different type of controller.
After import, once the instance is started from CloudStack its CPU and RAM configuration, including CPU limits, CPU reservations, memory reservation, etc. may change from the original configuration, since all those properties are now controlled by CloudStack (i.e. by cluster-level settings and Compute Offering settings).
After importing a running instance, it will need to be stopped and started (not restarted) via CloudStack to be able to access the console of an instance.
Discovery of Existing Networks (for vSphere)
To import existing instances, the networks that they are attached to need to already exist as CloudStack networks. As an existing environment can have a great many networks which need creating, A Python 3 script has been created to enumerate the existing networks.
The script (discover_networks.py) can be found in the vm/hypervisor/vmware directory in the CloudStack scripts install location. For most operating systems, CloudStack installs scripts in /usr/share/cloudstack-common/. The script leverages VMware’s pyvmomi library (https://github.com/vmware/pyvmomi). The script lists all networks for a vCenter host or cluster which have at least one Instance attached to them. The script will iterate through these networks and will report the following parameters for them:
cluster (vCenter Cluster belongs to)
host (vCenter Host belongs to)
portgroup (Portgroup of the network)
switch (Switch to which network is connected)
virtualmachines (Instances that are currently connected to the network along with their NIC device details)
vlanid (VLAN ID of the network)
The script can take the following arguments:
-h, --help show this help message and exit
-s HOST, --host HOST vSphere service to connect to
-o PORT, --port PORT Port to connect on
-u USER, --user USER User name to use
-p PASSWORD, --password PASSWORD Password to use
-c CLUSTER, --cluster CLUSTER Cluster for listing network
-S, --disable_ssl_verification Disable ssl host certificate verification
-d, --debug Debug log messages
Note
To run this script host machine should have Python 3 and module pyvmomi installed.
Python binaries can be found here: https://www.python.org/downloads/
Install instructions for pyvmomi are here: https://github.com/vmware/pyvmomi#installing
The output of this script can then be used in conjunction with the ‘createNetwork’ API to add all of the networks to CloudStack that will be required for a successful import.
Unmanaging Instances
Administrators can unmanage guest Instances from CloudStack. Once unmanaged, CloudStack can no longer monitor, control or administer the provisioning and orchestration-related operations on an Instance.
To unmanage a guest Instance, an administrator must either use the UI or invoke the unmanageVirtualMachine API passing the ID of the Instance to unmanage. The API has the following preconditions:
The Instance must not be destroyed
The Instance state must be ‘Running’ or ‘Stopped’
The Instance must be a VMware Instance (as of CloudStack 4.19, it’s also possible to unmanage a KVM-based Instances)
The API execution will perform the following pre-checks, failing if they are not met:
There are no Volume Snapshots associated with any of the Instance volumes
There is no ISO attached to the Instance
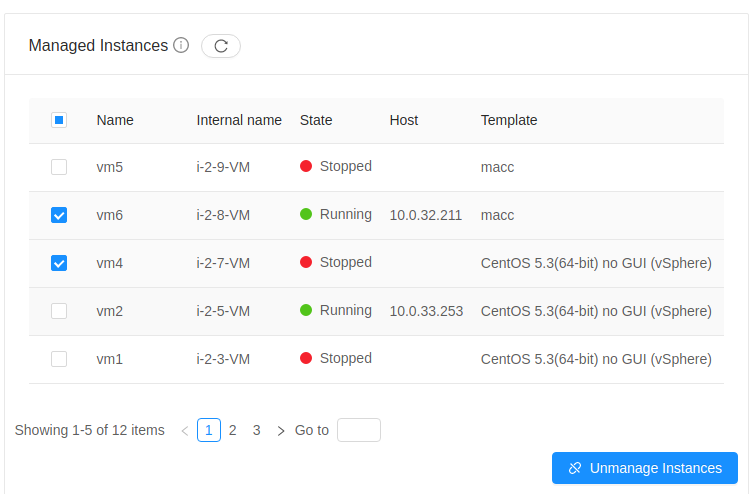
In the UI, Unmanage instance action can be used in the Instance view. ![]()
Alternately, the same operation can also be carried out using Unmanage Instance action in Import-Export Instances view under the Tools section.
Preserving unmanaged Instance NICs
The zone setting: unmanage.vm.preserve.nics can be used to preserve Instance NICs and its MAC addresses after unmanaging them. If set to true, the Instance NICs (and their MAC addresses) are preserved when unmanaging it. Otherwise, NICs are removed and MAC addresses can be reassigned.
Unmanaging Instance actions
Clean up Instance NICs and deallocate network resources used such as IP addresses and DHCP entries on virtual routers.
If ‘unmanage.vm.preserve.nics’ = ‘false’ then the NICs are deallocated and removed from CloudStack
If ‘unmanage.vm.preserve.nics’ = ‘true’ then the NICs remain allocated and are not removed from the database. The NIC’s MAC addresses remain preserved and therefore cannot be assigned to any new NIC.
Clean up Instance volumes in the CloudStack database
Clean up Instance Snapshots in the CloudStack database (if any)
Revoke host access to any managed volumes attached to the instance (applicable to managed storage only)
Clean up the Instance from the following:
Remove the Instance from security groups (if any)
Remove the Instance from instance groups (if any)
Remove firewall rules for the Instance (if any)
Remove port forwarding rules for the Instance (if any)
Remove load balancing rules for the Instance (if any)
Disable static NAT (if the Instance is assigned to it)
Remove the Instance from affinity groups (if any)
Remove instance details from the CloudStack database
Decrement the account resources count for volumes and Instances
Generate usage events:
For volumes destroyed, with type: ‘VOLUME.DELETE’
For Instance Snapshots destroyed (if any), with type: ‘VMSNAPSHOT.DELETE’ and ‘VMSNAPSHOT.OFF_PRIMARY’
For Instance NICs destroyed: with type: ‘NETWORK.OFFERING.REMOVE’
For the Instance being unmanaged: stopped and destroyed usage events (similar to the generated usage events when expunging an Instance), with types: ‘VM.STOP’ and ‘VM.DESTROY’, unless the instance has been already stopped before being unmanaged and in this case only ‘VM.DESTROY’ is generated.
Import Instances from External Hosts
Note
This is currently only available for KVM hypervisor.
External Host
An External Host refers to a host that is not managed by CloudStack. The “Import from external host” feature enables importing/migrating instances from these external hosts. This feature is available in both UI and API.
Prerequisites
Ensure that the External KVM host are running libvirt
Allow libvirt TCP connections (listen_tcp=1) on those External Hosts from CloudStack hosts.
Instances on the external host have to be in a stopped state, as live migration of instances is not supported
For some guest operating systems, it’s also required that the operating system inside the Instance has been gracefully shut down.
Currently, it’s supported to only use NFS and Local storage as the destination Primary Storage pools in CloudStack
Currently, only libvirt-based instances can be migrated
listVmsForImport API
listVmsForImport API serves the purpose of listing all instances currently in a stopped state on the designated External KVM host. Linux user’s username and password are needed for this API call and those same credentials are later used for SSH authentication when the QCOW2 images are moved to the destination CloudStack storage pools
Request parameters:
- zoneid (Zone to which Instance will be imported)
- host (the host name or IP address of External Host)
- username (the username of External Host for authentication)
- password (the password of External Host for authentication)
Response:
- name
- osdisplayname
- memory
- powerstate
- cpuCoresPerSocket
- cpunumber
- cpuspeed
- disk
   - id
   - capacity (in bytes)
   - controller
   - controllerunit
   - imagepath
   - position
- nic
   - id
   - macaddress
   - networkname
   - vlanid
   - pcislot
   - adaptertype (when available)
   - ipaddress
importVm API
importVm API invokes the import/migration of the instance (it’s disks). Instance’s volumes are first converted to the QCOW2 file on the remote host, and then copied over via SSH to the CloudStack pool.
The conversion of existing disk images of the Instance on a remote host, to a QCOW2 format is handled by the qemu-img utility. Administrators can choose the temporary storage location on the external host for the converted file, with the default location set to /tmp.
Request parameters:
- zoneid (Zone to which Instance will be imported)
- host (the host name or IP address of External Host)
- username (the username of External Host for authentication)
- password (the password of External Host for authentication)
- importsource (Import source should be external)
- tmppath (Temp Path on external host for disk image copy)
- name (Instance name on External Host)
- displayname
- hostname
- account (An optional account name for the Instance. Must be used with domainid parameter)
- domainid (An optional domain ID for the Instance. Must be used with account parameter)
- projectid
- serviceofferingid
- nicnetworklist (Map for NIC ID and corresponding Network UUID)
- nicipaddresslist (Map for NIC ID and corresponding IP address)
- datadiskofferinglist (Map for data disk ID and corresponding disk offering UUID)
- details (Map for Instance details)
- forced (If true, an Instance is imported despite some of its NIC's MAC addresses being already present)
Note
The forced parameter is false by default and thus prevents importing an Instance which has a NIC containing a MAC address that has been previously assigned by CloudStack to another existing VM. If it is set to true, importing a VM with such already-used MAC addresses of the NICS will be allowed. This should be done with a full understanding of possible consequences due to duplicate MAC addresses.
Response:
Same response as that of deployVirtualMachine API.
Importing Virtual Machines From VMware into KVM
Note
This functionality requires to install the virt-v2v (https://www.libguestfs.org/virt-v2v.1.html) binary installed on destination cluster hosts, as it is not a dependency of the CloudStack agent installed on the hosts.
As of CS 4.19, it is possible to select a VMware VM from an external or existing VMware datacenter, convert it to a KVM Virtual Machine and importing it into an existing KVM cluster.
Requirements on the KVM hosts
The CloudStack agent does not install the virt-v2v binary as a dependency, for which this functionality is not supported by default. To enable this functionality, the virt-v2v binary must be installed on the destination KVM hosts where to import the Virtual Machines.
In case virt-v2v is not installed on a KVM host attempting a Virtual Machine conversion from VMware, the process fails.
The virt-v2v output is logged on the CloudStack agent logs to help administrators tracking the progress on the Virtual Machines conversion processes. The verbose mode for virt-v2v can be enabled by adding the following line to /etc/cloudstack/agent/agent.properties and restart cloudstack-agent:
virtv2v.verbose.enabled=true
Installing virt-v2v on Ubuntu KVM hosts does not install nbdkit which is required in the conversion of VMWare VCenter guests. To install it, please execute:
apt install nbdkit
Supported Distributions for KVM Hypervisor:
Linux Distribution |
Supported Versions |
|---|---|
Alma Linux |
8, 9 |
Red Hat Enterprise Linux |
8, 9 |
Rocky Linux |
8, 9 |
Ubuntu |
22.04 LTS |
Importing Windows guest VMs from VMware requires installing the virtio drivers on the hypervisor hosts for the virt-v2v conversion.
On (RH)EL hosts:
yum install virtio-win
You can also install the RPM manually from https://fedorapeople.org/groups/virt/virtio-win/direct-downloads/stable-virtio/virtio-win.noarch.rpm
For Debian-based distributions:
apt install virtio-win
Usage
In the UI, Virtual Machines to import from VMware are listed in Tools > Import-Export Instances section, selecting:
Source |
Destination Hypervisor |
|---|---|
Migrate From VMware |
KVM |
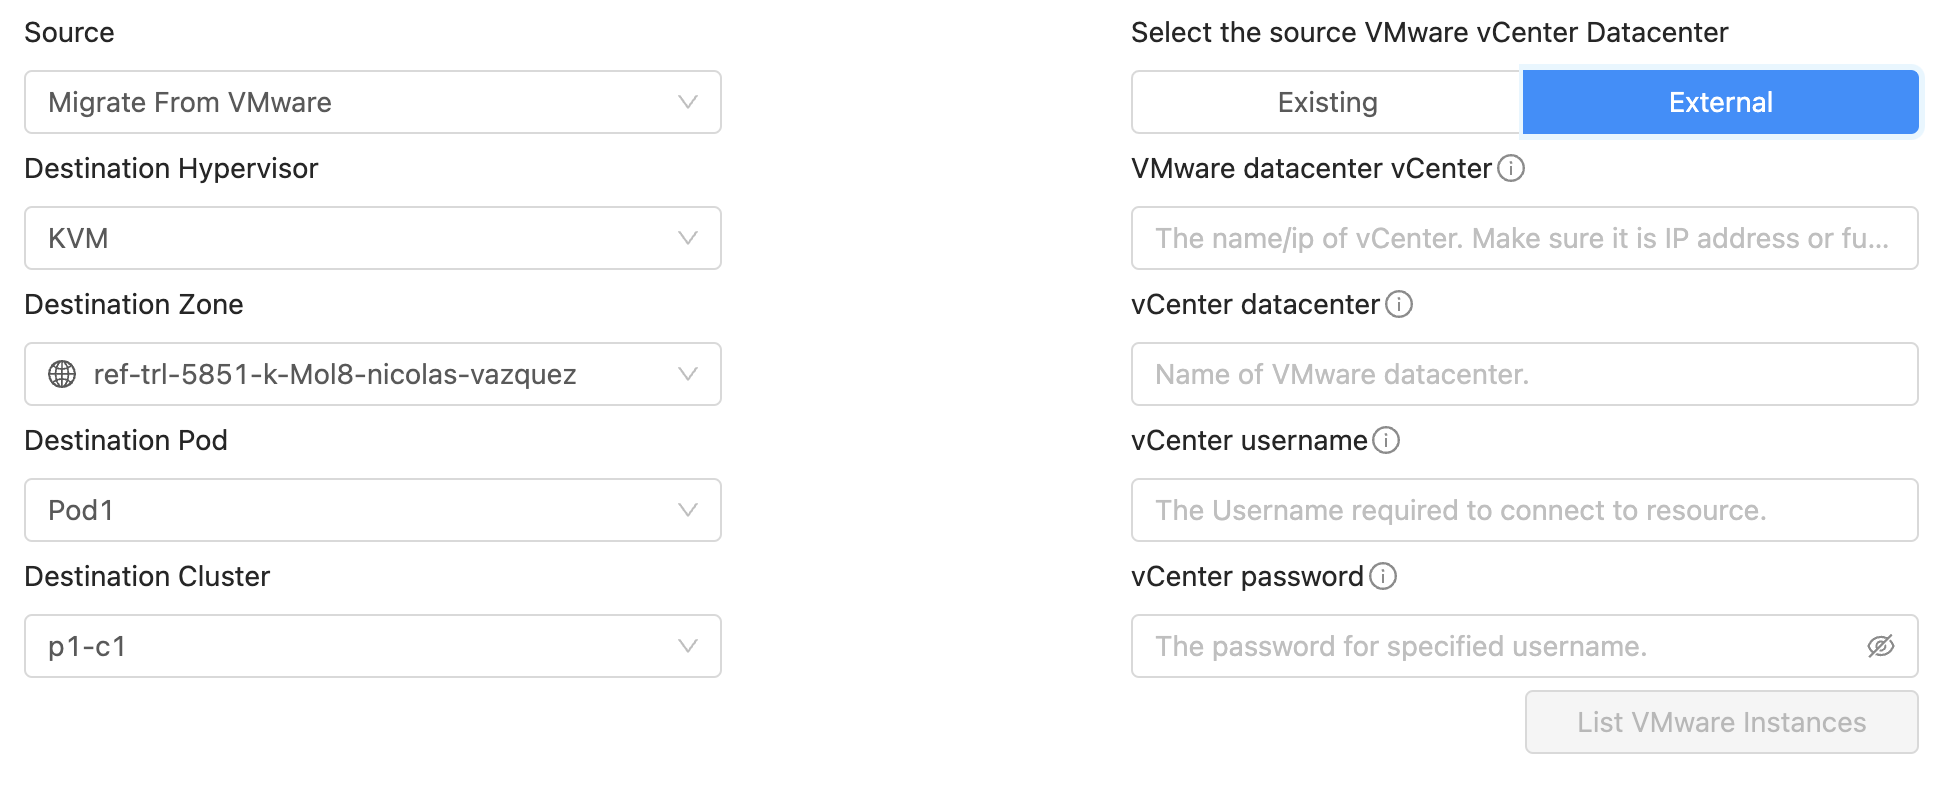
Selecting the Destination cluster
CloudStack administrators must select a KVM cluster to import the VMware Virtual Machines (left side of the image above). Once a KVM cluster is selected, the VMware Datacenter selection part is displayed (right side of the image above).
Selecting the VM from a VMware Datacenter
CloudStack administrators must select the Source VMware Datacenter:
Existing: The existing zones are listed, and for each zone CloudStack will list if there is any VMware Datacenter associated to it. In case it is, it can be selected
External: CloudStack allows listing Virtual Machines from a VMware Datacenter that is not associated to any CloudStack zone. To do so, it needs the vCenter IP address, the datacenter name, and username and password credentials to log in the vCenter.
Once the VMware Datacenter is selected, click on List VMware Instances to display the list of Virtual Machines on the Datacenter
Converting and importing a VMware VM
Note
CloudStack allows importing Running Linux Virtual Machines, but it is generally recommended that the Virtual Machine to import is powered off and has been gracefully shutdown before the process starts. In case a Linux VM is imported while running, it will be converted in “crash consistent” state. For Windows Virtual Machines, it is not possible to import them while running, it is mandatory they are shut down gracefully so the filesystem is in a clean state.
When importing a Virtual Machine from VMware to KVM, CloudStack performs the following actions:
Cloning the Source Virtual Machine on the selected VMware Datacenter: The source Virtual Machine will be cloned in the original state (running or stopped for Linux VMs, or stopped for Windows VMs). The recommended state is the stopped state to prevent data inconsistencies or loss when cloning the virtual machine.
Converting the Cloned Virtual Machine to KVM using virt-v2v: CloudStack (or the administrator) selects a running and Enabled KVM host to perform the conversion from VMware to KVM using virt-v2v. If the binary is not installed, then the host will fail the migration. In case it is installed it will perform the conversion into a temporary location (which can be selected by the administrator) to store the converted QCOW2 disks of the virtual machine. The disks are then moved into the destination storage pools for the virtual machine. The conversion is a long-lasting process which can be set to time out by the global setting ‘convert.vmware.instance.to.kvm.timeout’. The conversion processes take a long time because virt-v2v creates a temporary virtual machine to inspect the source VM and generate the converted disks with the correct drivers. Additionally, it needs to copy the converted disks into the temporary location.
Note
Please consider not restarting the management servers while importing as it will lead to the interruption of the process and you will need to start again.
Note
As mentioned above, the migration/conversion process uses an external tool, virt-v2v, which supports most but not all the operating systems out there (this is true for both the host on which the virt-v2v tool is running as well as the guest OS of the instances being migrated by the tool). Thus, the success of the import process will, almost exclusively, depend on the success of the virt-v2v conversion. In other words, the success will vary based on factors such as the current OS version, installed packages, guest OS setup, file systems, and others. Success is not guaranteed. We strongly recommend testing the migration process before proceeding with production deployments.
Note
The resulting imported VM uses the default Guest OS: CentOS 4.5 (32-bit). After importing the VM, please Edit the Instance to change the Guest OS Type accordingly.
Instance Backups (Backup and Recovery Feature)
About Backup And Recovery
CloudStack version 4.14 introduces a new Backup and Recovery (B&R) framework that provides CloudStack with users the ability to back up their Guest Instances for recovery purposes via 3rd party backup solutions. The framework abstracts the API commands required for common backup and recovery operations, from the vendor specific commands needed to perform those actions and provides a plugin model to enable any solution which provides backup and recovery ‘like’ features to be integrated.
The following providers are currently supported:
VMware with Veeam Backup and Recovery
KVM with DELL EMC Networker
See the Veeam Backup and Recovery plugin documentation for plugin specific information. Veeam Backup and Recovery Plugin
See the DELL EMC Networker Backup and Recovery plugin documentation for plugin specific information. DELL EMC Networker Backup and Recovery Plugin
Backup and Recovery Concepts
Backup and recovery has been designed to support two modes:
‘SLA’ based backups
Adhoc and user scheduled backups
‘SLA’ based backups are ones where the Cloud provider (ie the root admin) controls the time, and frequency of a backup scheme. A user signs up for a ‘Gold’ offering, which might give them a RPO of 12 hours and the last 14 backups kept; however the user would not be allowed to perform additional backups nor set the exact time that these backups took place. The user might be charged a fix rate for these backups regardless of the size of the backups.
To use an SLA based backup policy the user adds their Instances to the offering/policy. The job then runs at its predetermined times and ‘includes’ the Instance when it runs. A user can remove the Instance from the offering/policy and it will no longer be included in the job when it runs.
Adhoc and user scheduled backups follow the same idea as Volume Snapshots, however they leverage the backup solution rather than secondary storage. These could likely be billed on backup storage consumed or protected capacity (the full virtual size of the Instance(s) being backed up.
Adhoc and user scheduled backups are created and managed in the same fashion as Volume Snapshots are.
Configuring Backup and Recovery
The cloud administrator can use global configuration variables to control the behavior of B&R feature. To set these variables, go through the Global Settings area of the CloudStack UI.
Configuration |
Description |
|---|---|
backup.framework.enabled |
Setting to enable or disable the feature. Default: false. |
backup.framework.provider.plugin |
The backup provider (plugin) name. For example: ‘dummy’, ‘veeam’ and ‘networker’. This is a zone specific setting. Default: dummy. |
backup.framework.sync.interval |
Background sync task internal in seconds that performs metrics/usage stats collection, backup reconciliation and backup scheduling. Default: 300. |
Plugin specific settings
Each backup and recovery plugin is likely to have settings specific to that plugin. Refer to the CloudStack documentation for your plugin for details on how to configure those settings.
Backup Offerings
Admins can import an external provider’s backup offerings using UI or API for a particular zone, as well as manage a backup offering’s lifecyle. Admins can also specify if a backup offering allows user-defined backup schedules and ad-hoc backups. Users can list and consume the imported backup offerings, only root admins can import or delete offerings.
Supported APIs:
listBackupProviders: lists available backup provider plugins
listBackupProviderOfferings: lists external backup policy/offering from a provider
importBackupOffering: allows importing of an external backup policy/offering to CloudStack as a backup offering
listBackupOfferings: lists CloudStack’s backup offerings (searching via keyword, and pagination supported)
deleteBackupOffering: deletes a backup offering by its ID
Importing Backup Offerings
See plugin specific documentation to create ‘Backup provider offerings’
To import a backup provider offering;
(As root) navigate to Service Offerings, click on the ‘select offering’ dropdown box and select ‘Backup Offerings’
Click on Import Backup Offering
Enter your user-friendly name and description and select the applicable zone. The External ID will then be populated with the Template jobs which CloudStack retrieves from the connected provider.
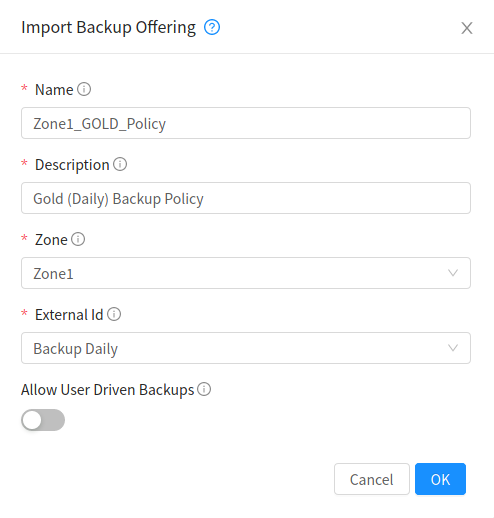
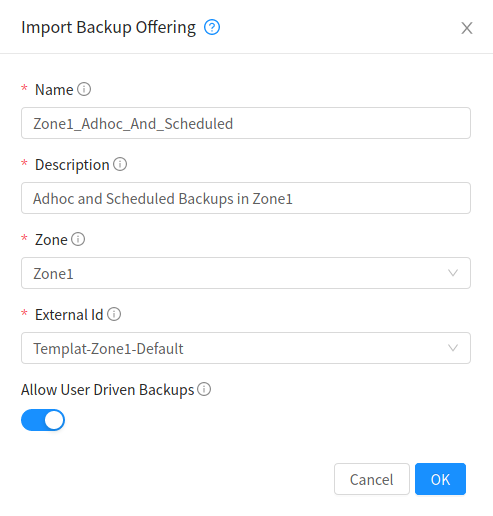


Creating Instance Backups
SLA/Policy Based backups
With the backup and recovery feature enabled for a zone, users simply add and remove an Instance from a backup offering.

Adhoc and Scheduled Backups
For backup offerings that allow ad-hoc user backups and user-defined backup schedules, user will be allowed to define a backup schedule for an Instance that is assigned to a backup offering using UI and API. An Instance with backup will not be allowed to add/remove volumes similar to Instance Snapshots.
To trigger an adhoc backup of an Instance, navigate to the Instance and click on the ‘Create Backup’ icon.

To setup a recurring backup schedule, navigate to the Instance and click on the ‘Backup Schedule’ icon.

Then set the time and frequency of the backups, click ‘Configure’ and then ‘Close’
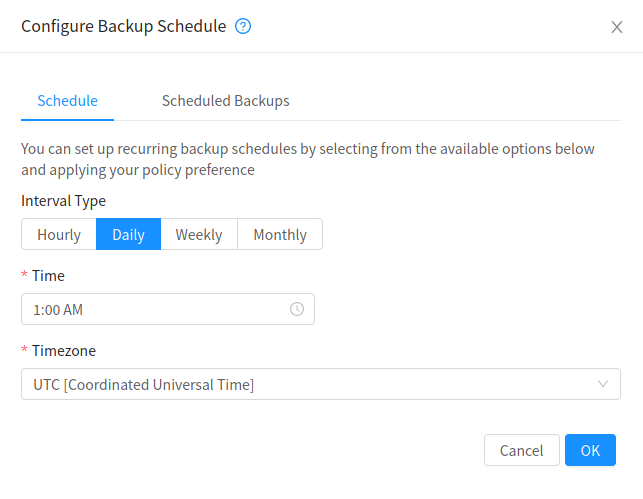
Restoring Instance Backups
Users will need to stop an Instance to restore to any existing Instance backup, restoration of an expunged Instance will not restore nics and recovery any network which may/may not exist. User may however restore a specific volume from an Instance backup and attach that volume to a specified Instance.
Supported APIs:
assignVirtualMachineToBackupOffering: adds an Instance to a backup offering.
removeVirtualMachineFromBackupOffering: removes an Instance from a backup offering, if forced true parameter is passed this may also remove any and all the backups of an Instance associated with a backup offering.
createBackupSchedule: creates a backup schedule for an Instance.
updateBackupSchedule: updates backup schedule.
listBackupSchedule: returns backup schedule of an Instance if defined.
deleteBackupSchedule: deletes backup schedule of an Instance.
createBackup: creates an adhoc backup for an Instance.
deleteBackup: deletes an Instance backup (not support for per restore point for Veeam).
listBackups: lists backups.
restoreBackup: restore a previous Instance backup in-place of a stopped or destroyed Instance.
restoreVolumeFromBackupAndAttachToVM: restore and attach a backed-up volume (of an Instance backup) to a specified Instance.
Using SSH Keys for Authentication
In addition to the username and password authentication, CloudStack supports using SSH keys to log in to the cloud infrastructure for additional security. You can use the createSSHKeyPair API to generate the SSH keys.
Because each cloud user has their own SSH key, one cloud user cannot log in to another cloud user’s Instances unless they share their SSH key files. Using a single SSH key pair, you can manage multiple Instances.
Creating an Instance Template that Supports SSH Keys
Create an Instance Template that supports SSH Keys.
Create a new Instance by using the Template provided by cloudstack.
For more information on creating a new Instance, see
Download the cloudstack script from The SSH Key Gen Script to the Instance you have created.
wget http://downloads.sourceforge.net/project/cloudstack/SSH%20Key%20Gen%20Script/cloud-set-guest-sshkey.in?r=http%3A%2F%2Fsourceforge.net%2Fprojects%2Fcloudstack%2Ffiles%2FSSH%2520Key%2520Gen%2520Script%2F&ts=1331225219&use_mirror=iweb
Copy the file to /etc/init.d.
cp cloud-set-guest-sshkey.in /etc/init.d/
Give the necessary permissions on the script:
chmod +x /etc/init.d/cloud-set-guest-sshkey.in
Run the script while starting up the operating system:
chkconfig --add cloud-set-guest-sshkey.in
Stop the Instance.
Creating the SSH Keypair
You must make a call to the createSSHKeyPair api method. You can either use the CloudStack Python API library or the curl commands to make the call to the cloudstack api.
For example, make a call from the cloudstack server to create a SSH keypair called “keypair-doc” for the admin Account in the root domain:
Note
Ensure that you adjust these values to meet your needs. If you are making the API call from a different server, your URL/PORT will be different, and you will need to use the API keys.
Run the following curl command:
curl --globoff "http://localhost:8096/?command=createSSHKeyPair&name=keypair-doc&account=admin&domainid=5163440e-c44b-42b5-9109-ad75cae8e8a2"
The output is something similar to what is given below:
<?xml version="1.0" encoding="ISO-8859-1"?><createsshkeypairresponse cloud-stack-version="3.0.0.20120228045507"><keypair><name>keypair-doc</name><fingerprint>f6:77:39:d5:5e:77:02:22:6a:d8:7f:ce:ab:cd:b3:56</fingerprint><privatekey>-----BEGIN RSA PRIVATE KEY-----
MIICXQIBAAKBgQCSydmnQ67jP6lNoXdX3noZjQdrMAWNQZ7y5SrEu4wDxplvhYci
dXYBeZVwakDVsU2MLGl/K+wefwefwefwefwefJyKJaogMKn7BperPD6n1wIDAQAB
AoGAdXaJ7uyZKeRDoy6wA0UmF0kSPbMZCR+UTIHNkS/E0/4U+6lhMokmFSHtu
mfDZ1kGGDYhMsdytjDBztljawfawfeawefawfawfawQQDCjEsoRdgkduTy
QpbSGDIa11Jsc+XNDx2fgRinDsxXI/zJYXTKRhSl/LIPHBw/brW8vzxhOlSOrwm7
VvemkkgpAkEAwSeEw394LYZiEVv395ar9MLRVTVLwpo54jC4tsOxQCBlloocK
lYaocpk0yBqqOUSBawfIiDCuLXSdvBo1Xz5ICTM19vgvEp/+kMuECQBzm
nVo8b2Gvyagqt/KEQo8wzH2THghZ1qQ1QRhIeJG2aissEacF6bGB2oZ7Igim5L14
4KR7OeEToyCLC2k+02UCQQCrniSnWKtDVoVqeK/zbB32JhW3Wullv5p5zUEcd
KfEEuzcCUIxtJYTahJ1pvlFkQ8anpuxjSEDp8x/18bq3
-----END RSA PRIVATE KEY-----
</privatekey></keypair></createsshkeypairresponse>
Copy the key data into a file. The file looks like this:
-----BEGIN RSA PRIVATE KEY-----
MIICXQIBAAKBgQCSydmnQ67jP6lNoXdX3noZjQdrMAWNQZ7y5SrEu4wDxplvhYci
dXYBeZVwakDVsU2MLGl/K+wefwefwefwefwefJyKJaogMKn7BperPD6n1wIDAQAB
AoGAdXaJ7uyZKeRDoy6wA0UmF0kSPbMZCR+UTIHNkS/E0/4U+6lhMokmFSHtu
mfDZ1kGGDYhMsdytjDBztljawfawfeawefawfawfawQQDCjEsoRdgkduTy
QpbSGDIa11Jsc+XNDx2fgRinDsxXI/zJYXTKRhSl/LIPHBw/brW8vzxhOlSOrwm7
VvemkkgpAkEAwSeEw394LYZiEVv395ar9MLRVTVLwpo54jC4tsOxQCBlloocK
lYaocpk0yBqqOUSBawfIiDCuLXSdvBo1Xz5ICTM19vgvEp/+kMuECQBzm
nVo8b2Gvyagqt/KEQo8wzH2THghZ1qQ1QRhIeJG2aissEacF6bGB2oZ7Igim5L14
4KR7OeEToyCLC2k+02UCQQCrniSnWKtDVoVqeK/zbB32JhW3Wullv5p5zUEcd
KfEEuzcCUIxtJYTahJ1pvlFkQ8anpuxjSEDp8x/18bq3
-----END RSA PRIVATE KEY-----
Save the file.
Creating an Instance
After you save the SSH keypair file, you must create an Instance by using the Template that you created at Section 5.2.1, “ Creating an Instance Template that Supports SSH Keys”. Ensure that you use the same SSH key name that you created at Section 5.2.2, “Creating the SSH Keypair”.
Note
You cannot create the Instance by using the GUI at this time and associate the Instance with the newly created SSH keypair.
A sample curl command to create a new Instance is:
curl --globoff http://localhost:<port number>/?command=deployVirtualMachine&zoneId=1&serviceOfferingId=18727021-7556-4110-9322-d625b52e0813&templateId=e899c18a-ce13-4bbf-98a9-625c5026e0b5&securitygroupids=ff03f02f-9e3b-48f8-834d-91b822da40c5&account=admin&domainid=1&keypair=keypair-doc
Substitute the Template, service offering and security group IDs (if you are using the security group feature) that are in your cloud environment.
Logging In Using the SSH Keypair
To test your SSH key generation is successful, check whether you can log in to the cloud setup.
For example, from a Linux OS, run:
ssh -i ~/.ssh/keypair-doc <ip address>
The -i parameter tells the ssh client to use a ssh key found at ~/.ssh/keypair-doc.
Resetting SSH Keys
With the API command resetSSHKeyForVirtualMachine, a user can set or reset the SSH keypair assigned to an Instance. A lost or compromised SSH keypair can be changed, and the user can access the Instance by using the new keypair. Just create or register a new keypair, then call resetSSHKeyForVirtualMachine.
User-Data and Meta-Data
Users can register userdata in CloudStack and refer the registered userdata while deploying or editing or reset userdata on an instance. The userdata content can also be directly provided while deploying the instance. Userdata content length can be up to 32kb.
To register a new userdata:
Log in to the CloudStack UI.
In the left navigation bar, click Compute and then User Data.
Click Register a userdata.
In the dialog, make the following choices:
Name: Any desired name for the userdata.
Userdata: Plain userdata content. CloudStack UI does base64 encoding.
Userdata parameters: Comma separated list of variables which (if any) declared in userdata content.
Domain: An optional domain for the userdata.
Account: An optional account for the userdata.
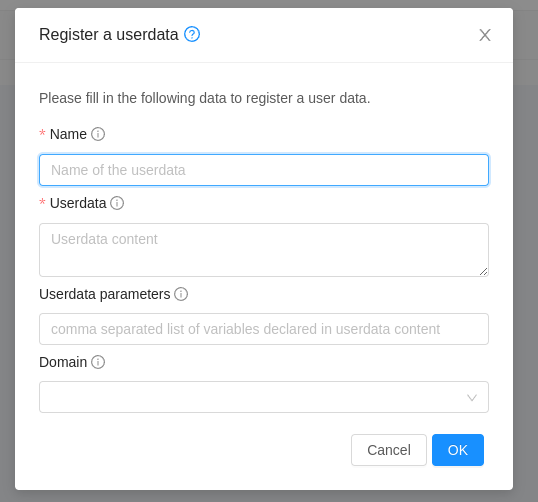
If userdata content has variables declared in it, user can register the Userdata with userdata parameters.
For example, if userdata content is like below having a custom variable “variable1”
## template: jinja
#cloud-config
runcmd:
   - echo 'TestVariable {{ ds.meta_data.variable1 }}' >> /tmp/variable
   - echo 'Hostname {{ ds.meta_data.public_hostname }}' > /tmp/hostname
Userdata has to be registered with userdata parameter “variable1” like below
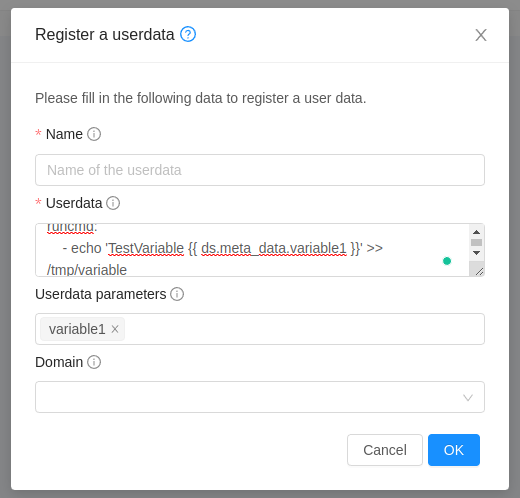
If the variables in userdata content are of a predefined metadata like “public_hostname” or “instance_id”, then userdata parameters should not declare these variables. That is the reason in the above example “public_hostname” is not declared.
There are three CloudStack APIs that can be used to provide user-data to instance:
deployVirtualMachine, updateVirtualMachine and resetUserDataForVirtualMachine.
These APIs accepts parameters userdataid and userdatadetails.
userdatadetails is to specify the custom values for the variables which are declared
in userdata in a key value parameter map details.
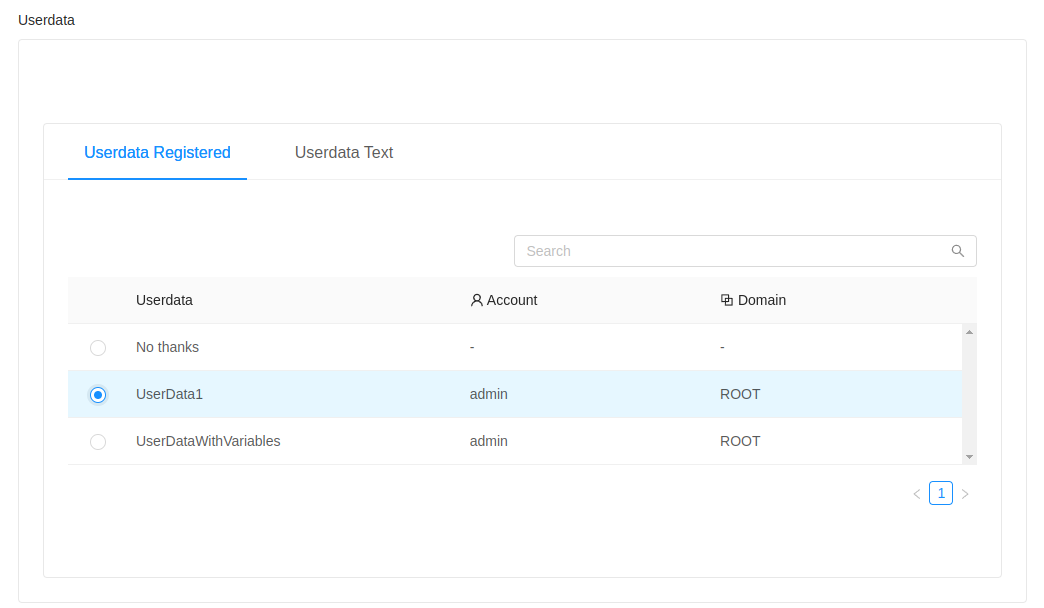
If the userdata contains variables that are declared during registration then those values has to be specified like below,
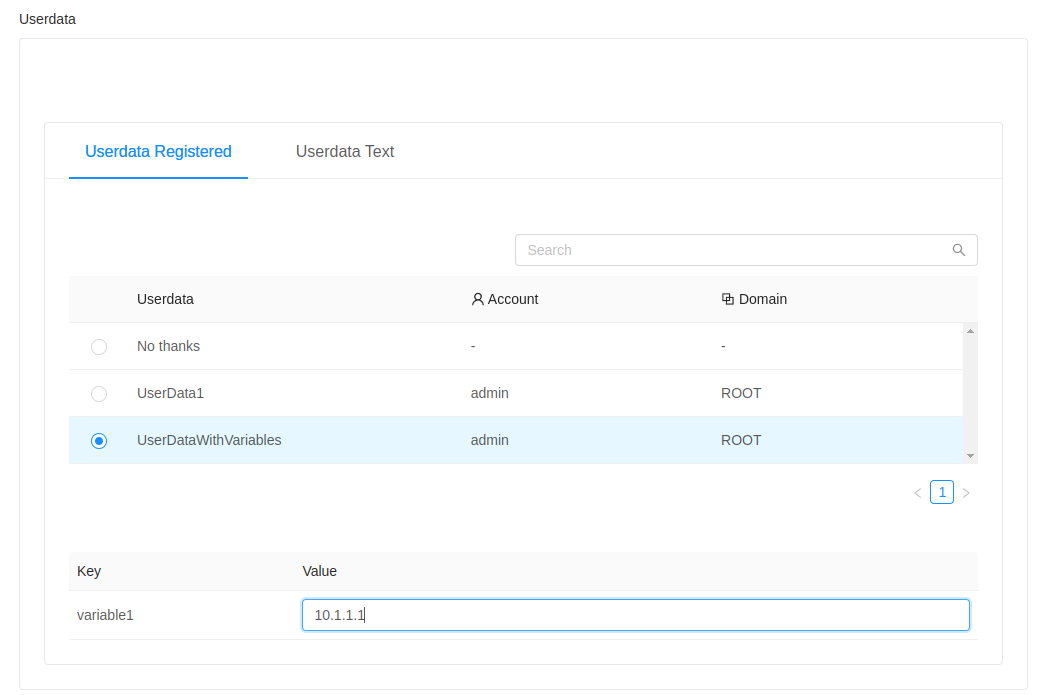
These details will be saved as meta-data file(s) in both config drive and virtual router, which in turn support jinja based instance meta-data feature of cloud-init, refer to https://cloudinit.readthedocs.io/en/latest/topics/instancedata.html.
These APIs also support the parameter userdata= to provide the userdata content
directly. The value for this parameter must be a base64-encoded
multi-part MIME message. See further below for an example of what this should look like.
The registered UserData can be linked to a Template or ISO on registration/upload/editing using linkUserDataToTemplate API. The same API can be used to unlink the mapping of userdata and Template.
While linking userData to a Template/ISO userdata override policy has to be specified. Following are the override policies available:
- Allow Override: Allow users to override UserData for the Template during instance deployment or on reset.
This is the default override policy if not specified
Deny Override: Override of UserData isn’t allowed during instance deployment or on reset.
- Append Only: Don’t allow users to override linked UserData but allow users to pass userdata content
or ID that should be appended to the linked UserData of the Template. When the users pass userdata it is appended to the Template userdata in the form of a multipart MIME message
This is how it looks like in Template/ISO register/upload/edit forms.
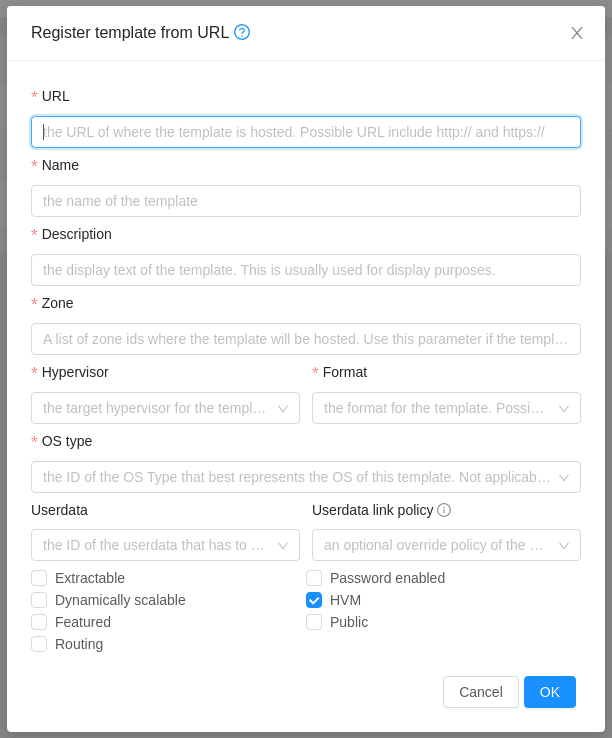
Based on these override policies, “Add Instance” UI form provides relevant options to either override or append. If it is “Deny Override” then “Add Instance” will not allow adding user specific userdata
Storing and accessing userdata
HTTP GET parameters are limited to a length of 2048 bytes, but it is possible to store larger user-data blobs by sending them in the body via HTTP POST instead of GET.
From inside the instance, the user-data is accessible via the virtual router, if the UserData service is enabled on the network offering.
If you are using the DNS service of the virtual router, a special hostname called data-server. is provided, that will point to a valid user-data server.
Otherwise you have to determine the virtual router address via other means, such as DHCP leases. Be careful to scan all routers if you have multiple networks attached to an instance, in case not all of them have the UserData service enabled.
User-data is available from the URL http://data-server./latest/user-data
and can be fetched via curl or other HTTP client.
It is also possible to fetch instance metadata from the same service, via the URL
http://data-server./latest/{metadata type}. For backwards compatibility,
the previous URL http://data-server./latest/{metadata type} is also supported.
For metadata type, use one of the following:
service-offering. A description of the instances service offeringavailability-zone. The Zone namelocal-ipv4. The guest IP of the instancelocal-hostname. The hostname of the instancepublic-ipv4. The first public IP for the router.public-hostname. This is the same as public-ipv4instance-id. The instance name of the instance
Determining the virtual router address without DNS
If can’t or don’t want to use the virtual router’s DNS service, it’s also possible to determine the user-data server from a DHCP lease.
Run the following command to find the virtual router.
# cat /var/lib/dhcp/dhclient.eth0.leases | grep dhcp-server-identifier | tail -1Access the data-server via its IP
# curl http://10.1.1.1/latest/user-data
Fetching user-data via the API
User-data is not included with the normal instance state for historic reasons. To read out the base64-encoded user-data via the API, use the getVirtualMachineUserData API call:
cmk get virtualmachineuserdata virtualmachineid=8fd996b6-a102-11ea-ba47-23394b299ae9
Using cloud-init
cloud-init can be used to access and interpret user-data inside Instances. If you install cloud-init into your Instance Templates, it will allow you to store SSH keys and user passwords on each new Instance deployment automatically (Adding Password Management to Your Templates and using ssh keys).
Install cloud-init package into an Instance Template:
# yum install cloud-init
  or
$ sudo apt-get install cloud-init
Create a datasource configuration file in the Instance Template:
/etc/cloud/cloud.cfg.d/99_cloudstack.cfgdatasource_list: [ CloudStack, None ]
Custom user-data example
This example uses cloud-init to automatically update all OS packages on the first launch.
Register the following user-data in CloudStack. If APIs are used to register userdata or to provide direct userdata text then userdata needs to be wrapped into a multi-part MIME message and encoded in base64:
base64 <<EOF
Content-Type: multipart/mixed; boundary="//"
MIME-Version: 1.0

--//
Content-Type: text/cloud-config; charset="us-ascii"
MIME-Version: 1.0
Content-Transfer-Encoding: 7bit
Content-Disposition: attachment; filename="cloud-config.txt"

#cloud-config

# Upgrade the instance on first boot
# (ie run apt-get upgrade)
#
# Default: false
# Aliases: apt_upgrade
package_upgrade: true
EOF
Deploy an instance with this user-data either by providing the UUID of the registerd userdata or by providing base64 encoded userdata:
cmk deploy virtualmachine name=..... userdata=Q29udGVudC1UeXBlOiBtdWx0aXBhcnQvbWl4ZWQ7IGJvdW5kYXJ5PSIvLyIKTUlNRS1WZXJzaW9uOiAxLjAKCi0tLy8KQ29udGVudC1UeXBlOiB0ZXh0L2Nsb3VkLWNvbmZpZzsgY2hhcnNldD0idXMtYXNjaWkiCk1JTUUtVmVyc2lvbjogMS4wCkNvbnRlbnQtVHJhbnNmZXItRW5jb2Rpbmc6IDdiaXQKQ29udGVudC1EaXNwb3NpdGlvbjogYXR0YWNobWVudDsgZmlsZW5hbWU9ImNsb3VkLWNvbmZpZy50eHQiCgojY2xvdWQtY29uZmlnCgojIFVwZ3JhZGUgdGhlIGluc3RhbmNlIG9uIGZpcnN0IGJvb3QKIyAoaWUgcnVuIGFwdC1nZXQgdXBncmFkZSkKIwojIERlZmF1bHQ6IGZhbHNlCiMgQWxpYXNlczogYXB0X3VwZ3JhZGUKcGFja2FnZV91cGdyYWRlOiB0cnVlCg==
cmk deploy virtualmachine name=..... userdataid=<Userdata UUID>
Note
When using multipart userdata, cloud-init expects userdata format of one particular type only in one multipart section.
Disclaimer
Refer to the cloud-init CloudStack datasource documentation for latest capabilities. cloud-init and the cloud-init CloudStack datasource are not supported by Apache CloudStack community.
Assigning GPU/vGPU to Guest Instances
CloudStack can deploy guest Instances with Graphics Processing Unit (GPU) or Virtual Graphics Processing Unit (vGPU) capabilities on XenServer hosts. At the time of Instance deployment or at a later stage, you can assign a physical GPU ( known as GPU-passthrough) or a portion of a physical GPU card (vGPU) to a guest Instance by changing the Service Offering. With this capability, the Instances running on CloudStack meet the intensive graphical processing requirement by means of the high computation power of GPU/vGPU, and CloudStack users can run multimedia rich applications, such as Auto-CAD, that they otherwise enjoy at their desk on a virtualized environment. CloudStack leverages the XenServer support for NVIDIA GRID Kepler 1 and 2 series to run GPU/vGPU enabled Instances. NVIDIA GRID cards allows sharing a single GPU cards among multiple Instances by creating vGPUs for each Instance. With vGPU technology, the graphics commands from each Instance are passed directly to the underlying dedicated GPU, without the intervention of the hypervisor. This allows the GPU hardware to be time-sliced and shared across multiple Instances. XenServer hosts use the GPU cards in following ways:
GPU passthrough: GPU passthrough represents a physical GPU which can be directly assigned to an Instance. GPU passthrough can be used on a hypervisor alongside GRID vGPU, with some restrictions: A GRID physical GPU can either host GRID vGPUs or be used as passthrough, but not both at the same time.
GRID vGPU: GRID vGPU enables multiple Instances to share a single physical GPU. The Instances run an NVIDIA driver stack and get direct access to the GPU. GRID physical GPUs are capable of supporting multiple virtual GPU devices (vGPUs) that can be assigned directly to guest Instances. Guest Instances use GRID virtual GPUs in the same manner as a physical GPU that has been passed through by the hypervisor: an NVIDIA driver loaded in the guest Instance provides direct access to the GPU for performance-critical fast paths, and a paravirtualized interface to the GRID Virtual GPU Manager, which is used for nonperformant management operations. NVIDIA GRID Virtual GPU Manager for XenServer runs in dom0. CloudStack provides you with the following capabilities:
Adding XenServer hosts with GPU/vGPU capability provisioned by the administrator.
Creating a Compute Offering with GPU/vGPU capability.
Deploying an Instance with GPU/vGPU capability.
Destroying an Instance with GPU/vGPU capability.
Allowing an user to add GPU/vGPU support to an Instance without GPU/vGPU support by changing the Service Offering and vice-versa.
Migrating Instances (cold migration) with GPU/vGPU capability.
Managing GPU cards capacity.
Querying hosts to obtain information about the GPU cards, supported vGPU types in case of GRID cards, and capacity of the cards.
Prerequisites and System Requirements
Before proceeding, ensure that you have these prerequisites:
The vGPU-enabled XenServer 6.2 and later versions. For more information, see Citrix 3D Graphics Pack.
GPU/vPGU functionality is supported for following HVM guest operating systems: For more information, see Citrix 3D Graphics Pack.
Windows 7 (x86 and x64)
Windows Server 2008 R2
Windows Server 2012
Windows 8 (x86 and x64)
Windows 8.1 (“Blue”) (x86 and x64)
Windows Server 2012 R2 (server equivalent of “Blue”)
CloudStack does not restrict the deployment of GPU-enabled Instances with guest OS types that are not supported by XenServer for GPU/vGPU functionality. The deployment would be successful and a GPU/vGPU will also get allocated for Instances; however, due to missing guest OS drivers, Instance would not be able to leverage GPU resources. Therefore, it is recommended to use GPU-enabled service offering only with supported guest OS.
NVIDIA GRID K1 (16 GiB video RAM) AND K2 (8 GiB of video RAM) cards supports homogeneous virtual GPUs, implies that at any given time, the vGPUs resident on a single physical GPU must be all of the same type. However, this restriction doesn’t extend across physical GPUs on the same card. Each physical GPU on a K1 or K2 may host different types of virtual GPU at the same time. For example, a GRID K2 card has two physical GPUs, and supports four types of virtual GPU; GRID K200, GRID K220Q, GRID K240Q, AND GRID K260Q.
NVIDIA driver must be installed to enable vGPU operation as for a physical NVIDIA GPU.
XenServer tools are installed in the Instance to get maximum performance on XenServer, regardless of type of vGPU you are using. Without the optimized networking and storage drivers that the XenServer tools provide, remote graphics applications running on GRID vGPU will not deliver maximum performance.
To deliver high frames from multiple heads on vGPU, install XenDesktop with HDX 3D Pro remote graphics.
Before continuing with configuration, consider the following:
Deploying Instances GPU/vGPU capability is not supported if hosts are not available with enough GPU capacity.
A Service Offering cannot be created with the GPU values that are not supported by CloudStack UI. However, you can make an API call to achieve this.
Dynamic scaling is not supported. However, you can choose to deploy an Instance without GPU support, and at a later point, you can change the system offering to upgrade to the one with vGPU. You can achieve this by offline upgrade: stop the Instance, upgrade the Service Offering to the one with vGPU, then start the Instance.
Live migration of GPU/vGPU enabled Instance is not supported.
Limiting GPU resources per Account/Domain is not supported.
Disabling GPU at Cluster level is not supported.
Notification thresholds for GPU resource is not supported.
Supported GPU Devices
Device |
Type |
|---|---|
GPU |
|
vGPU |
|
GPU/vGPU Assignment Workflow
CloudStack follows the below sequence of operations to provide GPU/vGPU support for Instances:
Ensure that XenServer host is ready with GPU installed and configured. For more information, see Citrix 3D Graphics Pack.
Add the host to CloudStack. CloudStack checks if the host is GPU-enabled or not. CloudStack queries the host and detect if it’s GPU enabled.
Create a compute offering with GPU/vGPU support: For more information, see Creating a New Compute Offering..
Continue with any of the following operations:
Deploy an Instance.
Deploy an Instance with GPU/vGPU support by selecting appropriate Service Offering. CloudStack decide which host to choose for Instance deployment based on following criteria:
Host has GPU cards in it. In case of vGPU, CloudStack checks if cards have the required vGPU type support and enough capacity available. Having no appropriate hosts results in an InsufficientServerCapacity exception.
Alternately, you can choose to deploy an Instance without GPU support, and at a later point, you can change the system offering. You can achieve this by offline upgrade: stop the Instance, upgrade the Service Offering to the one with vGPU, then start the Instance. In this case, CloudStack gets a list of hosts which have enough capacity to host the Instance. If there is a GPU-enabled host, CloudStack reorders this host list and place the GPU-enabled hosts at the bottom of the list.
Migrate an Instance.
CloudStack searches for hosts available for Instance migration, which satisfies GPU requirement. If the host is available, stop the Instance in the current host and perform the Instance migration task. If the Instance migration is successful, the remaining GPU capacity is updated for both the hosts accordingly.
Destroy an Instance.
GPU resources are released automatically when you stop an Instance. Once the destroy Instance is successful, CloudStack will make a resource call to the host to get the remaining GPU capacity in the card and update the database accordingly.
Instance Metrics
Instance statistics are collected on a regular interval (defined by global setting vm.stats.interval with a default of 60000 milliseconds). Instance statistics include compute, storage and Network statistics.
Instance statistics are stored in the database as historical data for a desired time period. These historical statistics then can be retrieved using listVirtualMachinesUsageHistory API. For system VMs, the same historical statistics can be retrieved using listSystemVmsUsageHistory API
Instance statistics retention time in the database is controlled by the global configuration vm.stats.max.retention.time, with a default value of 720 minutes, i.e., 12 hours. The interval in which the metrics are retrieved are defined by the global configuration vm.stats.interval, which has a default value of 60,000 milliseconds, i.e., 1 minute. The default values are only meant for guideline, as they can have a major impact in DB performance. The equation below presents the overall storage size required considering the values of these configurations.
StatsSize: the size, in bytes, required for storing the VM stats;
retention: the value of the configuration
vm.stats.max.retention.time;interval: the value of the configuration
vm.stats.interval;nodes: the number of nodes running the management server in the environment;
VMs: the number of running VMs in the environment;
registrySize: the estimated size, in bytes, of the registry in the DB;
Considering the default values of the configurations vm.stats.max.retention.time and vm.stats.interval, three nodes running the management server, 10,000 running VMs and an estimated registry size of 400 bytes, it would need, approximately, 8 GB of storage to store VM stats. Therefore, the values for these configurations should be changed considering the CloudStack environment, evaluating the required storage and its impact in DB performance.
Another global configuration that affects Instance statistics is vm.stats.user.vm.only. When set to ‘false’ stats for system VMs will be collected, otherwise stats collection will be done only for user Instances.
In the UI, historical Instance statistics are shown in the Metrics tab in an individual Instance view, as shown in the image below.
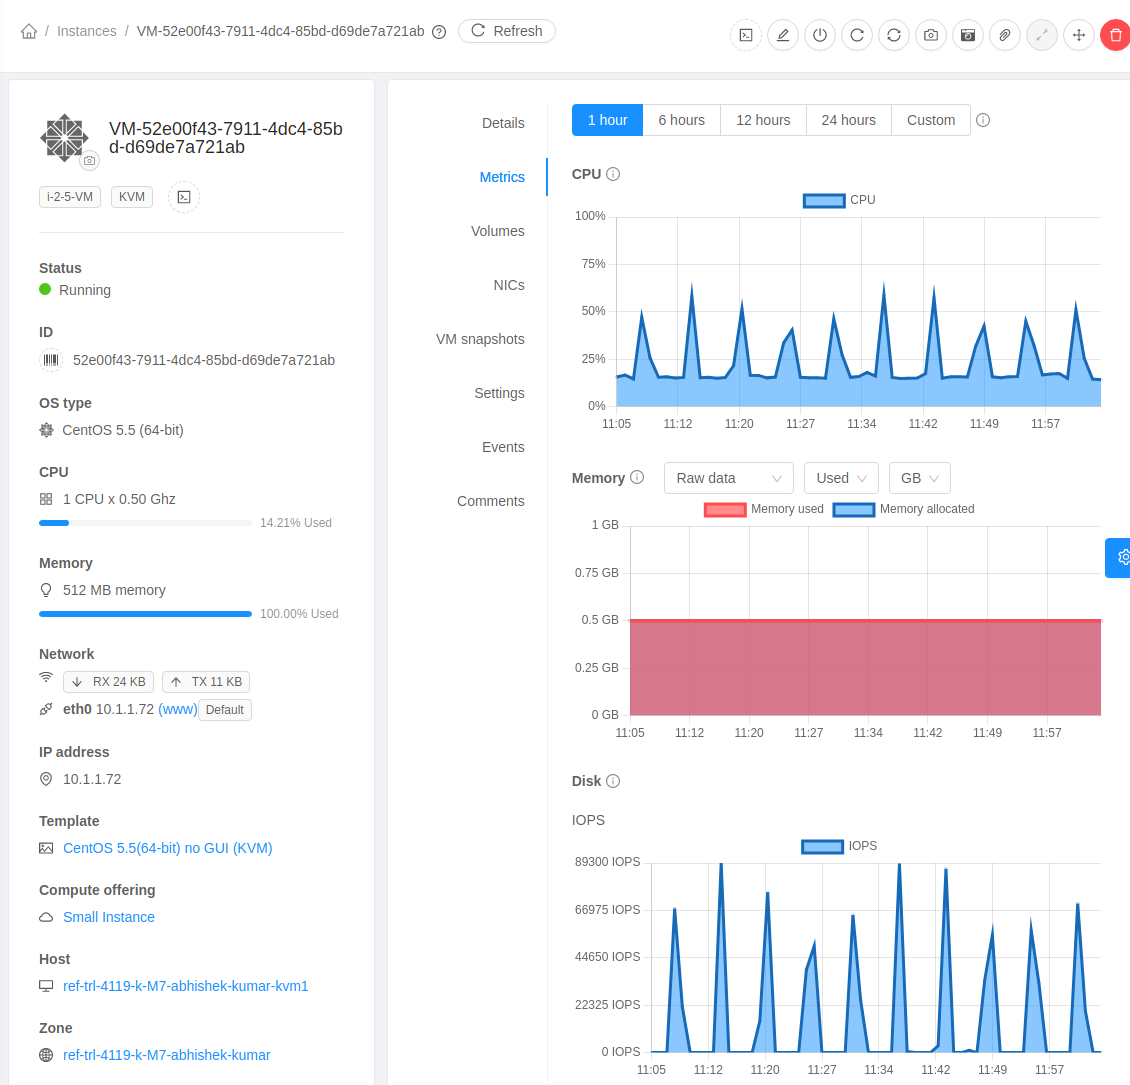
Instance Disk Metrics
Similar to Instance statistics, Instance disk statistics (disk stats) can also be collected on a regular interval (defined by global setting vm.disk.stats.interval with a default value of 0 seconds which disables disk stats collection). Disk stats are collected in form of diskiopstotal, diskioread, diskiowrite, diskkbsread and diskkbswrite.
Instance disk statistics can also be made to store in the database and the historical statistics can be retrieved using listVolumesUsageHistory API.
Instance disk statistics retention in the database is controlled by the global configuration - vm.disk.stats.retention.enabled. Default value is false, i.e., retention of Instance disk statistics is disabled. Other global configurations that affects Instance disk statistics are:
vm.disk.stats.interval.min - Minimal interval (in seconds) to report Instance disk statistics. If vm.disk.stats.interval is smaller than this, use this to report Instance disk statistics.
vm.disk.stats.max.retention.time - The maximum time (in minutes) for keeping disk stats records in the database. The disk stats cleanup process will be disabled if this is set to 0 or less than 0.
Instance disk statistics are shown in the Metrics tab in an individual volume view, as shown in the image below.